Scratch El Tubo Loco Original Design / Scratch Built
Scratch - El Tubo Loco {Scratch}
Contributed by Dick Stafford
| Manufacturer: | Scratch |
Brief:
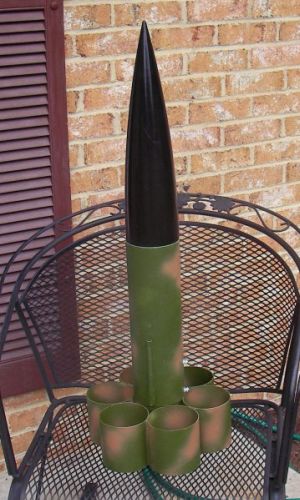
This is another simple, "el cheapo" tube fin rocket based on my tube can concept. A tube can is a fin can with tube fins of course, built using the telescoping inside tube from a Container Store mailing tube. 'Real' rocket coupler tubes can also be used.
Construction:
The parts list:
- 4" mailing tube (~13.25) and liner (~26")
- one 4" nose cone (in this case recycled from a grounded HPR bird)
- plywood centering rings (2)
- 29mm motor tube
- 3' of thin wire rope and two crimp terminals
- heavy Kevlar twine
- buttons from railbuttons.com
- one FirstFire tube
- 2 small nylon rivets from Giant Leap
- chute and protector to be selected on the field
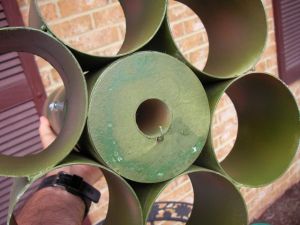
I cut the six tube fins from the mailing tube liner and attached them to a longer piece of that tubing using carpenter's glue. A 29mm motor tube is mounted between two plywood centering rings on the ends, forming a fin can. The fin can slips into a short body tube that I liberated from my daughter (it held a bottle of wine) and is connected to the body tube by the lower rail button and a nylon pop rivet.
The recovery harness is a long piece of thin steel cable mounted through the top ring and a longer piece of thick Kevlar twine. I forget where I came across the wire, but it was found, not bought. It is held in place by two crimp terminals (these were bought). I don't know if I have the right term, but you slide them on the cable and crimp them on (read: beat them with a big hammer).
 For motor retention, I mounted a thin aluminum tube through the two rings. A hook made out of a coat hanger is then run through this tube. On the top, a bend in the wire keeps it in and on the bottom it is bent to mate with the motor. This is the same technique I used on my Fat Boy 3x4. The hook pivots to allow the motor to be inserted and removed and masking tape is used to keep it in the locked position.
Finishing:
I finished mine in a camo style using Model Master dark tan and medium green that was left over from my AquaBottleBat. The cone was previously painted black and I left it that way.
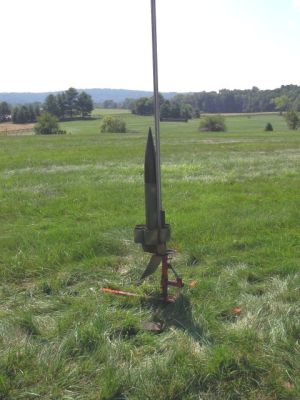
Flight and Recovery:
I used a chute protector and a 48" chute for recovery duties. I also added just a tad of dog barf as usual. The motor of choice was a G64-7W with the delay drilled down to 4 seconds. When I installed the motor, I found that, since my wire retainer was custom made for the 29/120 casing, it didn't mate properly with the 29/40-120 hobby line case. I quickly fashioned a spacer from a tube that, if my memory is correct, came with a pack of G20s. I used a few wraps of masking tape to hold this spacer tight against the motor and ensure the retainer stayed in place.
The El Tubo Loco flew nicely, however, the delay seemed closer to the original 7 seconds than the desired 4. Nevertheless, it call came down undamaged. This rocket would fly really nicely on a 29mm H, but for now that ain't happening.
Summary:
I like cheap rockets. I liked the idea of using up the extra tubing that I had laying around. And I'm now liking tube fins. Not much else to say...
 |
 |