Scratch Estes Streamer 4.8x Original Design / Scratch Built
Scratch - Streamer 4.8x {Scratch}
Contributed by Chan Stevens
| Manufacturer: | Scratch |
Brief:
If you're ired of trying to track your 13mm stock Screamer, consider upscaling
to this biggie-sized BT-80 version. It no longer screams off the pad quite as
quickly, but is still a fun to fly rocket and certainly an easy upscale cloning
project.
Modifications:
Assuming you've ever built a 3FNC kit, and can handle a motor mount with
centering rings, you can probably build this one straight up without
instructions (fin and centering ring patterns are available in the included
Rocksim file). If you need directions or standard scale fin patterns, they're
available on the Jim Z plan site, a fantastic resource for anyone interested in
cloning the classics.
I built the motor mount assembly using a 10.5" length of BT-50 and a pair of centering rings. The length of the tube is not critical, but should be fairly long to help generate a decent ejection charge in the large BT-80 body tube. Also, I was fairly anal retentive, and wanted to be able to use the tube coupler as a reinforcement to anchor the motor mount in place, so the 10.5" length was carefully designed to put the upper ring right against the coupler. I also used a 20/50 centering ring (the regular thick cardboard Estes style) as a block, and a metal E-sized engine clip for retention.
I cut the (3) fins from 1/8x6 balsa stock. Technically, the 1/8 isn't quite a true 4.8x upscale, but I'd rather use up standard stuff I have laying around that pursue more exotic materials. The fins appear to be a bit oversized for this upscale. They were oversized on the original too, though the upscale just makes this a little more pronounced. There certainly won't be a problem with stability, as the margin is nearly 4:1.
I made the body tube from short tube stock, so had to use two pieces and a coupler to cover the 24.5" needed. I'd rather have used a single tube and avoided the seam, but this was a more convenient way to help clean out the basement a bit, as I don't have any long BT-80 stock.
The nose cone was a little hard to come by, as I don't think it's worth buying a Phoenix kit to bash for this project. I had called Estes last summer to order a few hard-to-find replacement parts, and on a whim decided to pick up a few odd cones, this one included. BMS also makes a decent balsa version, so if you're ordering materials rather than using up spare parts, I'd consider using BMS, which can cover the cone, longer BT-80, and even the centering rings under a single shipping charge.
One last upgrade I wound up reflecting in this design is the use of Kevlar® running from the motor mount up to the top of the body tube, followed by elastic going to the cone. This is a much more durable and reliable method that the old tri-fold paper and elastic method. I also employed the QUARK anti-zipper technique (posted on the tips page) by wrapping a few layers of masking tape around the Kevlar® towards the top of the BT-80.
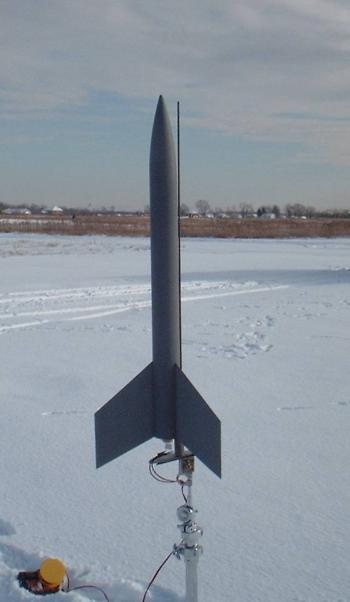
Since I had procrastinated way too much on the EMRR 2005 Challenge, I was cornered into building and flying this on the only weekend remaining before the deadline, leaving me a few weeknights to finish up the multi-color paint scheme. For the first flights, the rocket was practically naked, getting just a couple quick coats of primer.
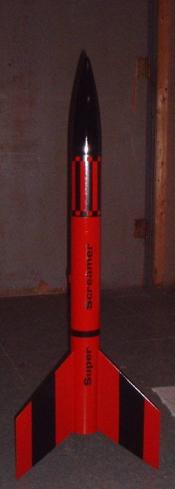
The finished version will be a Rustoleum red base coat, trimmed with gloss black. I'm beginning to use more and more Rustoleum over Krylon. I find that it fills spirals and grains better, and is a much better finish, though does take considerably longer to cure (I allow 2 days between coats if masking). I'll then apply the excellent Excelsior water-slide decals, for a very nice looking finished clone.
Construction:
This project actually started about a year ago, when browsing the Excelsior
Rocketry site I noticed they offered a number of BT-80 upscale decal clones. I
decided to pick up a set for the Screamer, which had always been one of my
favorite 13mm designs. In fact, it was the stock Screamer that wound up getting
me my NARTREK bronze after a number of failed attempts with competition-style
streamer duration birds. Once I had picked up the decals, the rest of the parts
scavenging was pretty simple:
- BT-80 body tube(s) 24.5" long (I used two tubes from a Red Arrow parts pack, along with a TC-80 from same).
- PNC-80K nose cone (Estes Phoenix/replacement part)
- BT-50 motor tube (10.5")
- 1/8" balsa fin stock (I used most of a 6x36 sheet)
- 3/16 launch lugs
- 50/80 centering rings (I cut mine from a cereal box)
- 24" mylar parachute
- Kevlar®/elastic shock cord
- E-sized motor hook
Note that the original Screamer used a streamer, but due to the weight of this and the fairly fragile balsa fins, I upgraded to a 24" chute. I think it would also get by fine with an 18" chute on windier days.
 Finishing:
Pros on the finishing is the two-color paint scheme is not terribly difficult
to mask. Plus, the Excelsior decals are very good quality reproductions.
Cons of finishing would be the decals are very fragile, and not true upscaled clones. For example, there are trim pieces for the fins that were not included in the decal set. The decal set did include, though, an extra checkerboard pattern, plus they've added a "super" to go along with the screamer nametag. Also, a bit tongue in cheek, the "mini brute" ladybug has been upgraded to "maxi brute" on this set.
Flight:
Rocksim estimates for a D12 a 4 second optimal delay. I chose to start with 3's
given the windy conditions and expecting a weathercock. The first two flights
were on D12-3's, and the flight was slow and straight, only a little bit of a
turn into the wind. The apogee was perfect, so I did not try 5's.
Since the altitude was pretty wimpy (I'm guessing about 250 versus the Rocksim estimate of 535), I followed up with an E9-4. This is a great motor for this bird, offering a very long, slow ascent to about 500 feet. The delay was a little bit early, and I'll probably try a 6 on the next flight.
Of course, this is no longer worthy of the Screamer name, as it's a larger, more lumbering oaf of a cousin. In a drag race against my true (1X) clone, there would be no contest--the 1X would be halfway back to the pad by the time this guy reaches apogee.
Recovery:
Pros--slow, steady flight, fun to watch.
Cons--slow, steady flight, nothing like its namesake.
Summary:
This one has nostalgic appeal to me, as I really like flying the original. It's
a fun and easy upscale, thanks to the readily available decals. If you like
the low and slow flights of Estes BT-80 style rockets, this one will appeal to
you. If you're looking for a true "screamer" on 24mm motors, this
would need to go on a serious diet before consideration.
 |
 |