Scratch Estes S.W.A.T. 1.38X Original Design / Scratch Built
Scratch - S.W.A.T. 1.38X {Scratch}
Contributed by Jeff Lane
| Manufacturer: | Scratch |

Brief:
138% upscale of the Estes S.W.A.T. The S.W.A.T. is a low orbit interceptor-style kit Estes produced in the early
1990s. When kids see my original S.W.A.T., they actually scream with delight, always asking “how high?" The
original kit was designed with an 18mm motor mount, but I converted it to 24. It’s a beautiful kit and has flown
many times.
The last thing I wanted to do when building my level 1 certification rocket was three fins and a nose cone, so the S.W.A.T. seemed like a natural upscale. Cool toy but bigger and badder. What’s not to like? The original rocket was 34” long and the upscale is a little less than 47”. The optional electronics bay brings it up to 52”. The original paint scheme called for an orange and black camouflage scheme but was updated to a current Digi-cam look. The original fin patterns (Jimz) were printed out from Photoshop at 138%.
Construction:
Materials:
- 1 Body tube: 34” LOC 2.26” O.D., plus the optional electronics bay
- LOC nose cone
- 5 sheets of Lasertrans waterslide inkjet decal paper
- 4 sheets of 1/8” aircraft grade hobby plywood
- 11.5 in of LOC 38mm motor mount tube
- ¼" centering rings (2)
- #6 screws and T-nuts for the motor mount
- 1 coupler and bulkhead
- 1 eyebolt
- 3ft 300lb Kevlar®
- 6ft ½" elastic
- 1ft ¼" dowels for missles
- Mylar for missle fins
- BT-50 for outboard fin tubes (two at 3.75”)
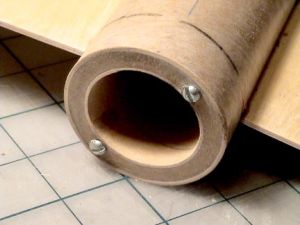
The motor mount is a LOC tube with two centering rings with Kevlar® for the shock cord system mounted to the forward ring. The #6 T-nuts had to be ground down to fit into the aft centering ring, and the two tubes and T-nuts were fiberglassed in for a smooth, finished, flush look.
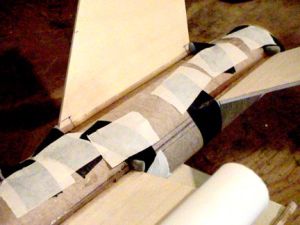 The fins were cut using a razor saw then epoxied through the wall to the motor mount. The
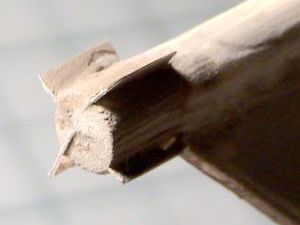
slots were cut with a Dremel. The missile dowels were sharpened in a pencil sharpener then blunted and rounded. A tip
(#5) from the EMRR library was tried for the fin fillets. Fillets areas were dammed at the ends with kneaded eraser
then the eraser dam was taped on to further reduce the possibility of leaking. The rocket was leveled. Thinned epoxy
was poured in and allowed to set. Included in this process were the fillets for the outboard fin tubes and the
missiles.
The fins were cut using a razor saw then epoxied through the wall to the motor mount. The
slots were cut with a Dremel. The missile dowels were sharpened in a pencil sharpener then blunted and rounded. A tip
(#5) from the EMRR library was tried for the fin fillets. Fillets areas were dammed at the ends with kneaded eraser
then the eraser dam was taped on to further reduce the possibility of leaking. The rocket was leveled. Thinned epoxy
was poured in and allowed to set. Included in this process were the fillets for the outboard fin tubes and the
missiles.
A razor saw was used to cut an X-shaped slot in the aft portions of the missile dowels then sheet mylar fins pressed in.
Finishing:
The fins and fillets were brushed with two coats of thinned Elmer's Fill 'n' Finish and sanded. Then the entire
rocket was sprayed with high-build automotive primer twice and sanded. Final paint was light gray enamel for the belly
and undersides of fins and white enamel for the upper surfaces of body and fins with the nose cone upper surface
sprayed camouflage.
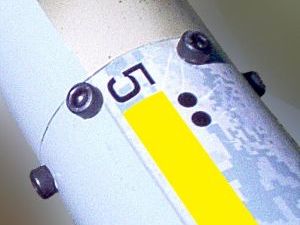
The top half was finished with 5 sheets of Lasertrans waterslide decal sheets. It's basically a body decal over all of the white surfaces. The only upper surface that's not decal is the nose cone because of the compound curves. Lasertrans dries to a nearly opaque white base material, but if you spray it with a petroleum-based clear coat, then it turns transparent. Catalyzed automotive urethane clear coat was used in this case.
The nose cone was fastened to the electronics bay with hex cap screws, which adds some post-industrial grunge to the look.
[NOTE: You can download all 5 decal patterns by clicking on the following links: (1), (2), (3), (4), and (5).]
Flight and Recovery:
Recommended motors: AT F39W-3, AT G64W-6, and Pro38 H153-10. Prep is standard wadding. 28-30” parachute. #6
T-nuts for motor retention.
Flight CONs: RockSim said it would get 3500 feet on an H153, however, actual altitude was 2400. It doesn’t quite fly straight up, so it requires an extra-strong shock cord system and a long walk.
First flight was a level 1 certification attempt at Tripoli Colorado. The Cesaroni H153's 13 second delay, which simmed fine, was way too long for this rocket, since it took off at an angle 6 degrees from vertical. The tubular nylon parachute harness broke when the 30” LOC chute snapped open, and the rocket came down without laundry. It broke one fin and knocked another loose, which has been repaired. The second attempt will be with a beefier shock cord system. Amazingly, the parachute was recovered by another rocketeer who went on a long walk for his rocket.
Summary:
PROs: Kids love it. Adults love it. Wow, look at the size of the motor mount in this thing. Man, it's heavy, too. The
Digi-cam is awfully cool.
Build CONs: Lots of fin cutting, slot cutting, and fillet making. The sheer amount of fin material makes this a fairly heavy rocket for its diameter. The BT-50s are flimsy compared to the rest of the construction. The dorsal fin decal is 1/2” too short so the dorsal fin was shortened to match rather than printing out another sheet of expensive Lasertrans decals. The two long side fins (to which the outboard tubes are attached) are too long for the hobby store material, so they have a butt joint in the middle.
 |
 |