Scratch F-32 Avenger 1.85X Original Design / Scratch Built
Scratch - F-32 Avenger 1.85X {Scratch}
Contributed by Les Bradshaw
| Manufacturer: | Scratch |
Brief:
1.85x upscale of the Starlight F-32 Avenger, including upgrading the motor from 18mm to 24mm.
Modifications:
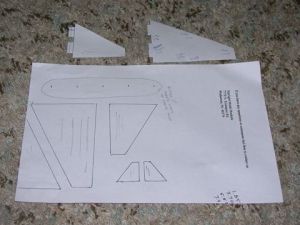
I have the Starlight kit, so I decided to build both in parallel. I traced the wing fins, tail fin, and canard fins
onto paper. I also made 5 registration marks 1" apart. I then brought the drawing to a copy machine and enlarged
until the registration marks showed I achieved the 1.85x size.
I positioned the long motor hook onto the ST-950 tube so 1/2" extended beyond the bottom of the tube. I made a mark and slit to allow inserting the motor hook. I cut a 3/8" piece of an expended D motor to make a motor block. A little glue and the spent casing to push the block down to the hook wire. Finally, I used 4 of the centering rings. I notched 2 of the rings to clear the hook. The original kit has its rear centering ring even with the body tube. Its centering ring is 1/4" thick. The Semroc rings are fiber board, so I glued 2 together to increase the thickness. These rings glue to the motor tube 0.925" from the rear of the tube. The third ring overlapped the hook by about 1/2" from the top. The last ring glued onto the front end about 1/8" down.
While the motor mount was drying, I worked on the fins. Since the enlarged wing fins are 6.388" long, I decided they should use through the tube mounting. I sketched tabs onto the enlarged fin pattern for both the wings and the tail fin (I did not bother with tabs for the canards since they are small and the motor tube did not extend that far), taking into account the need to avoid the third centering ring on the motor mount and then cut all the fins out. Meanwhile, I learned a valuable lesson: pay attention to which tube is which. I drew tabs for the difference between the ST-18 and the ST-13, but the motor used the ST-9. My tabs were too short! I cut some extra balsa that I glued onto my tabs to lengthen them.
 I took a strip of paper, wrapped it around the ST-18 body tube and marked where
they overlapped. I removed the paper and measured its length. I divided the length by 3 and by 4 and marked the paper
accordingly. The "by 3" marks indicated where the wings and tail go, the "by 4" indicated where the
canards and launch lug belong. I reapplied the paper to the tube, transferred the marks, and then lengthened the marks
along the body tube.
I took a strip of paper, wrapped it around the ST-18 body tube and marked where
they overlapped. I removed the paper and measured its length. I divided the length by 3 and by 4 and marked the paper
accordingly. The "by 3" marks indicated where the wings and tail go, the "by 4" indicated where the
canards and launch lug belong. I reapplied the paper to the tube, transferred the marks, and then lengthened the marks
along the body tube.
I double checked the tab placement on the wings and tail against the motor mount assembly. I held the wing and tail fins against the body to mark where the cutouts would be required for the tabs. Then using a new, sharp blade, I cut out the tab slots. I checked the fit of the fins and then glued the motor mount in with the motor hook aligned with the tail line.
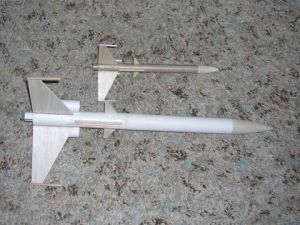
I again checked the fins into the slots and the fit with the motor tube. After my first error, I made the tabs a little long and sanded them down to fit, then glued the wings and tail on. After the fins were dry, I added the canards and launch lug. Once they were dry, I applied a glue fillet to all the joints. Last, I cut the 1/4" dowel to size and glued these to the ends of the wing fins and to the sides of the launch lug. The ST-13 tube got cut into 2 lengths each 5.088" long. These got glued onto the tops of the wing fins.
I used 4' of 1/4" elastic with a standard Estes tri-fold mount for the shock cord.
The nose cone was a bit long for the 1.85x upscale plus it was more pointy. I cut 1/4" off the top and then sanded the cone to be more rounded and a better match to the original cone. A screw eye was installed to tie the shock cord to. I am going to use a stock 18" chute that I have lying around.
Construction:
This was my first attempt at upscaling a rocket. I did not want anything too wild or difficult, but I wanted
something more than a 3FNC rocket. I finally decided on the Starlight F-32 Avenger. This kit looks like a delta wing
fighter with tubes as engine pods/nacelles with additional canards and some dowels for details.
My first design decision was how much to upscale. The original kit uses 2 different size body tube, a BT-50 for the main tube and BT-20 for the "engine nacelles". After comparing available tubes (and knowing the delivery speed which I needed since I procrastinated, again), I went with Semroc products. I replaced the BT-50 with their ST-181120 (a 1.885x factor) and the BT-20 was replaced with their ST-13105 tube (a 1.821x factor). I used the average (1.85x) for all the other dimensions. The longest size 18 tube is only 18" long. I needed 22.2" for the new body tube, so I ordered 2 of the 12" tubes plus an HTC-18 coupler. One of the tubes I cut down to 10.2" and used the coupler to join the tubes to have an overall 22.2" length. Other parts that I ordered included:
- BC-1853 Balsa nose cone
- CR-918 Centering rings (pkg of 6)
- EH-38 Long Engine Hook
- LL-3B 3/16" X 2" launch lugs
- ST-950 Size 9 x 5" body tube for motor mount.
In addition, I picked up some 1/4" dowel and 3/16" x 6" x 36" balsa from AC Moore.
Finishing:
I used Elmer's Fill 'n' Finish for the spirals on the tubes plus I sealed all the balsa. I first used Krylon gray
primer (I feel it has better filling properties and is better for sanding), sanded, then Krylon white primer, and then
finally 2 coats of Krylon gloss white.
I used a copy machine with a ruler to enlarge the decals by 1.85x. The decals are mostly black and white. The red stripes I plan to use tape to duplicate, but for my initial flights I flew both this upscale and the original kit without decals.
Flight:
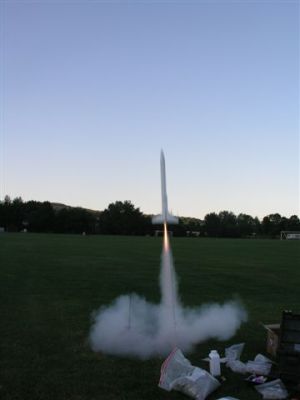
I did a total of 4 flights. The first three all were on D12-3 (with an extender since I made the motor mount for an E
length) and the fourth flight was on an E9-4.
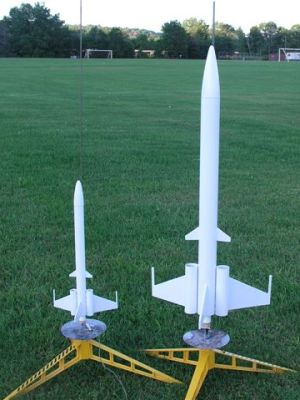
When I first went to my local launch field (a school yard), I had to turn around as the field was in use. After dinner, I returned to the field and it was empty. I set up 2 launch pads (I was also flying the original kit).
For the upscaled version, all flights were nice and straight. I was actually surprised that with the large wing fins it did not weathercock more, but then again the winds were very light (<5mph). The D12-3 was just about perfect--the nose was just going down when the chute would be ejected. For the E9-4, the chute did not deploy until about a second after apogee.
Recovery:
I had no problems with my shock cord. I had protected everything with a generous load of dog barf. The descent rate
was good--nice soft landings. My only issue is the field is shielded by some hills so at ground level where I launched
there were no winds. Higher up it was a different story. I had a good hike through a weed field after the E9 flight,
but I got it back.
 |
 |