Scratch FGM-148 Javelin Original Design / Scratch Built
Scratch - FGM-148 Javelin {Scratch}
Contributed by Todd Mullin
| Manufacturer: | Scratch |
 Brief:
In search of a subject for the unkitted scale model portion of the 2008 EMRR Challenge, I stopped by my favorite
missile scale data web
site. There is a HUGE arsenal of missiles there to choose from but I settled on a design that I've been eyeing for
several years, the Javelin. For more background information on this missile, check out this
web
site. One of the things that I liked about the Javelin is it's small size. I was intrigued by the thought of
building a full scale version of it! The downside to that thought is that the real missiles have an outside diameter of
5" which is not a standard rocket tube size. My decision then was to build a 80% scale model rather than
oversizing it to a 110% version. For this scale I decided to try and use at least a 29mm motor mount because in several
of the pictures of real Javelins, it appears to have a greenish flame which I wanted to reproduce with the newly
released Aerotech Mojave Green motors.
Construction:
The parts for the Javelin are:
- 32.625" 98mm tube
- 4" 98mm tube coupler
- 1/4" Eye bolt
- Small quick connect
- 48" long 1/2" tubular nylon shock cord
- (2) 24" nylon parachutes
- (2) 98mm x 29mm x 1/4" plywood centering rings
- 8 - Front rins
- 4 - Rear fins
- 12" 29mm motor tube
- (2) 8-32 T-nuts
- (2) mirror clips
- (2) 8-32 x 1" bolts
- nose cone - formed with 7 ounce fiberglass fabric.
I "built" the Javelin in Rocksim and was pleasantly surprised that the design was stable without extra nose weight. Normally real missiles are designed to be marginally stable in the real world so that their active guidance systems can turn them quickly as their target moves. Rocksim's user interface is intuitive and easy to use, even for a relative novice at simulation software. I knew that I would be starting with a 4" airframe, so I scaled the nose cone and fins to 80% of the real missile. After I had the appearance of the design correct, I added the "guts" to make it a flight worthy model. I then printed out the fin patterns from Rocksim.
I built the semi-hemispherical nose cone using the technique in this featured tip. After building the nose, I collected the rest of the parts for the build and cut out the fins. I carefully marked and cut the fin slots into the tube, all twelve of them. I epoxied on the front motor mount centering ring but left the rear one loose. Next, I glued the motor mount into the airframe with the rear ring holding the end of the motor tube centered being careful not to block the fin slots. Since I had put masking tape tabs onto the rear ring, I was able to pull it out once I had epoxied in all of the fins. This allowed me to be able to apply internal fillets to the fins to greatly increase their strength. Luckily, I was able to do all the fillets in one shot on the inside. At this point, I added in t-nuts to the rear ring for motor retention. Next came the insanely tedious part on this rocket - lots and lots of little tiny fillets.
After doing fillets for many days, I finally finished off the body of the rocket by epoxying in the tail centering ring and adding 1/4" launch lugs. All that remained was to attach the recovery system.
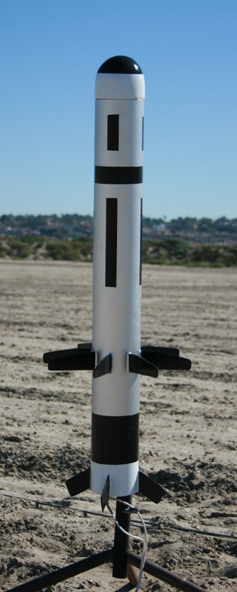
Finishing:
I filled in some slight chips in the wood of the fins with wood putty and then sprayed the entire model with a super
heavy coat of Kilz filling primer. Next came lots of sanding. I started the finished paint scheme with black on the
fins, nose and airframe. Next was the white on the nose and tail and finally silver on the main body with some masking
to produce the roll patterns seen on the missile. There seem to be several distinctly different sets of marking on the
Javelins but I chose the one from the photos I was able to find on the internet for the "A" model.
 Flight:
Working with Rocksim, I decided that I was going to need to work with smaller than expected motors for flying here on
San Diego's Fiesta Island. My original plan was to use the Aerotech H250G but that would make the flight MUCH to high
for a field surrounded by water. I decided that I would start off with the Aerotech F40-4 and if that went well, I'd
try the G71R-7. The G76G will be released in about a month, so I will probably try that one or the H250G at the next
Tripoli San Diego desert launch.
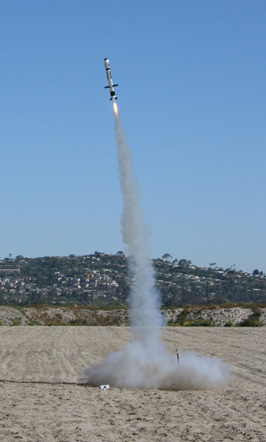
I loaded up the F40 reload and inserted it into the rocket, tightening down the mirror clips for motor retention. I packed the parachute with several handfuls of dog barf wadding and off I went to the pads. After loading up the Javelin, I returned to the launch control panel and waited in the queue for my turn to launch. When it's time came, the Javelin shot of the pad like it's namesake. The Rocksim numbers said that the rocket would only reach 524 feet on the F40, but the thrust to weight ratio looked safe. The actual flight seemed to fly much higher than what I expected from the sims, though this is only a gut feeling as there is no altimeter bay or flight data that I'm basing this on.
The second flight, I loaded up the G71R-7 and let it rip! The red flame looked great with the rocket, even though it wasn't quite the right color. The flight was nice and straight but instead of the normal "bonus delay" on the flight, it was only to about 3-4 seconds of delay when the ejection charge went off.
Recovery:
For the first flight, I decided that I wanted to get the rocket down as quickly as possible and not risk putting it
in the water. I loaded up just a single 24" parachute. Rocksim said that this would come in at about 30 fps.
Faster than recommended, but it would be landing on sand so I decided to risk it. The ejection charge deployed the
parachute perfectly and the rocket made what looked like a safe descent. The rockets landed a touch hard and had one of
the rear fins crack slightly and delaminate one of the plys in the plywood.
For the second flight, I added a second 24" parachute. Since the ejection charge blew early, I was concerned about zippering but after a much slower landing I was pleased to see that the Javelin had not been damaged.
Summary:
The Javelin has long been one of the missiles that I wanted to build a model of. I think that Rocksim was a valuable
tool in my development of the Javelin. More than likely, without the simulations, I would have added unnecessary nose
weight to the rocket. Being able to have the program print out the fin patterns with the correct fin tab lengths was
also very helpful.
The Javelin caught the attention of many of the other fliers at the range the day that I flew it. Lots of people have heard of the missile, but not many people seem to recognize it. Many asked if it was going to helicopter recover for some reason as well. This rocket is a great flier and is a fairly simple scale build that goes way beyond 3FNC!
 |
 |