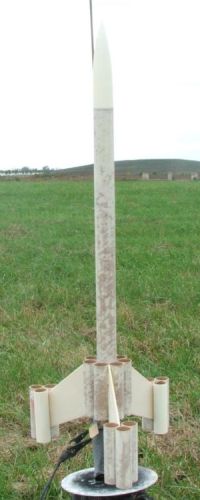
Scratch Fishhead Rocketry - Warlord Original Design / Scratch Built
Scratch - Fishhead Rocketry - Warlord {Scratch}
Contributed by Bill Eichelberger
| Manufacturer: | Scratch |
Brief:
Sometimes good things happen when you least expect it, or so I'm told. In this
case something good happened when I screwed up another project and found myself
with a partially completed, irretrievably screwed up rocket.
Construction:
The parts list:
- BT-50 main body tube
- PNC-50Y nose cone
- 15 BT-20J ram tubes
- 3/32" basswood
- BT-20J motor tube
- 18mm engine hook
- 2 2050 centering rings
- 520 centering ring for engine block
- 30" Kevlar®
- 30" sewing elastic
- 12" nylon parachute
- medium snap swivel
This rocket actually started out as a straight clone of the Estes Nebulon Warrior, but somewhere along the line I got the idea that actually reading the instructions was a waste of time. By the time I realized my mistake, the glue had dried and I was looking at not only a waste of time, but of BT-50 as well. It was out of this sense of desperation and a need for a scratchbuild project for the EMRR Challenge that the Warlord was born.
Since the "gotcha" was the reason this project existed in the first place, I breezed through design and construction and had the rocket flightworthy for the club launch that weekend. I had assumed that the Nebulon Warrior was like any other tube finned rocket and had its tubes all glued right next to each other. After the six BT-20Js had been glued in place, I found myself with a large gap where there should have been none. Then I read the instructions, but the damage had been done. I thought about the problem for all of five minutes before heading off to the rocket room to see what kind of tube scraps I had laying around. I tried everything from BT-55 to BT-70, but nothing struck me as appropriate.
Finding myself at a crossroads, I blindly sketched out a fin pattern on a piece of scrap paper. Within a few minutes I had two large fins glued into place where the seventh tube logically would have been. I made another fin in the same shape as the other two minus the large balsa tab. I glued this in between two tubes on the other side of the rocket, which gave the rocket a look that to me suggested a bounty hunter. (I have no idea why...it's just what came to mind.) I wanted the design to be as much mine as possible, which meant more tubes. I had quite a few 18mm engine tubes laying around from rockets that were treated to 24mm conversions, so I gathered them up and put one on the end of each fin. Then, to liven things up even more, I put two more tubes alongside the wingtip tubes to form a triangle shape at the end of each fin. (The final piece of the puzzle was supposed to be a cockpit from an Apogee design pack that I bought several years back, but the paper with the cockpit designs on it got "misplaced" during our recent move.) Into this mess I stuck an 18mm engine mount with a yard of Kevlar® glued in behind the forward centering ring. From here all that was left was to finish it.
Finishing:
I finished all of the body tubes with thinned Elmer's Fill 'n' Finish before
applying them, but since the requirement for the Challenge was to use two of
the tips from the library, I decided to go a different route for the fins.
Tip #1: Use thinned wood glue as a sealer on the fins in place of the normal thinned Elmer's Fill & Finish.
I like this. It wasn't quite as easy as it sounded, but since the fins were basswood, there wasn't all that much grain to do away with in the first place. The process seems better suited to balsa fins, part of the reason being that it seems to make the fins somewhat stronger. I'm going to have to give thin CA a try in this technique at some point in the future as well.
With all of the filling and sanding done, I primed the whole rocket with Valspar primer. This was important because I needed to get the insides of the tubes coated in white so that the florescent paint to follow would pop. The florescent red was next, it being a no label can that was left over from my STP red/Petty blue modeling days. When the inside of the tubes was bright enough, I let the paint dry and began gathering up every expended 18mm motor casing I could find. Each of the tubes on the rocket, and I do mean all 15 of them were stuffed with an 18mm casing. (This is a new tip-to-be coming to EMRR soon.) This allowed me to spray on the metallic bronze paint without disturbing the "glowing engine" look of the motor tubes. This brings us to:
Tip #2: Let the paint can sit in a pan of warm water before spraying.
This supposedly helps the paint flow better on the rocket. I didn't notice much of a difference, if any, but the metallic paint seems to go on thinner than regular paint does, which could possibly have had an effect on things.
Flight:
I first flew this rocket almost as an afterthought on a day when I had other
first flight rockets that I had been looking forward to flying. I flew the
Warlord mostly out of curiosity. I wanted to see if the big rear fins would be
enough to compensate for the rockets big rear. Loaded with a C6-5, the fins
were apparently plenty big as the flight was stable, although obviously prone
to windcocking. The rocket turned into the wind immediately upon leaving the
pad and was carried well past the pad in the opposite direction after the
ejection charge fired. It was my first long walk of many on that particular
day.
More than a month later, I finally found the time to fly the Warlord again. With the EMRR Challenge deadline looming and the chances of good launch weather fading with each passing day, I grabbed my pad and made a quick run up to pseudo-legendary B6-4 Field. Winds were light and with a reefed chute that seemed to be more reef than chute, I felt that I'd stand a good chance of getting the rocket back. Flight #2 was a B6-4 and behaved in much the same way as the C6-5 powered flight had behaved. The winds were much lighter and the rocket tipped into them as it left the pad. Recovery was perfect and the B4-2 flight that followed was also a decent flight. Had I not forgotten my camera, the next flight might not have happened.
 Since I wanted
a launch shot for the Warlord, I dragged it back to B6-4 Field the following
week to try to get another picture of the launch on a B4-2. The flight was
great but after all the trouble, I missed the picture. I didn't miss what
followed. I knew I had problems as soon as I heard the ejection charge. It had
that firecracker sound that I've come to associate with damaged rockets. True
to form, the two pieces started going in opposite directions. I followed the
body down and saw it hit hard on the frozen ground. From where I stood, I could
see the parts fly into the air, so I knew the news wasn't going to be good. As
expected, I'd managed to snap off two of the three fins and they weren't clean
snaps. Jagged pieces of basswood stuck out from where the fins had snapped on
impact. I might be able to fix it, but it would never look as good as it once
did.
Since I wanted
a launch shot for the Warlord, I dragged it back to B6-4 Field the following
week to try to get another picture of the launch on a B4-2. The flight was
great but after all the trouble, I missed the picture. I didn't miss what
followed. I knew I had problems as soon as I heard the ejection charge. It had
that firecracker sound that I've come to associate with damaged rockets. True
to form, the two pieces started going in opposite directions. I followed the
body down and saw it hit hard on the frozen ground. From where I stood, I could
see the parts fly into the air, so I knew the news wasn't going to be good. As
expected, I'd managed to snap off two of the three fins and they weren't clean
snaps. Jagged pieces of basswood stuck out from where the fins had snapped on
impact. I might be able to fix it, but it would never look as good as it once
did.
Summary:
PROs: I liked the look of this rocket despite its start as a mistake. Great
small field flier.
CONs: We need to develop new construction techniques for the Estes M-80 ejection charges.
 |
 |