Scratch Fly Ball Original Design / Scratch Built
Scratch - Fly Ball {Scratch}
Contributed by Moira Jean Whitlock
| Manufacturer: | Scratch |
(Contributed - by Moira Jean Whitlock)
 Height=47.5"
Weight=31"
Width=3"
Motor=29mm
Recovery=parachute
Brief
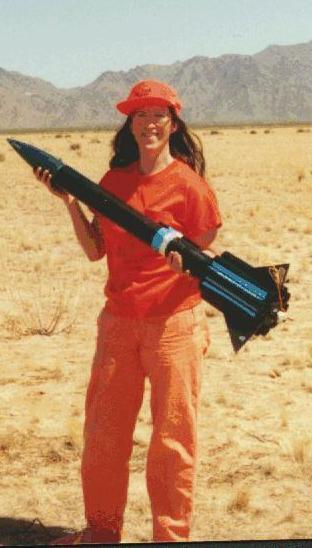
This is a sport rocket in two senses. It's for fun and also is done
up to celebrate baseball. Arizona's new team, the Diamondbacks, inspired this
rocket and it's done up in the team colors of teal, purple, black, and tan. Its
chute is made up of gores of teal and black. The model has a special look as
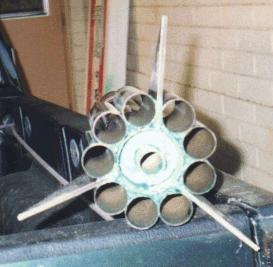
well. It has three delta fins and also nine 1.5 inch Estes body tubes around
the main body tube with the fins protruding at every third tube.
Construction
If there is any "gotcha" at all, it's that the main 3 inch
body tube is phenolic. When I conceived of this project, I didn't yet have
proper tools to cut dado grooves into phenolic. So, I affixed the three fins
(3/16 inch plywood birch with root edge of 7 1/2 inches and trailing edge of 5
1/4 inches length) right to the body tube. But then I wondered how strong this
could be as is if I opted to fly larger than G motors in it. Phenolic does have
good pressure strength after all. So I wondered about how to strengthen the
bond of the fins by other means. Then I noticed that nine Estes body tubes,
each 9 inches in length and 1.5 inches in diameter, would go around the body
perfectly and let the fins stay where they were perfectly. So I used then as a
sort of fillet, as it were, with 30 minute epoxy all around. I chose that over
faster drying epoxy because I read that its bond is stronger as its setting
time increases. Alignment was easy because the tubes essentially aligned
themselves along with the fins.
 I started with good fin
placement because I used a measuring tape and trisected the main body tube's
circumference to place the fins. I performed two trisections so that I could
draw a straight line for each fin and avoid canting.
I started with good fin
placement because I used a measuring tape and trisected the main body tube's
circumference to place the fins. I performed two trisections so that I could
draw a straight line for each fin and avoid canting.
Supplies are easy to get. The PML phenolic tube and nose cone and Estes parts are stock supplies at many hobby stores as is the birch wood, although I opted to get my wood at a local hardwood dealer.
The motor mount is made from a 10 inch length of LOC 29mm motor tubing and 2 LOC 1/4 inch thick plywood centering rings that fit 29mm tubes into 3 inch body tubes. The forward ring has a screw-eye bolted and glued into place and affixed to it is the shock cord mount. The initial 12 inches of the shock cord is 1/4 inch steel cable which I got at Home Depot. It's the sort of wire suitable to go with bicycle locks. Then the 4 feet of shock cord itself is 1/4 inch bungee that is tied to the loop at the base of the nose cone. The chute is 30 inches in diameter and is an octagon made of eight gores of nylon in alternating teal and black with a teardrop shape to the gores, giving a skirts appearance when opened up.
The launch lug is 6 inches of 13mm Estes body tubing. I chose this because I wanted to be able to use sturdy launch rods, as the model is heavy.
The motor retainer is two loops of doubled piano wire through holes in the aft centering ring. The loops are bolted and glued on the forward side of the centering ring and loop over the motor, but are not placed right over the nozzle. The loops are further held in place with an automotive hose clamp around the part of the motor tube overhanging the main body.
Overall, what you get is a very sturdy model with a unique look, almost rough and tough.
The finishing touches is a series of baseball decals for the team, available in many local stores and team shops. I also made my own personal decal using self adhesive glossy paper. It's a baseball streaking up the body tube with a flame trail behind it.
 Flight
Note that the launch rod must go through one of the outer tubes and
through the launch lug.
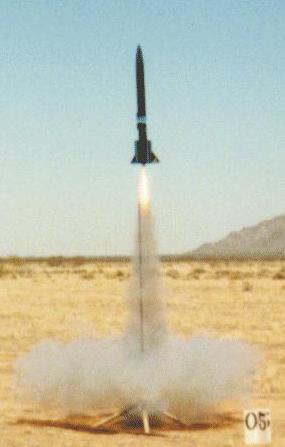
Thus far, the G35 and G80 have produced great flights. They had a delay of 7, but maybe 4 would be better, as it seemed to me that the chute came out at only a couple hundred feet. No nose weighting was needed. However, with the H97 and H180 I plan to use, I will probably add 3 or 4 ounces to the nose to increase static stability. On the other hand, the tubes act as fins themselves, so maybe the weighting might not be needed. I'll be testing this soon. Thus far, flights have been straight and cool. Watchers liked it a lot and stopped me for photos.
No damage or burning occurred as of yet. I used worm bed wadding to protect the chute, and it's effective.
Summary
This was fun because it mutated as I went. The end product was highly
admired and different. The hard part was not being able to groove the phenolic.
So far, I'm not sure how to do it without cracking it, as it's a bit brittle.
The project didn't cost much, either.
 |
 |