Scratch Franken Goblin Original Design / Scratch Built
Scratch - Franken Goblin {Scratch}
Contributed by Hans "Chris" Michielssen
| Manufacturer: | Scratch |
Brief:
My original Goblin clone (BT-55 based) was one of the first I built after really getting back into the hobby.
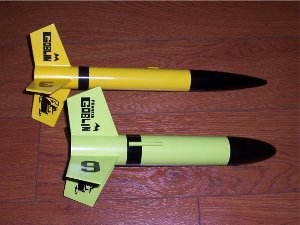
My 1.7X upscale was finished late last year. And four months ago, the "baby" was born. It's a MMX powered, carded model. It has a hand rolled ½" diameter body tube and triple laminated fins. All in total, three Goblins. Finished, flown and ready for family portraits.
For two extra points (2009 EMRR Challenge), I needed to add another member of the Goblin Family by the October first deadline.
Construction:
This year, money is tight. I set a goal of building another model using just the materials I had on hand. No ordering
parts!
I had a ThunderGoon ready for final paint. It's been sitting for months. I just wasn't moved to finish it. Nice model but just not for me. I decided to cut off the fins and body tube, salvaging the engine mount and nose cone. The engine hook was made from that metal strip from a windshield wiper blade. I remember the look my youngest daughter gave me when I pulled it from the trash can at an auto supply store.
I found scrap BT-60 and cut it to 8-½". The ThunderGoon's nose cone was taller than a Mini Bertha's. It didn't matter, it'll still capture the original feel.
I pulled some scrap 1/8" balsa and upscaled the fins slightly from the BT-55 dimensions. I cut two of the fins and realized I didn't have quite enough for other two. I didn't want to cut into another full sheet of balsa.
I started piecing together scraps making sure the grain was parallel. I glued the seams with CA, then cut the remaining two fins. This is when I started thinking of the "Frankenstein Goblin" moniker.
The Kevlar® was already attached to the engine mount from the Thundergoon. I pulled an 18" length of elastic out of my first attempt at a paper rocket. I've never flown that paper model or doubt I ever would. There was too many mistakes learning the new paper carding techniques.
The 12" parachute was pulled from an old Groove Tube, a homemade garbage bag type. For this rocket, what else? I found a screw eye in my parts box. This eye is way too large but seemed to fit the theme and the extra nose weight can't hurt.
There was nothing unusual about the build. It was a little different building a new model from pieces and parts pulled from other models. If you include leftover balsa scraps, I estimate the Franken Goblin was built with parts from six different models.
Finishing:
Originally, I was going to use some Goblin decals from Excelsior. They were leftovers from my original BT-55 based
clone. Phred always seems to add extra images on the master sheet.
I thought I would have some fun. I scanned the Goblin decal sheet, enlarged it slightly then cleaned it up in Corel Draw. The more I drew, the stranger it got. I drew the word "Franken" trying to emulate the original hand drawn font. I added Frankenstein "stitches" and neck bolts to the Goblin character. The Goblin even got a bad nose job. Sure, the humor is a little inside, but still fun.
The original plans show a decal "3" flipped on it's back, centered on both sides of one fin. I decided to use a "6" instead. It's only two sixes, almost three--almost evil.
Of course, I had to go with a "Frankenstine" green and black motif. Normally I use the Walmart (cheap) spray paint for most primary colors but they didn't have a green I liked. For this model I bought a can of Rustoleum Key Lime Green, the only new expense on this rocket.
I shot the model with Grey primer and sanded smooth. I then followed with a white undercoat. I was pleasantly surprised by how well the green Rustoleum spray paint covered. It's the old line of "You get what you pay for." The Rustoleum went on quickly with far fewer coats than the Walmart brand usually requires.
The decal sheets required 3 light coats of clear acrylic. I had never made decals before and was prepared for the worst. I tested the printed decal sheet using Microscale Liquid Decal Film applied with a foam brush.
When I tried to transfer the Microscale treated decals, they didn't seem thick enough. Some of the black ink dissolved. I had much better luck with the clear acrylic sprayed decals. The decals instructions did recommend spraying with clear acrylic.
While my homemade decal's "skin" is a little thicker than a decal that would come with a kit, I was still very happy with the results.
While placing the decals I noticed a mistake in construction. When building, I glued a salvaged one piece launch lug at the center of gravity with a C6-5 engine installed. The lug is now in the way of the thick black decal band above the fins. I had to pre-cut a "notch" in the decal wrap to fit around the bottom of the lug. Another "Frankenstin" puzzle piece, cut and joined together. The original Goblin instructions had you cut the lug in two. Half at the top, half at the bottom of the body tube.
Flight and Recovery:
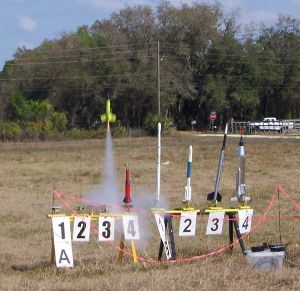
I flew the Franken Goblin three times on March 7, 2009, at the monthly R.O.C.K. section launch.
The first flight was with an A8-3. I called for a heads-up. Sometimes "Gooney-fying" a classic leads to questionable stability. It flew straight and true. Not high but stable. The 12" chute ejected fine.
The next two flights were with B6-4s. The wind was coming up so I cut a spill hole in the 12" parachute. This seems to be the ideal engine for this model, providing good performance and altitude. On the third flight it was loaded on the rack, side by side with it's smallest sibling, my MMX carded Goblin.
After three flights, there were two small body tube dings in the nose cone. Both were not very deep.
I know this model will be a regular flier in my fleet. It's stubby (I like stubby models) and personalized. Some of the older fliers remembered the Goblin and liked the variation on the original theme.
Summary:
PROS: I know this model will be a regular flier in my fleet. It's stubby (I like stubby models) and personalized.
Some of the older fliers remembered the Goblin and liked the variation on the original theme.
CONS: None really.
 |
 |