Scratch Killer Bee Original Design / Scratch Built
Scratch - Killer Bee {Scratch}
Contributed by Dick Stafford
| Manufacturer: | Scratch |

Brief:
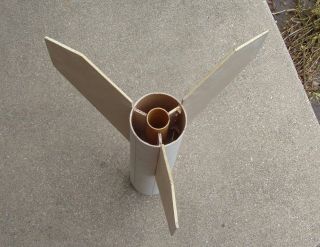
The Killer Bee is a 3" diameter rocket that I built around a set of
Aerospace
Composite fins from Giant Leap Rocketry. It sports a 29mm motor mount and
zipperless construction.
Construction:
The following are the major components used:
- 1 LOC 3" plastic cone
- 1 3" tube, 14" long
- 1 3" tube, 15.75" long
- 1 3" tube coupler
- 1 38mm-3" centering ring
- 1 38mm tube, 10.5" long
- 2 29mm-3" centering rings
- 1 29mm motor tube, 8.5" long
- 1/8" ply for forward fins
- 3 Giant Leap honeycomb fins, style #8
- 2 medium eye bolts
- 2 T-nuts
- ¼" ply large enough to overlap a 38mm hole
- 1 1" long tube that fits into a 38mm motor tube (IIRC from a roll of tape)
- 10 ft of ¾" tubular nylon
- 3 socket-head cap screws to retain nose cone and make it removable
The following are used but are not dedicated to this rocket:
- quick link
- retainer clips
- chute
The lower portion of the rocket was generally built following the zipperless design presented on ROL InfoCentral, although I made a few changes along the way. These changes were not necessarily better ideas, but rather were to adjust for the components I had on hand. In this design, the rocket separates in the middle with the bottom section forming an ejection baffle. The lower section was mainly built with Bob Smith 20-minute epoxy, although some 5-minute was used to tack things in place.
 I cut the fin slots
myself using a sharp X-Acto blade. To support the end of the tube, I installed
T-nuts on one ring and dry-fit it in the end of the tube during this process.
The 29mm motor mount extends through two centering rings, which sandwich the
lower fin tabs. The tube extends about an inch above the top ring. The motor
mount was installed first with the rear ring being dry fit until the end of the
build so I could add internal fillets.
I cut the fin slots
myself using a sharp X-Acto blade. To support the end of the tube, I installed
T-nuts on one ring and dry-fit it in the end of the tube during this process.
The 29mm motor mount extends through two centering rings, which sandwich the
lower fin tabs. The tube extends about an inch above the top ring. The motor
mount was installed first with the rear ring being dry fit until the end of the
build so I could add internal fillets.
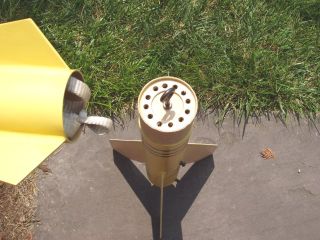
I measured a section of 38mm tube to reach from the top ring to the top end of the coupler. (I could have used a longer piece of 29mm tube, but I started with other plans and was left with the 38mm tube.) I have several small cardboard rings stashed away that fit nicely into a 38mm tube. Once installed, this ring will mate the 38mm tube with the 29mm motor mount. I also didn't have any bulkheads so I glued a chunk of ¼" ply over the hole on a 38mm-3" centering ring. I attached an eyebolt to this plate, oriented so that the plate is on the bottom side of the ring. This fabricated bulkhead assembly was ground down to fit the ID of the coupler. After the bulkhead was installed in the coupler, I drilled ¼" holes around its periphery. I also drilled ¼" holes along the 38mm tube. The hole laden 38mm tube rests between the bulkhead assembly and the top centering ring.
I happened to already have the top piece of tube with the fins installed and quickly decided this would look nice as the top of this rocket. I ran a RockSim model to see if the forward fins would get me into trouble. Because the lower fins are so large and extend behind the end of the rocket, the CP is still around the front of the fins and I had almost one caliber of stability without a chute or cone. So the decision was made.
The nose cone is attached with 3 small screws so I can remove it.
Finishing:
I couldn't bring myself to paint the fins since I liked having the honeycomb
pattern visible. The fins are also translucent, which adds to the effect. This
honeycomb pattern led me to the rocket's name and the name to the paint scheme.
I will have to get some UV clear varnish to protect the fins.
I masked the fins and primed the rest of the rocket with Kilz primer. I then painted the rocket with Wally-Mart (ColorPlace) 97-cent Sun Yellow paint. This was not a bright a yellow as I expected but it still looks good. I added some vinyl striping to give it a 'bee-like' look.
Flight:
I flew the Killer Bee on one of the new Aerotech reload G79 motors with
a short delay (6 sec). Prep included building the motor and installing some
motor clips. The zipperless design eliminated the need for wadding, so all I
did was attach the chute's integral swivel to the lower quick link and I was
set to go. I was going to use a 48" chute but instead used a 36" one
since the wind was blowing toward some trees. You are not paranoid if they are
really out to get you. The boost was great to a bit under 1000'.
Recovery:
On recovery I noticed a line through one of the fins where it looks like it
started to bend. The fin seems rigid and there is no line on the other side of
the fin. I guess I'll add a thin veil of glass over this line just in case.
Summary:
The design of this rocket started with the unique Giant Leap fins and evolved
from there. I think the rocket looks pretty nice, even if I have to say so
myself. As I mentioned in the referenced fin review, the fins are very light
and pretty strong, but the landing showed that they are not indestructible.
They are also, after all, pretty large. I should have gone for a slightly
bigger chute as originally planned.
 |
 |