Scratch Klingon Targ Original Design / Scratch Built
Scratch - Klingon Targ {Scratch}
Contributed by Clive Davis
| Manufacturer: | Scratch |
Brief:
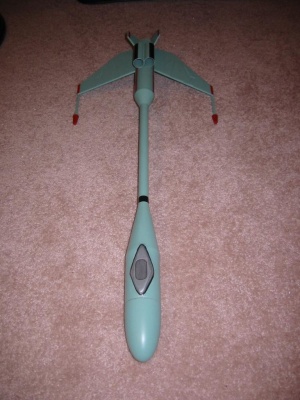
Loosely based on the Star Trek inspired Klingon Bird of Prey, the
Klingon Targ was supposed to be a civilian ship designed for training pilots.
It features two large wings, small fins and two tube fins, a thin neck, and a
large forward compartment housing the parachute.
Construction:
Components consist of:
- BT-5 tubing
- BT-55 tubing
- BT-60 tubing
- BT-60 Big Bertha Style Nose Cone
- 24 mm motor mount with 18 mm mount adaptor (with engine hooks)
- Cardboard centering rings
- balsa/basswood/lite ply for fin construction
- paper for cockpit and fin detail
- two wire connectors for detail
- mylar parachute and shock cord
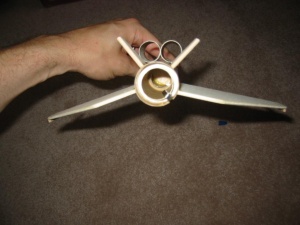
As part of the 2005 EMRR Challenge, I wanted to build a rocket based on a concept I had developed in the past few months. I also will indicate in this report the two tips that I used in my construction. I had a vision of creating a rocket based loosely on the Bird of Prey design. I began with the long thin neck, consisting of a section of BT-5. I added centering rings, and then created the paper transitions. Next, I glued the BT-60 tubing on the top of the BT-5 and glued the BT-55 on the bottom. I marked the BT-55 for fin alignment and then began working on the motor mount.
One of the tips that I decided to use was the suggestion to use the yellow spacer tubes to build a baffle system for the rocket. I punched a few holes in the yellow spacer, glued this directly on top of the motor mount, and then glued a balsa bulkhead to the top of the yellow spacers so that the hot gases would be forced around the bulkhead, the then be pushed up the BT-5 neck. I had my doubts that this technique would work, but later flight tests revealed absolutely no damage whatsoever to the mylar parachute. I removed the shoulder from the nose cone so that there would be room in the nose compartment for the mylar parachute and the shock cord. In addition to this, since I was using a baffle, I used the tri-fold method for attaching the shock cord to the upper body tube of the rocket.
Finishing:
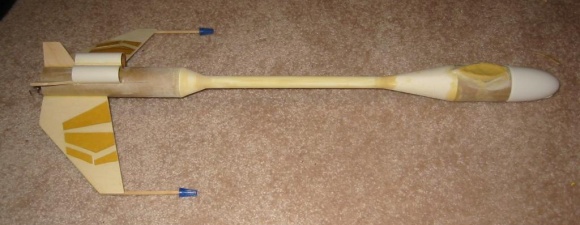
I designed the rocket in RockSim, and thus used the fin templates to help me
trace the patterns on the light ply and balsa I had for the fins. The second
tip I used was to use
thinned
yellow glue or white glue to seal the fins. I first attached the fins to
the body before worrying about sealing them. Again, I was skeptical about this
technique as I prefer Elmer's Fill 'n' Finish. The method works fine, but I
found it to require far more than just 2 applications. More like 5 or 6
applications seem to work to fill all the grain I had in my fins.
 I also
added some detail to the rocket including a cockpit, some raised detail on the
fins, and two phaser cannons on either side of the main wings. After I had
filled in all the grooves and sealed the fins, I gave the rocket a few shots of
Krylon primer, sanding in between.
I also
added some detail to the rocket including a cockpit, some raised detail on the
fins, and two phaser cannons on either side of the main wings. After I had
filled in all the grooves and sealed the fins, I gave the rocket a few shots of
Krylon primer, sanding in between.
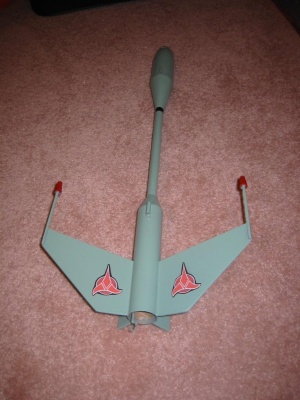
After I was satisfied with the priming, I gave it a good single coat of a kind of strange minty green of Krylon I had in storage for probably 5 years.
Next, I added more detail by way of a Sharpie pens (black and silver) and decals, using some created by myself on white adhesive labels and others from a decal sheet from my old Aerotech Warthog.
Flight:
Since I used RockSim to design and build the rocket, I had data that told me
the rocket was stable on a D12. I decided to do a swing test to see if this was
so. I found that the swing test was not conclusive for the D12, but did
indicate that a C6 would be a suitable motor for a stable flight.
Unfortunately, while performing my swing test, an inordinate amount of stress
was placed on the BT-5 neck of the Klingon Targ, causing it to fold over. I
printed up a sheet of paper similar in color to my paint scheme and ended up
wrapping this around the neck with yellow glue.
The next day was a beautiful day, and I decided to launch the rocket. First flight was on a C6 and then I graduated to a C11 flight. I wrapped the mylar parachute carefully, placed a little wadding in the BT-5 neck, not being too certain the baffle was going to work. I wrapped a sheet around the parachute as well.
The C6-5 got the Targ into the air, but there was a little squirrelly in flight after motor burn out. The delay was very long and ejection occurred way past apogee, as the rocket was nosing to the ground. Parachute deployed perfectly and I was ready for flight two.
 On flight
two, I decided to try the C6-3 before trying the C11. I prepped the rocket was
before and launched it again. The flight seemed to be much better than the
first, but the rocket had more of an arc flight to it this time, probably due
to the odd gusts of wind that were blowing during the launch. Unfortunately,
when the ejection charge arrived, the parachute did not fully deploy, causing
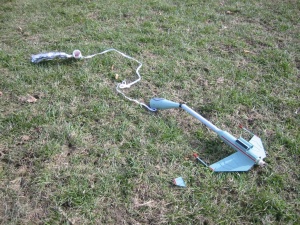
the rocket to do a kind of tumble recovery. It landed on grass, but there was
definite damage including a broken fin (repairable) and a major bend/tear at
the neck just below the BT-60 portion of the rocket. The rocket is not flyable
as is and is currently retired. I need to rethink the BT-5 since it failed on
me twice. Also, I was not too pleased with the rocket's flight being
squirrelly. With that in mind, the design and the rocket really need to go back
to the drawing board.
On flight
two, I decided to try the C6-3 before trying the C11. I prepped the rocket was
before and launched it again. The flight seemed to be much better than the
first, but the rocket had more of an arc flight to it this time, probably due
to the odd gusts of wind that were blowing during the launch. Unfortunately,
when the ejection charge arrived, the parachute did not fully deploy, causing
the rocket to do a kind of tumble recovery. It landed on grass, but there was
definite damage including a broken fin (repairable) and a major bend/tear at
the neck just below the BT-60 portion of the rocket. The rocket is not flyable
as is and is currently retired. I need to rethink the BT-5 since it failed on
me twice. Also, I was not too pleased with the rocket's flight being
squirrelly. With that in mind, the design and the rocket really need to go back
to the drawing board.
I would definitely not launch this rocket on a B motor. I think the C11 and D12 would put in a good performance, but I won't be able to tell on my current rocket.
Summary:
PROs: Unusual design. Baffle system is great. On two flights, the parachute
shows not signs whatsoever of damage or scorching
CONs: The BT-5 neck needs some rethinking. It became the point of failure two different times. Either I enlarge the BT-5 neck to a BT-20, or I need to reinforce the neck with a sheet of fiberglass, which is not my style.
 |
 |