| Manufacturer: | Scratch |
B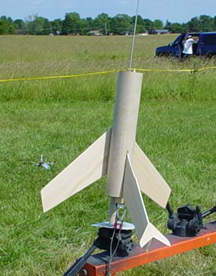 rief:
rief:
I began building upscale versions of classic kits more out of necessity than for a desire for bigger rockets. I found early on that while a lot of the nose cones for the old kits that I wanted to recreate were no longer available in the 1:1 size, they were occasionally available in larger sizes. (They weren't always exact replicas, but close enough for me.) The Estes Rogue and Satellite Interceptor both qualified as "close enough" with the PNC-55BB nose cones, while a BT-56-based Condor became a favorite also. As it turned out, I enjoyed the larger versions of the old rockets. In a lot of cases the added size made for a more satisfying final product, while the larger engines made for much more satisfying flights. That said, I had my doubts when I found that Mike Jerauld of Blast From The Past Rocketry had upscaled the Mach 10. The original Centuri kit was one of the rockets that had always intrigued me as a kid, but with no local retailer I was forced to try to figure out how such an unorthodox rocket ever flew based solely on the catalog picture. I got on Mike's list for the kits as soon as I found out about it, but he temporarily stopped production soon after to concentrate on remodeling his house. I cloned a 1:1 version and after some initial problems, found it to be one of my favorite fliers, but I still couldn't help but be a skeptic when it came to the upscale. Of course, I had no choice but to clone a big one also.
Construction:
Parts needed:
- BT-80 fuselage tube (13.5")
- BT-50 engine tube (10.33")
- PNC-50 marker cone
- BT-20 belly tank tube (2.375")
- BT-80 tube connector (1.25")
- 2 BNC-20 belly tank cones
- 1/8" balsa fin stock
- clay for nose weight
- engine hook
- AR-2050 engine block
- Streamer
- 6" Kevlar
- 2 Mylar or stout paper hold down rings
- 2 - 5"x1/8" launch lugs
- cardstock cockpit pattern
- decals
 While the Mach 10+ is a fairly simple project, I still managed to find a couple of problems that are worth mentioning. During the initial construction I found that I had only one launch lug of sufficient length instead of the two that were called for. I decided that this wouldn't be a problem since I could only load it onto the launcher on one side at a time anyway, and I thought I could get by without the decorator touch of the "machine guns". It never occurred to me that the reason for the called for placement of the lugs on both sides of the wings was more than just a cosmetic affectation. While it is true that they look good as "machine guns" and also allow for loading onto the pad from either side of the fuselage, it turns out that their most important function is to act as stabilizers for the huge wings. (As you'll see, I found this out the hard way.)
The second problem that I encountered was in gluing in the engine tube. Based on my experience, it might be a good idea to "beef up the driveline" by using an extremely sturdy glue when mounting the large piece of BT-50 that acts as the engine tube. Securing the engine hook is another potential "gotcha". I'd suggest a sturdy hold down strap to withstand the added punch that the "D" engine will undoubtedly have at ejection. I used masking tape to which I added a thick coating of glue, but this turned out to be more than slightly insufficient. A traditional Mylar or heavy paper ring would probably work, but as yet I haven't found one in my parts stash. Another consideration involved in this project lies in picking an appropriate BNC-50 nose cone to act as the marker cone. Since packing it full of clay seems to help the rocket boost somewhat straighter, it might be worth your time to track down a two piece cone to make loading the clay easier. Nothing will make it perfectly straight, but the heavy load of clay in the marker cone seems to help somewhat.
As with all gliders, restraint should be your operative word when it comes to finishing the M10+. Since added weight is one of a glider's worst enemies, (behind only Port-O-Let's, access roads, and walls,) minimal effort should be expended in sealing the balsa and filling the tube spirals. I never got around to finishing my M10+, but once I get around to making the necessary repairs and adjustments I've got a bottle of silver model dope with the Mach 10+'s name on it.
 Flight:
My M10+ only made two flights during it's first stint on the flight line, but both were learning experiences and thrillers in their own way. The first flight was on a windy Sunday in April, 2002 that has come to be know as Black Sunday because of the widespread carnage that I experienced. (Flew six. Lost three. Crashed two, one to death .) I had built the M10+ the previous winter, but it went unflown for several months, mostly due to my lack of confidence in the rocket. I had only brought it along on Black Sunday after finding a stray D12-3 motor rolling around in my range box. My son and two of his friends were along for the launch and we set up in a corner of quasi-legendary B6-4 Field that was shielded from the bulk of the wind by a large hillside. This gave us the whole rest of the field for recovery, (not that we recovered anything.) I loaded the rocket on the pad, figuring that at worst I'd get the typical Mach 10 flight, a large loop off the pad that managed to miss the ground, with something approaching a glide if I was lucky. The show we got was beyond all of our wildest expectations.
The M10+ roared off the pad and climbed to about the fifty foot mark, but it was at the forty foot mark where the show really began. The big v-tailed drag brake on the rocket virtually guarantees a loop as the rocket leaves the pad. The rocket was just starting to show signs of beginning it's loop when suddenly the air was full of balsa confetti. A quick look at the corpse left little doubt as to what happened. The left wing had simply exploded when the load became too much for it. The rest of the rocket attempted in vain to recover, but after flailing about in a crazed flight path, it eventually crashed in a heap in the thick grass on the side of the hill. The ejection charge went off with the four of us standing gape-mouthed, wishing that we'd captured THAT particular moment in the history of flight on film. At first I thought I had just discovered the meaning behind the phrase "speed of balsa", but upon further examination I realized that the left wing had failed because of the missing launch lug. This was obvious when you gave the rocket even the most cursory of glances. The wing had flexed, then shredded, luckily into pieces that would make repairing it a fairly simple job. As you can imagine, I added a piece of launch lug when I made the repairs.
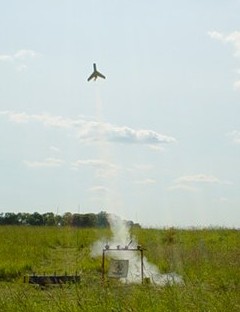
The second flight was on another local field in July at a launch that I put on for the kids of some friends. I brought the newly repaired M10+ along because it had been my experience that, while kids love rockets, they REALLY love gliders. It didn't disappoint. Loaded with a C11-3 for this flight, it didn't as much roar off the pad as it did slowly glide off. Very impressive. It would have made for a great launch picture, but I was still several month's short of the digital camera that I received as a 40th birthday present and my old camera was notoriously slow, so I did without. I shouldn't have. The M10+ didn't attain any great heights, maybe 70' at best, but it was an extremely smooth flight with a straighter than expected boost. It initially looped out over the soccer field, but began banking during the coast phase, looking enormous as it strafed our launch position. At ejection the marker cone dropped from the rocket rather than was launched from it and something also appeared to fly out of the back end, but since it was still gliding I didn't think much about it. It took a nose down attitude and began a rapid descent toward the gravel parking lot, but since my original 1:1 clone had survived a number of gravel or asphalt landings with little more than scrapes, I still wasn't worried. The landing was pretty rough, but survivable and I was ready to pack it up for another launch as I approached it where it lay in a jumble of little feet, courtesy of my six year old recovery army. (Even the adults were impressed.) "Do it again! Do it again!" the kids all yelled excitedly. I was planning to do just that and went to remove the expended engine casing when I noticed that it wasn't there. In fact, nothing was from the middle of the engine tube back. Apparently the force of the ejection charge had been too much for the masking tape hold down strap, and much of the propulsion system had simply propelled out into the middle of the soccer field. We combed the field and turned up the engine casing, but no engine hook.
After waiting almost a year to do the necessary repairs, I finally go re-interested in this project recently. For the new and improved M10+ I decided to use epoxy to mount the engine tube and secure the engine hook. It seems to have worked from a strength standpoint, but it also seems to have changed the balance of the rocket. The recovery phase no longer looks as much like a glide as it does a flutter. I made three flights with it, twice with D12-3's and once with a C11-3, changing the weight in the bomb pod each time, but never got a good mix of fall and fly. On the third flight of the day on the C11-3, the glide took it on such a steep angle that it appeared to nose into the ground. At this point I suspect that it might be necessary to add a slightly larger elevator to allow it more surface area to bring the nose up.
Summary:
While on the surface the Mach 10 may seem to be a fairly complicated project in either size, it's actually a surprisingly easy build. It's a perfect project for a weekend build and fly as you can easily build it on Friday, trim and paint it on Saturday, then fly it on Sunday. (And trim it some more on Sunday too!) While it isn't a glider that will be a good choice for competition, it can scarcely be beat for entertainment value.
Pro's:
- It's BIG.
- Slow takeoff with C11 engines are perfect for getting that classic launch shot.
- Did I mention that it's BIG?
Con's:
- Slightly difficult to trim, but as with it's smaller sibling, once it's flying, it's well worth the trouble.
Other Reviews
- Scratch Mach 10+ By Bob Hvarven
( Contributed - by Bob Hvarven) Brief: An Approx. 2X upscale of the Centuri MACH 10 (Mig 15 Jet looking) Boost Glider made around 1972. Recovery is glide with jettisoned nose cone using streamer or small parachute. Construction: This rocket is easy to build and should be no problem to anyone who has scratch built before. There are no items that need special attention as construction ...
Related Products
 |
 |
Flights
|
|