Scratch Micro Titan III-C MOL Original Design / Scratch Built
Scratch - Micro Titan III-C MOL {Scratch}
Contributed by Dick Stafford
| Manufacturer: | Scratch |
 Brief:
This Micro Maxx rocket is a semi-scale model of the Titan III C Manned Orbiting
Laboratory (MOL) mock-up, which included a stretched version of the Titan III C
topped with a Gemini capsule. Although the actual MOL never was built, the
mock-up did fly on November 3, 1966. For more info, see "Rockets of the
World", by Peter Alway.
Construction:
After the success of my Micro-Viking, I decided to build a second rocket using
the tubing from the Aerotech First Fire igniters. This model uses one 5
½" tube for the main airframe and two 2 ½" sections for the
strap-on boosters. The nose cones were all turned from 3/8" dowels. I was
not terribly careful with the dimensions but the overall look of the rocket is
about right. I used Estes launch lugs for the side pods and thin packaging
plastic for the fins.
The recovery system includes a section of thin Kevlar® twine and as much streamer material as I can stuff in (to be installed at launch).
I used a small hook-eye on the nose cone because I was afraid some extra weight might be required. The CG of the finished model is 4.125 inches from the tip of the nose.
I used a mix of glues - carpenter's glue for the wraps and boosters, thick CA for the clear fins, and Liquid Nails for the side pods. I also used some Liquid Nails on one fin, which for some reason refused to be bonded with CA. This was odd since the other three fins adhered just fine.
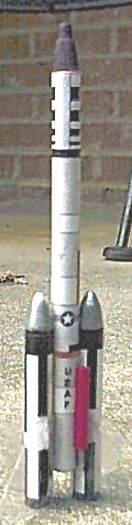
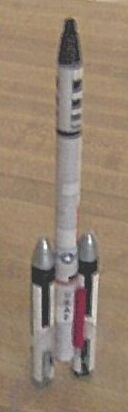 I painted the capsule black,
the booster cones silver, and the side pods red. The tubes are covered with
paper wraps that I printed on my Inkjet. Again, I did not try to be too
detailed; for instance, I increased the size of Air Force emblem and text to
make them more visible. Before cutting out the wraps, I shot on a coat of
Krylon clear polyurethane spray to try to help prevent smudging. From a
distance, the finished product looks good (my opinion of course!) but up close,
there are a few smudges, wrinkles, etc. With some practice, however, I think
this technique will work fine on small models. Prior to launch, I also added
American flag stickers to the clear fins (after the photos were taken). My new
launch policy is to have at least one flag displayed on every rocket I fly!
I painted the capsule black,
the booster cones silver, and the side pods red. The tubes are covered with
paper wraps that I printed on my Inkjet. Again, I did not try to be too
detailed; for instance, I increased the size of Air Force emblem and text to
make them more visible. Before cutting out the wraps, I shot on a coat of
Krylon clear polyurethane spray to try to help prevent smudging. From a
distance, the finished product looks good (my opinion of course!) but up close,
there are a few smudges, wrinkles, etc. With some practice, however, I think
this technique will work fine on small models. Prior to launch, I also added
American flag stickers to the clear fins (after the photos were taken). My new
launch policy is to have at least one flag displayed on every rocket I fly!
Flight:
The engine is meant to overhang to the bottom of the fins and is held in place
with masking tape. I flew the rocket twice on the new MMX motors. The flights
were stable and fairly low. I forgot the streamer stock so I decided to fly
with only nose cone separation. It survived the first flight just fine, but one
fin broke off on the second flight. This was not a big surprise since the
rocket is relatively heavy and comes down fast. I will try a streamer next
time.
Summary:
Despite a few finishing flaws, I am quite pleased with this rocket. The
materials and techniques I used worked well, and the resulting rocket looks
nice and flies fine.
 |
 |