Scratch Mirror Image Original Design / Scratch Built
Scratch - Mirror Image {Scratch}
Contributed by Dick Stafford
| Manufacturer: | Scratch |
Brief:
I couldn't believe it when my wife spotted the Guillow's foam Shuttles on
clearance at Michael's Crafts. I am finally getting her fully trained to spot
rocket components. Anyway, I bought two more of them. I found the review of the
Twin
Shuttle and decided to build something similar. Mine uses a similar but
different design to hold and release the gliders.
Construction:
The parts list:
Shuttle Gliders:
- Two Guillow's Gliders
- ¼" square Basswood stock
- 3/16" dowel
- 1/64" G10 fiberglass
Main body:
- FlisKits BT-60 cone
- 2 FlisKits 18" BT-60
- 3 FlisKits 24mm centering rings
- Estes motor hook (long for E motors)
- 3/16" lug
- Kevlar® twine and elastic
- lead shot
- chute to be selected from range box as required
Glider mounts
- 3/32" plywood
- ¼" balsa
- tube from AT FirstFire igniter
- four small rectangular pieces of wood
The Shuttle mods included embedding a short piece of ¼" basswood stock in place of the glider's rubber band hook, adding a section of dowel on the basswood base, and reinforcing the rudder with 1/64" G10. All these components were attached with 5-minute epoxy. I had considered replacing the rudder or glassing it, but decided a piece of thin G10 was quicker and easier (as it cuts with standard scissors). As it turned out, the mods on the nose and the tail balanced out. As a result, the only trimming I did was to cant the ends of the rudders slightly.
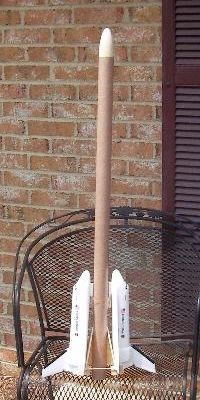
The rocket is typical 3FNC--without the 3 fins of course. Two BT-60 tubes with mid separation, FlisKits balsa cone, and a typical motor mount. I added 3rd centering ring right at the end of the tube. This was an afterthought when I realized that, without fins, it would land on the end of the tube.
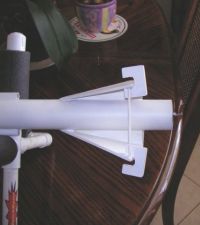
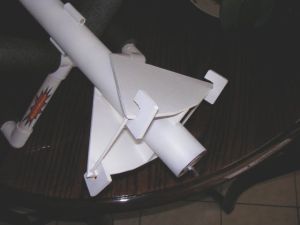
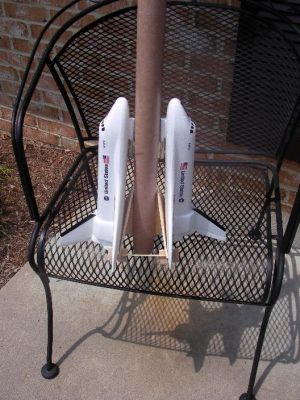
The meat of this design is the method of mounting the Shuttles. The upper part of the mount is a short piece of a FirstFire tube that mates with the peg on the glider. The Shuttle mounts are mainly attached with wood glue although I used some 5-minute epoxy on the front end.
I liked the way the mount of the Twin Shuttle mated with the rear of the Shuttles. I didn't have the materials used in that design, so I decided to build a mount out of thin plywood. I carefully measured the angle of the bottom rear section of the Shuttle relative to the rest of its base and computed the dimensions of the support plate and the underlying triangular support. This triangular support member ensures that the rear of the Shuttle's base rests evenly on the support plate. The bottom rim of the support plate roughly follows the contour of the Shuttle wings and the entire plate is actually sized to extend slightly into the body tube. I notched the tube at the point the support plate intersected it and then backfilled the gap with SuperFil epoxy filler. The hooks that hold the Shuttle's wings in place were cut from small rectangular pieces of wood that I grabbed at Michael's while buying unrelated items.
I made a quick and dirty RockSim file just to get a feel for stability. It seemed OK without added nose weight, but I didn't have full confidence in the model so I added about 0.7 oz of lead shot in the nose. To keep it adjustable, I drilled a large hole, added the shot, then screwed a small plate over the end. The overall weight is 8oz, which should be OK with the planned E18. After looking at my Estes Shuttle stack, I wonder if any nose weight was actually required.
Finishing:
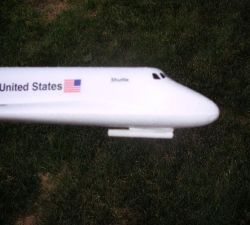
The Shuttles came with decals to approximate the look of the real thing. These
decals were better quality than on the earlier models. I also painted the added
items on the Shuttles with white acrylic brush-on paint. As for the main
rocket, it flew "nekkid" for its maiden flight and I since shot a few
coats of white Plastikote primer. Since I lost my launch window this weekend, I
decided to submit before I finished painting it.
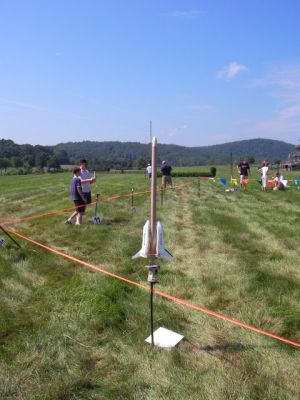
Flight:
To prep the rocket, I added a liberal amount of dog barf wadding and wrapped
the 18" chute with some Estes wadding as added protection. I had to wrap
the interstage coupler with tape to get a snug fit. The maiden flight was on a
E18-4 RMS. The motor hook grabbed the case nicely, but I taped it to the motor
anyway.
Since I had been witness to a major mishap with a rocket holding a parasite glider, I made sure the LCO called for a heads up launch. The boost on the E18 was perfect--it was reasonably noisy and fast and the altitude attained was low enough to get a good view of the Shuttles coming off.
Recovery:
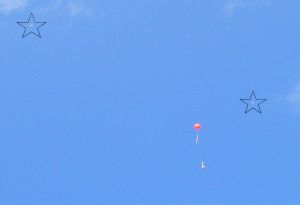
I wasn't at all sure how the Shuttles would perform, but I was very pleased
with the results. They circled around the body as it came down and descended at
roughly the same rate. One landed a bit before and one a bit after. Both were
within about 25 feet of the body.
Summary:
This was my first rocket with parasite gliders and the Guillow's Shuttle is a
natural for this application. They didn't require any real trimming, however,
the mods I performed pretty much balanced out. Since everyone will probably use
different materials, this should be checked in each application.
My results were fantastic and I recommend that everyone have a similar rocket in their fleet. Based on previous observations, I would recommend against using a single parasite of this size, so buy two!
 |
 |