| Manufacturer: | Scratch |
Note: This is a slightly condensed version of all the information that Bert has produced for his Level 3 project. Visit the Tripoli Netherlands site (look under Projecten) to read the additional information and enjoy additional pictures.
 Introduction
In 1998 Wilfred van Bergen, who launched HPR rockets with the NERO, an
experimental rocketry group in the Netherlands, introduced me to HPR. I joined
NERO and built a Binder Design Sentinel and launched it twice on J570's during
the summer of 1999.
The number of HPR-enthusiasts was steadily increasing, so in December 1999 we founded Tripoli the Netherlands. To be able to organize launches we needed at least two level 2, so off we went to Tripoli Switzerland to get our levels. In October 1999 I passed my Level 1, in March 2000 my Level 2 - again with my Sentinel. In July 2000 Netherlaunch 1 - the first launch of Tripoli the Netherlands was organized.
In the spring of 2001 I hope to attempt a Level 3 flight. In this project I hope to implement all the things I learned about building rockets during the last 2 years.
Concept
- I want to implementing techniques that are proven, preferably techniques that I have used before
- I'd like to design Orion to maximize chance of certification. A recovery system with redundancy built in, an anti-zipper airframe, fin-form designed to minimize chance of damage.
- The rocket must be strong enough to fly at least 5 times
- Orion should fly on a 98-7680 (M1419) motor
- Orion should be - or should be adapted to have a static margin of 1 to 2, so I can launch it later in the Netherlands - (NERO safety regulations)
- Orion must fit into my car
- If possible, Orion should be a very large rocket
- Orion should be prepared for clustering; two canted 38 mm motor mounts will be installed and room for avionics and wires will be prepared.
- The prepping time of Orion should be under 2,5 hours.
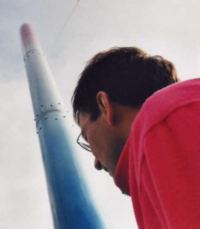
Nosecone
- The nosecone will be a glassed nosecone approx. 3.5:1 ogive
- The nosecone will be empty
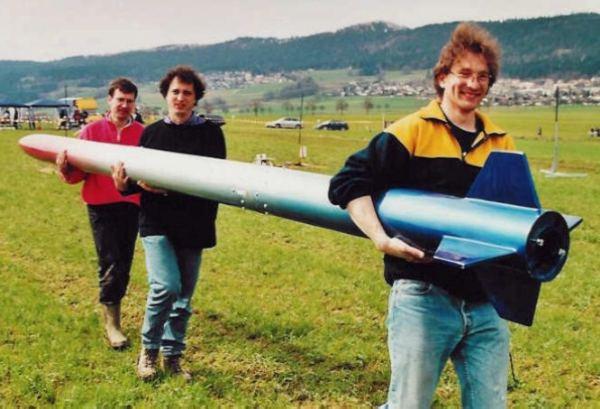
Airframe
- The airframe will be 20 cm in diameter. (inner diameter: 20.0, outer 21.0)
- Orion will have three sections and a nosecone: a fin section, an avionics section and a recovery section.
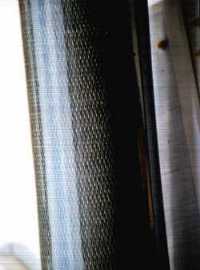 The airframe will be
built by gluing a 2 mm thick sheet of carbon fiber to a phenolic tube. The
carbon fiber will be laminated with laminating epoxy resin to the point that
all carbon fiber is covered. I used this technique in my Sentinel, it is heavy,
but very durable. After 5 flights I have a few pits in the epoxy (same as the
repairable ones in the windshield of a car) but the integrity of the tube is
unaffected. My Sentinel had in the first 3 flights no avionics and suffered
some high-speed deployments (First launch at an angle of 70 degrees, due to
high winds) but never zippered.
The airframe will be
built by gluing a 2 mm thick sheet of carbon fiber to a phenolic tube. The
carbon fiber will be laminated with laminating epoxy resin to the point that
all carbon fiber is covered. I used this technique in my Sentinel, it is heavy,
but very durable. After 5 flights I have a few pits in the epoxy (same as the
repairable ones in the windshield of a car) but the integrity of the tube is
unaffected. My Sentinel had in the first 3 flights no avionics and suffered
some high-speed deployments (First launch at an angle of 70 degrees, due to
high winds) but never zippered.
The components of the airframe (fin section, avionics bay and recovery bay will be bolted together by M10 bolts and nuts. The couplers will be strengthened to attach the sections together.
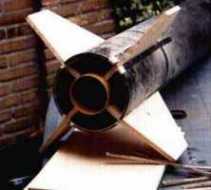
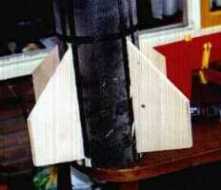
 Fin
Section
Fin
Section
The fins will consist of a G10 and aeroplane grade plywood sandwich. The G10
will be approx. 2 mm thick, the plywood 0.8 cm. The fins will be epoxied to the
motor mount, to 4 centering rings and to the airframe. Internally the rigidity
of the motor mount / fin unit will be strengthened by epoxying rectangular
plywood plates between two fins and two centering rings.
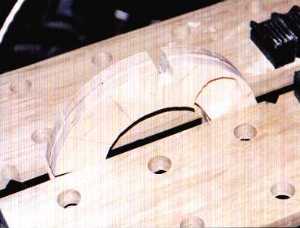
The centering rings will be made of 6 mm high-density airplane grade plywood.
Avionics
In Orion I'd like to use two RDAS units. For my rockets I developed a standard
size to house avionics. This consists of 25 cm 54 mm coupler tube, large enough
to house an RDAS, an expansion board and a 9 V battery. These coupler tubes are
fitted in a 54 mm PML Quantum tube and secured. These Quantum tubes are
built-in in the avionics bay, one on each side. The RDAS units can be armed
through the vent hole on the outside of the airframe.
The RDAS units fire 2 Daveyfire ignitors each, resulting in the ejection of the drogue and main chutes. This part of Orion is tested in Sentinel and Yellow rockets.
Both RDAS units produce the same beep when armed. To avoid problems with this, the left RDAS has some tape over the beeper, thus producing less sound. First the left RDAS will be armed (soft beeps) than the right RDAS (loud beeps). This will also enable me to read out the RDAS units audible (first the right one, than the left one).
The RDAS units are mounted at the bottom of the Avionics section, so that the vent / arm opening can be reached from the ground if the rocket is on the pad. (Approx. 1.7 m)
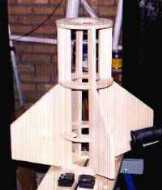
Avionics Bay
The avionics bay must have sufficient strength to keep the rocket intact.
Therefor four tubes are built in the bay. The outer tubes (QT54 mm) will house
the RDAS units; the larger tube will be an optional payload bay, made of a 98
mm tube. Not shown is a 70 mm tube with no function other than strengthening
the avionics bay. All tubes are attached to the to the airframe with three
centering rings.
Recovery Bay
The recovery bay is housed under the nosecone. During recovery both chutes will
leave this bay.
The top compartment of the recovery bay houses the drogue chute. By setting off the apogee ejection charges the nosecone will be blown off, thus deploying the drogue chute.
In the bottom compartment of the recovery by a 15 cm tube is placed, off set from the centre of the airframe tube. By blowing the main ejection charges - placed on the bottom of the main chute compartment - the main chute will deploy.
The ejection canisters are self made, but tested in 6 earlier flights.
Chutes
To land Orion safely I'd like to use a Rocketman "Pro-experimental"
RC3 as a drogue chute and an Impulse 5 meter chute as a main chute. According
to Rocksim the rate of decent will be 33 m/s at the drogue chute and 5 m/s at
the main chute.
The chutes are protected from ejection gases by Nomex flame flame shields.
Recovery Harness
The recovery harness will be assembled form tubular nylon - 2.5 cm - 20kN. A
Nomex flame protector protects the first meter. This protector will also avoid
zippering. For the drogue I'd like to use 10 meters of tubular nylon, for the
main 5.
All hardware will be M10, standardized throughout the rocket. The aim of the construction is that the force of deployment is distributed throughout the rocket.
The sections will be bolted together by attaching the couplers with M10 bolts to the next section. By using 10 bolts the force of the deployment of the chute should be distributed through the entire airframe. The ends of the sections that will house the bolts will be extra reinforced with Kevlar®, and so will the tube couplers on the inside.
Railguides
I plan to use a Blacksky high power rail and the aluminium launch lugs. Three
will be used, two on the fin section, one more at the bottom of the avionics
section. These lugs will be fastened during the building process and reinforced
on the inside of the airframe.
 After
my L2 cert. on ALRS1 I decided to go on for L3. The first step was coming up
with a concept. Since the hobby is still very young in Europe, I decided that
it was still relatively easy to make a rocket that stands out in the crowd. So
I went for the opportunity to build a BIG rocket. After a round of negotiating
with my wife, I made my first draft and send it to my two TAP members (Juerg
Thuering Frank De Brouwer). We discussed it elaborately and the design was
changed in the fin section and the recovery section.
After
my L2 cert. on ALRS1 I decided to go on for L3. The first step was coming up
with a concept. Since the hobby is still very young in Europe, I decided that
it was still relatively easy to make a rocket that stands out in the crowd. So
I went for the opportunity to build a BIG rocket. After a round of negotiating
with my wife, I made my first draft and send it to my two TAP members (Juerg
Thuering Frank De Brouwer). We discussed it elaborately and the design was
changed in the fin section and the recovery section.
Finally the building process could begin. I started in September with laminating the body tubes and worked my way up to the recovery bay. Finally in February the rocket was ready to be finished and painted, which was done by Rene van Hulst. After assembling the rocket for the first time, I was not satisfied with the couplers, so I redesigned them. This was also the time that I realized for the first time what I was going to do! Late at night I couldn't help thinking about what could go wrong and how I could eliminate the chance of something going wrong. But after some final changes and final tests I regained my confidence in the project.
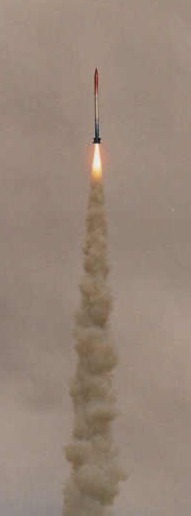
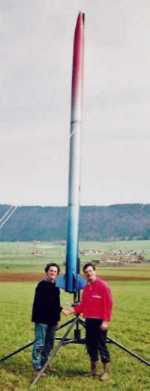
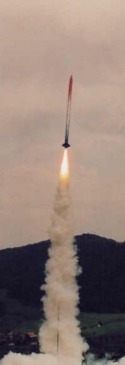 LEVEL 3 FLIGHT ATTEMPT!
March 24, 2001
ALRS 2 Launch - Switzerland
Rocket - Scratch Orion
Weight - 66 lbs
Motor - Aerotech M1419
Altitude - 2952 ft
Frank was so kind to transport the 4 1.8 meter segments to Switzerland and to build a super pad - large enough for this rocket. I arrived on ALRS2 at friday evening - tried to go to bed early and tried to sleep well. It was a nice try....
At 9 I arrived at the site, finding a huge pile of rocket segments and boxes. I managed to confiscate one table and started prepping Orion. During prepping I encountered some problems but they were eventually all solved with the help of Jeroen Louwers, Wilfred van Bergen and Marinus Wisselink. Our problems included an Altacc with a loose capacitor, many holes that should be big enough of 4 wires but weren't etc. etc.
In the meantime two additional stress factors were bothering me, one was a television crew which was making many close-ups and asking difficult questions while I was doing something critical and the other one was the wind that I could feel picking up... I managed to make a deal with the TV crew and I could press on.
This prepping period was not very relaxed, so I'll need to prepare this better. I distinctly remember arming my RDAS. I heard a high beep but was wondering what I should hear. (Forgot the manual) So I asked another member (which shall remain nameless): ''What sound does an RDAS make when all is right?''
''A low slow beep of course!'' He answered.
''But my RDAS makes a high beeping sound, ''I said - getting desperate.
''Oh Yes - that's what I mean!! A high beeping sound'' AAAARRRGHHH!!
When the rocket was prepped I took it out to the pad. That was wonderful - hearing all oohs and aaahs! When the rocket was finally on the pad, I realized we were surrounded by an army of photographers and TV-crews... I felt just like a moviestar!
I remember waiting for a lull, and the countdown. Than the motor ignited and lifted off - very slow, just like a real rocket! You could hear the motor do its work for a long time. At apogee we could see the nosecone come off and the drogue chute deploy. But a few seconds later the main chute deployed too, about 500 meters too high. Argh, that WAS my L3 attempt. A few members helped retrieve the rocket, which was in excellent shape.
It took me a while longer to come down to earth. For me it was a very adventurous day which I'm not likely to forget. I really learned a lot and saw (well, you can't expect ME to be objective) the most beautiful launch I've ever seen. I also really liked that all other rocketeers were prepared to help me, before and on the launch.
I made Juerg promise to arrange for a Redline reload for my 98-7680 casing. So I'll be back at ALRS3. But not with the biggest rocket however; I already heard rumors of Dany building a 6 meter Mosquito!!
I mentioned that a lot of people helped me. Also our new rocketry companies (Spacetec, RebelRocketry, AED and Cavemanrocketry) went out of their way to make this happen. Last but not least I'd like to thank all volunteers who make a big effort to organize rocketlaunches and to make HPR possible in Europe. Thanks!
 |
 |