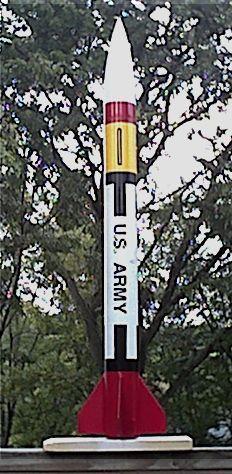
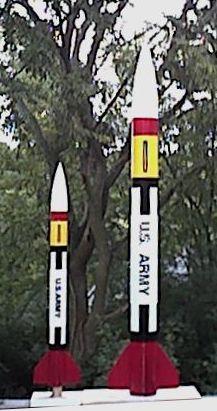
Scratch Patriot (Upscale) Original Design / Scratch Built
Scratch - Patriot (Upscale) {Scratch}
Contributed by Steve Carr
Brief:
I liked the Estes Pac-2 so much that I bought 2 and made one 24mm. Then for my
Level 1 certification project, I bought the PML 1/4 Scale Patriot and painted
it the same way. Must be the paint job. Nobody makes a midpower version, so
with a little math I came up with my own version. A 2.6" 29mm Patriot
capable of flying on E, F, and G impulse motors.
Construction:
All parts for this rocket are from LOC/Precision.
- 1 25" length of 2.6" body tube
- 1 8" length of 29mm motor mount tube
- 2 2.6" to 1.14" centering rings
- 1 PNC-2.56 nose cone
- Fins are made of 1/8" basswood
- 3 feet of flat Kevlar® mule line for the shock cord anchor
- 15 feet of surplus shroud line for the shock cord
Since this was a scratch build the degree of difficulty was up to me. To do the upscale, I used the simple idea of knowing what size body tube I wanted and what the body tube diameter of the original is, so dividing the larger by the smaller gave me a multiplier to determine my length and fin dimensions. It also helped with fin offset and paint layout.
For fin layout I used a guide I had leftover from an Aerotech kit. I first scribed the body tube with a hobby knife then used an 1/8" cutoff wheel in my moto tool for slotting. Scribing gave the cutoff wheel a strait line to follow.
The motor mount came next. the inner centering ring was glued so that it would sit flush with the front of the fins. The ring was also notched so the shockcord anchor could fit along the MMT. The anchor is a 3' length of Kevlar® mule tape. This was glued between the centering rings with 5 minute epoxy. The forward ring was also glued, but the rear was not to allow for fin gluing later. The motor mount was then glued in by the front ring and allowed to dry before the rear ring was removed.
The fins were cut from 1/8" basswood with the grain in mind, which was sanded, filled, and sanded again. This made life easier when it came to finishing. The fins were then fitted and tacked to the MMT with medium CA. This way I could check for alignment before epoxy fillets were applied to the body tube and MMT.
For motor retention I used 2 6-32 T nuts in the rear centering ring spaced 5/8" from the MMT. I liberally coated the fins, outside of the MMT, and inside of the bodytube with 30 minute epoxy. I then pressed in the rear centering ring (making sure it was in contact with the fins) and set it on end to dry. Launch lugs are 3/16 x 2". One at the base and one mounted at the center of gravity. I probably should have gone with 1/4" but I have not had any problem with rod whip.
Finishing:
The nose cone was sanded, primed, wet sanded, primed, and sanded again. This
gave an excellent surface for paint. The body was filled with lightweight wall
spackling then sanded, primed, and sanded. The only other thing I did to the
fins was to coat them with thin CA before sanding. Paint was all Valspar, which
does a good job. The entire rocket was first painted with several coats of
gloss white, then the yellow, red, and black.
The darker colors last made it easier to mask off. Masking was with 3M blue painter's tape left on only long enough for the paint to tack up. I've learned that if it's left on too long the paint can peel off. The only decals used were 1" vinyl letters from the office supply store. The entire thing was then coated with several coats of clear enamel for protection.
Flight:
First flight was on an E9-4 with a reducer in the motor mount and a 24"
plastic chute. It was a little under-powered but straight up and a very soft
landing.
For flights 2 and 3 I went with a 6 panel 18" nylon chute and F20-4's. Both flights were straight up, but the delay was early and the chutes deployed late due to tangling.
Flight 4 was similar to the previous two flights but on a F22-5 reload. Ejection appeared to come early.
Flight 5 was the best on another F22. This time the delay was a true 5 seconds and the chute deployed right at apogee, floating down for a perfect flight.
Recovery:
The shock cord on this rocket is 15' of shroud line I picked up at the local
surplus store. A loop is tied to the Kevlar®
anchor then the shock cord is tied to the loop and nose cone. A loop was then
tied in the shock cord 3' from the nose cone for chute attachment. For chute
protection, I used a homemade Nomex®
protector attached at the end of the Kevlar®.
Summary:
This rocket turned out better than expected. With the 3 ounce LOC nose cone,
there is no need for nose weight. It was only as difficult as I made it. Can't
wait to try it on a G.
 |
 |