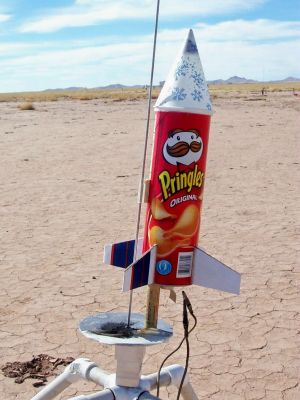
Scratch Pringles Recycled Rocket Project (PRRP) Original Design / Scratch Built
Scratch - Pringles Recycled Rocket Project (PRRP) {Scratch}
Contributed by William Beggs
Brief:
I have wanted to build a rocket out of a Pringles can for a long time now and I finally got the opportunity with this recycle contest.
Construction:
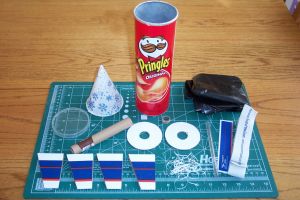
Materials:
- Pringles can for body tube
- Pringles lid and snow cone paper cup for nose cone
- Garcia & Vega plastic cigar case for the body tube
- A slice of a used Estes C motor casing for a motor block
- USPS Priority Mail box for fins and centering rings
- Dental floss for parachute lines
- Plastic Garbage bag for parachute
- Priority mail label to attach lines to parachute
- Elastic from old “Fruit of the Loom” underwear for the shock cord
- Two 1.25” pieces of a Bic plastic pen case for the launch lug
- 1.25 oz of nose weight. I used a crushed up rock
Additional materials:
- Two-part 5 minute epoxy for assembly
- CA to attach nose cone to Pringles lid
- X-acto with #11 blade
- Scissors to cut out parachute and stickers for attaching parachute lines.
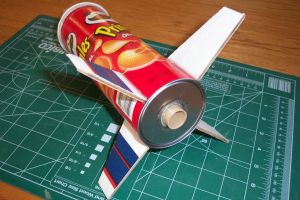
I first started by cutting out the centering rings and fins out of a USPS Priority Mail box that I received via an eBay auction. I then attached the two centering rings to a Garcia & Vega plastic cigar case using two-part epoxy. I decided to use the two-part epoxy since there are many different materials being used and didn't figure the plastic cement or white glue would have the bonding strength that I was looking for. I then applied some epoxy approximately 2-1/2 inches into the motor tube to secure the motor block. I then inserted the slice of a used Estes C motor casing into the cigar case and then used an Estes 18mm motor to push the slice to the correct depth. This is pretty much a standard motor tube building practice when there is no metal engine hook being used.
 I then modified the Pringles can by drilling a hole in the metal end to accept the plastic cigar case/motor tube. This didn't have to be perfect since I was not using this hole to center the motor tube. The centering of the motor tube is attained by the two centering rings that have already been attached to the motor tube. I then glued the motor assembly into the Pringles can using two-part epoxy.
Next, I scratched off some of the Pringles label so as to make a suitable surface to attach the cardboard fins. I then attached the four USPS cardboard fins to the Pringles can with two-part epoxy. The fin dimensions are a 2” root edge, a 1” tip, and 3” wide. They were also cut from the folded edge of the box so they are double thick.
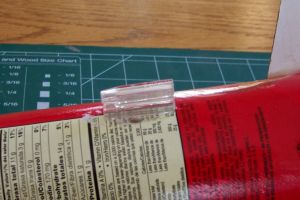
 I made a slit in the Pringles plastic lid and fed one end of the “Fruit of the Loom” elastic through the slit and epoxied it in place.
I then added epoxy to the bottom of the snow cone cup and poured in the 1.25 oz of rock weight. After the epoxy cured, I then placed the snow cone paper cup over the Pringles plastic lid and applied a generous amount of CA. I also applied CA to the snow cone paper cup so as to stiffen it up.
I then secured the launch lug assembly to the Pringles can using two-part epoxy and scratching off some of the finish on the can so that a good bond could be made. I ended up cutting two 1.25” pieces of a Bic pen to be used for the launch lug. I stacked one on top of the other so that the launch rod would clear the overhang of the nose cone. The launch lug is located approximately 4 inches from the bottom of the can. This location roughly straddles the CG of the rocket.
Next, I attached the other end of the “Fruit of the Loom” elastic shock cord to the inside of the Pringles can using the typical Estes technique of folding paper over the end of the elastic and then gluing it to the inside of the can.
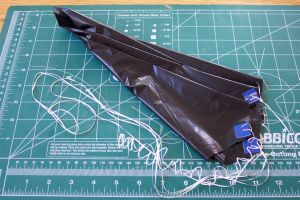
 Finally, I made the parachute using an Estes 24” parachute as a pattern on the black plastic garbage bag. I then attached the Priority mail label stickers that were cut down into approximately ½” squares so that I would have a place to attach the lines. I poked a hole through the stickers and fed the dental floss through the hole and tied it off. This is the same procedure that Estes recommends. I then attached the parachute about 2” down from the plastic lid.
Finishing:
There was no finishing done to the rocket so as to specifically show off the recycled parts.
The entire assembly took about 5 hours once all of the materials were cut and gathered. The main amount of time spent on assembly was on waiting for the epoxy to cure.
Flight and Recovery:
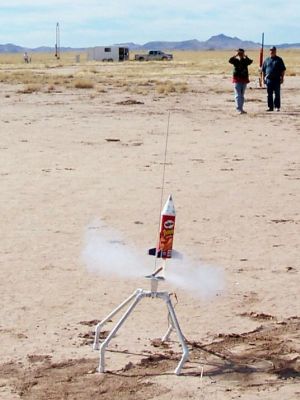
The first flight was on a C5-3 and was a perfect flight. Since the diameter of the rocket is fairly large, I ended up using 10 pieces of Estes wadding to protect the parachute. I also added tape around the bottom part of the motor tube to securely fasten the motor. The rocket deployed its parachute right at apogee.
The second and third flights were also on the same C5-3 motors and worked perfectly. I didn't get a good launch picture until the third flight. The previous two launches were just pictures of smoke trails.
 The fourth flight was not so perfect. I ended up using a single-use Aerotech D21-7 motor. I thought that the delay might be a little long but decided to try it anyway. I should have used my better judgment. It was beginning to be quite windy and the rocket zipped off the pad and right into the wind. At this point it was more like an artillery round than a rocket. As it was descending I thought that the parachute would be deployed but alas it hit the ground like a lawn dart. Upon recovery I was surprised to find that the only thing really damaged was the nose cone. Since there was so much space between the nose cone tip and the cap of the Pringles can, it softened the impact. The booster section of the rocket just flew off to the side with very minor damage. In order for it to fly again I just need to get another Pringles lid, snow cone cup, and nose weight and I'll be good to go.
Summary:
The PRRP flies great! I don't think the nose cone configuration will hold up for numerous flights but initial flights seem to suggest otherwise.
 |
 |