Scratch Pushing the Envelope Original Design / Scratch Built
Scratch - Pushing the Envelope {Scratch}
Contributed by Brian Kain
| Manufacturer: | Scratch |
Brief:
I wanted to build a rocket with the smallest fins I could get away with.....So I came up with this.
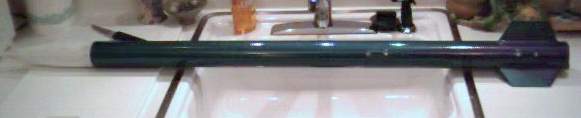
I used Rocsim, VCP and WRASP to get my optimal size fin. Oddly enough, most of the programs agreed with my rocket. This is a single stage rocket, with an interchangeable MMT. Anything from 54mm down to 24mm motors will push this little guy. It uses a PML 30" chute with the shroud lines tied in a knot half way up...This speeds the descent rate a little since the chute is oversized. I use 20' of tubular nylon I got from REI. Painted with automotive lacquer through an HVLP spray gun, it came out very nice...I just wish I filled the grooves better. It was kind of spur of the moment paint job with no time to prep, just primer and wet sand.
Construction:
- 2 Phenolic Body tubes.
- 3 G-10 1/16" fins
- 3 1/8" birch CR's for MMT adapter
- 2 2.1" coupler tubes
- 1 LOC 2.1" nose cone
- 1 Pair ACME 1/4" lugs for 2.1" airframe
- 1 29mm 8" MMT (as an adaptor)
- 20' of tubular nylon
- 2 3/16" stainless steel quick links for shock cord
- 1 30" chute
- 1 pair of motherboard mounting posts w/nuts and washers
- 1 pair of computer board retainers for motor retention
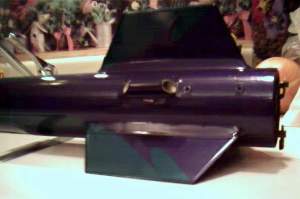 Very sturdy, even though it is not a TTW rocket. I just sliced mini fin slots in the BT with an X-Acto blade about half way through the airframe. Tacked the fins on with CA to make sure they are straight before committing to epoxy. I applied generous fin fillets since it isn't TTW. Countersunk the area where the lugs went, just about 1/3 of the way through the airframe.
I always use 30 min epoxy, though I have tried many different brands I used the Devcon from TAP Plastics, 2 ton 30 min epoxy.
I used a coupler to attach the shock cord lead to by cutting slits in the coupler and weaving the cord through it, tied it in a knot and epoxied over all that. This is where the 2 body tubes join together using the coupler with the shock cord lead. I tied the upper half of the shock cord lead in an overhand knot, then epoxied over that... This is where I attach the 20' of TN with Quick Links sewn on each end.
Construction of the MMT is simple.... First I drilled holes for the retention hardware, then attached the posts using washers and nuts. I epoxied over those. I put the CR's on the motor tube and epoxied fillets on each CR. Then I applied a generous amount of epoxy on the CR's and in between and slipped the coupler tube over that. I held the MMT in my hands and turned it very quickly using centrifugal force to spread the epoxy inside.
Flight:
It can fly on small F motors using an elastic shock cord to save weight. The rocket is designed without a permanent motor mount and therefore with a motor adapter I can use 24mm, 29mm and 38mm motors with the proper weight added to the nose. I could even go for it without an adapter and try a 54mm motor. I would recommend F40-4 up to J350-14 if it was glassed. I fly it most on 29mm G-64's for a nice flight. I used a Nomex® chute protector from Pratt Hobbies. I used a tiny handful of cellulose wadding too. It flew exactly where it was pointed. The wind did not effect it at all. On the 30" chute with the shroud lines tied in a knot, it descended at a nice rate to bring it home safe on the Black Rock Desert floor. I have flown this rocket quite a few times now.
Summary:
There are not many con's to point out so lets skip to the pro's. Cheap, simple, easy to build and fun to fly are some of the best I can think of..... Try it, I think you'll like it.
Other:
I think I learned from this rocket...... I will never build a rocket that is not through the wall again, most likely one that is not glassed with some sort of weight glass.
Other Reviews
- Scratch Pushing the Envelope By Brian Kain
( Contributed - by Brian Kain) Download RockSim file here ! Brief: My scratch built level 2 rocket. Made for the J-350 but can fly on small 29mm H motors also. Used old phenolic but glassed with 6oz fiberglass and 30 min epoxy. ACME 3/8" lugs, LOC nose cone, G-10 FR4 (fire and heat resistant fiberglass). Radio shack personal body alarm for corn field recoveries. Custom aluminum ...
- Scratch Pushing the Envelope By Brian Kain
Pushing The Envelope 38 ( Contributed - by Brian Kain) Download RockSim file here ! Brief: A down scale of my level 2 rocket. TTW to a 29mm MMT. Can fly the I-200 load. If you were crazy you could cert 1 on this rocket with a 29mm H motor. 9400' on the H-90. Construction: 3 38mm body tubes Phenolic 3 1/16" G-10 fins 5 1/8" birch CR's 12" of 29mm ...
 |
 |