| Manufacturer: | Scratch |
Brief:
G-Pod is a downward extension of my "Pod" series (see "H-Pod"
in EMRR). It is a stubby tubefin design for 29mm F-G power that is about the size of an Estes FatBoy. Actually, it
started life as an experiment to try 7 tubefins instead of the usual 6 on my "Auracle 54" design presented
some years ago on EMRR. After getting some very interesting results, which will appear in an upcoming issue of Sport
Rocketry, my "Auracle 7-54" augured in due to an ejection failure, leaving only the tube fin can intact.
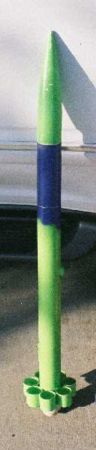
I thought it would be interesting to try a rocket layout with the nose cone larger than the whole rest of the rocket.
Actually, it flies great, flying on one of the new Green Mojave G78-7 motors (longer than the body tube) is a real
hoot!
Construction:
For a stubby, 7-tube design like G-Pod to work requires three tricks: 1) need to cut the bottom off of the nose cone
to create more room for the chute, 2) need the motor to extend out a couple of inches aft of the body tube, and 3)
using 7 tube fins instead of 6 means they have to be of smaller diameter than the body (about 75%) and spacers are
required for a perfect fit. Construction of the original "Auracle 7-54" that G-Pod was cut down from is
exactly the same as the Auracle 54 design on EMRR, so refer to that, and all I'll describe here is the modifications
and the 7-tube tubefin construction. The photos are self-explanatory.
- The G-Pod body tube is 5-1/4" long, cut from LOC 54mm stock (use 24" if you want to build an Auracle 7-54).
- The seven tube fins are 1-3/16" long, cut from LOC 38mm stock
- Saw off all but 1" of the hip of a LOC 54mm nose cone, you'll be adding a dowel rod cross bar inside to attach the recovery system.
- 54mm centering rings (29mm hole) were made from 1/4" Foam-Cor board faced with 1/64" ply on each side (as an experiment), but standard 1/8" ply rings would be fine.
- Motor tube (29mm LOC) was 3 1/4" long.
- A 1" piece of 5/16" brass tube was used as the launch lug, a standard 1/4" fiber lug would be acceptable.
- Recovery system was an 18" Top Flite nylon chute on 5" of para cord.

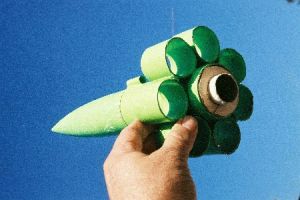
Attachment of the seven 38mm tube fins to the 54mm body tube follows the following somewhat odd protocol (OK, its very odd): 1) first tube fin is glued to the body tube 7/16" from the bottom with both tubes aligned on a flat surface. 2) 1/4" x 1/8" spacers 1-1/4" long were cut from spruce stock and glued to 5 of the 6 remaining tube fins. 3) Using the flat surface, the next tube fin is glued to the body next to the first with the spacer separating them and 5 minute epoxy is used throughout. 4) This process is repeated until the last two tube fins remain (one with and one without a spacer). 5) Glue the 6th tube fin to the assembly with the spacer against the body tube, not the adjacent tube fin as was done with the others. 6) The last tube fin is glued in place adding spacers stock where ever you need to to get it to fit snuggly--I had to add two 1/4" x 1/8" spacers (1/4" total gap to fill) to mine. This slightly non-symmetrical arrangement of the tubefins is not noticed by the rocket, you, or anybody else once painted. Before painting, I added a strip of 3/4" masking tape to the lower half of each tube fin to prevent landing dings. It actually works.
 The motor tube assembly is glued together in the usual way, with the rings glued in place
3/8" from the bottom and 1" from the top. A groove is cut in the upper ring, and the shock cord is tied
securely to the middle of the motor tube and passed through this groove before the motor tube assembly is glued into
the body tube. The launch lug is glued to the body tube flush with the top (this is only good practice with a very
short body tube!) and exactly in line with one of the triangular spaces between the tube fins (pick a triangular space
you haven't slopped epoxy into (usually, there is one).
The motor tube assembly is glued together in the usual way, with the rings glued in place
3/8" from the bottom and 1" from the top. A groove is cut in the upper ring, and the shock cord is tied
securely to the middle of the motor tube and passed through this groove before the motor tube assembly is glued into
the body tube. The launch lug is glued to the body tube flush with the top (this is only good practice with a very
short body tube!) and exactly in line with one of the triangular spaces between the tube fins (pick a triangular space
you haven't slopped epoxy into (usually, there is one).
An attachment point for the recovery system is created in the nose cone you trimmed by gluing in place just above the hip a well-fitted piece of dowel rod or square spruce stock (I used the latter) of 3/8" size. Epoxy some bits of scrap around the attachment points for strength. Personally, I think this is the best way to use LOC plastic cones: strong and gives you back the wasted space to hold your chute. Tie the shock cord to the cross piece with a suitable nautical knot or some such. There is little room for dog barf, so a small Nomex pad is a good idea.
Notice that despite the tiny size of G-Pod and the plan to use single use G-power in it, I haven't said a word about adding nose ballast for proper balance. That is because none is needed. None. Such is the beauty of stubby tube fin designs.
Finishing:
Painting was with Tamiya rattle can Lime Green.

Flight and Recovery:
G-Pod was thoroughly flight tested on motors from D12-3 (on which it is not stable) to G78-7G Green Mojave and G77-7R
Redline (on which it flies superbly and fast but only to about 1700-1800' or so, so you do get to fly it again.
Other motors with perfect flights included: E30-4 (with adapter) to about 600', F42-4 to about 900', F50-6 to about
1200'. Due to its small size, it was not possible to attach my customary altimeter "parasite pod", so these
are guesstimates from the SIM prediction using a calculated Drag Coefficient of 0.95. Because of the very high
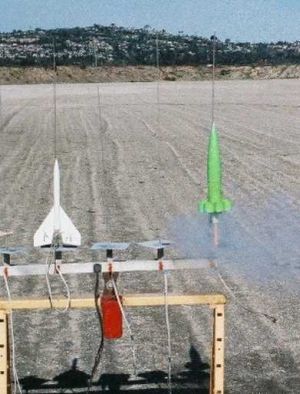
acceleration from the pad, I was only able to get a launch shot with the D12-3 (on which it tumbled, so don't try this
motor). I did manage a very cool landing photo of G-Pod on a G77-7R Redline, just as it was about to bonk Dr. Howard
Smart's truck (no damage to either)--look at the protruding motor (2" aft!) and how much bigger the cone is than
the rocket body! This rocket is basically like a cardboard 57mm anti-aircraft shell with tube fins!


Summary:
PRO: Tiny, stable, sturdy and unbelievable to see an Estes-sized rocket like this (photo) flying on G-power and
surviving. No heroic measures like glassing or a ton of nose lead to get it to work. Cheap and quick to build. Easy to
just toss in the car and go flying. F42 and E30 are the best all-around motors to use. G motors are mainly for showing
off!
CON: I need help tracking it with G-power, 18" chute makes it hard to see.
Sponsored Ads

 |
 |