Scratch Ringer Original Design / Scratch Built
Scratch - Ringer {Scratch}
Contributed by Dick Stafford
| Manufacturer: | Scratch |
Brief:
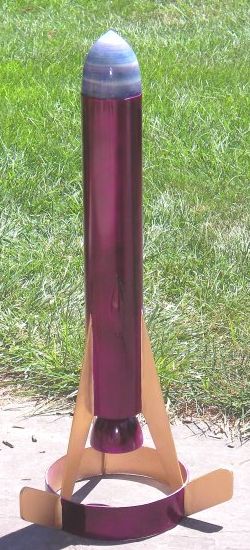
This is a ring-fin design that flies on 29mm motors. It uses several unique
components: a poured foam, yarn wrapped cone and an engine bell built from
Aquapod water bottles. The body is a
3" window tint tube. This is reportedly the same material as PML's Quantum
Tubing.
Construction:
Nose cone parts:
- Aquapod bottle
- 2-part foam (Giant Leap)
- dowel
- inside tube from 3" mailing tube (Container Store)
Engine bell/motor mount parts:
- Aquapod
- two 29mm x 3" ply rings (Giant Leap)
- Gatorboard left over from my Art Applewhite 18" saucer
- 29mm phenolic motor tube (Giant Leap)
- two T-nuts
- 2 part foam, same as NC
Body parts:
- 18" of 3" window tint tube
- ¼" Kevlar®
- buttons from railbuttons.com
- 2" of 3" phenolic coupler (Giant Leap)
- half of a plastic Christmas tree ornament
- 1/16" plywood
- 2" section of 8.25" Sonotube
- ¼" balsa
I started by drilling a hole in the bottom and cap of the Aquapod bottle and inserting a 3/16" dowel. I sealed the cap end with Liquid Nails and cut a corner off the bottle to pour in the foam and to vent the overflow. Pouring went well with only a little overrun. I wish I had remembered to spray in some mold release. I got the bottle off but it took some effort. The tip was turned from the foam at the neck of the bottle and the dowel. I just extended the natural curve of the bottle to form a point.
As I was sanding the plug smooth, I remembered a vendor at LDRS 19 who was selling homemade cones that were Styrofoam, wrapped with colored yarn, and laminated in epoxy. They looked nice and I wanted one, but they were all spoken for. A handful of email exchanges made it clear these folks weren't really in business, so I never got one. I began pondering this concept for my Aqua-cone, and I found that it actually fit nicely in a 3" coupler tube and realized that the added thickness of the yarn would allow it to mate nicely with a 3" tube.
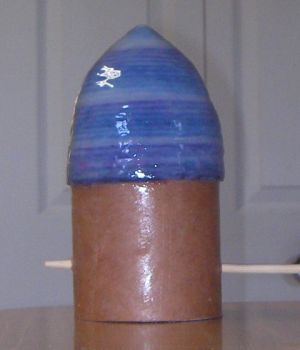 I first glued on
a chunk of coupler, wrapped with some multi-colored yarn, and started coating
it with Minwax Polycrylic. Covering the yarn and getting a smooth finish took a
zillion coats of Polycrylic--I know, I counted them. I normally dry sand. I
have on occasion wet sanded. Now on my Aqua-cone, I tried something new: frozen
sanding. Multiple, thick layers of Polycrylic are too rubbery to sand
effectively. It struck me that it might be easier to sand if I froze it. I gave
it a try and sure enough, this worked pretty well. I tried various grits and
150 seemed to work well. I also found that 15 minutes is about the right amount
of time to harden it. I left it in the freezer for several hours when we went
to dinner with friends and found it was actually too hard. Thus I froze,
sanded, froze, sanded...until 99% of the flaws were gone. Finally, I dipped the
whole thing two more times to regain the shiny finish.
I first glued on
a chunk of coupler, wrapped with some multi-colored yarn, and started coating
it with Minwax Polycrylic. Covering the yarn and getting a smooth finish took a
zillion coats of Polycrylic--I know, I counted them. I normally dry sand. I
have on occasion wet sanded. Now on my Aqua-cone, I tried something new: frozen
sanding. Multiple, thick layers of Polycrylic are too rubbery to sand
effectively. It struck me that it might be easier to sand if I froze it. I gave
it a try and sure enough, this worked pretty well. I tried various grits and
150 seemed to work well. I also found that 15 minutes is about the right amount
of time to harden it. I left it in the freezer for several hours when we went
to dinner with friends and found it was actually too hard. Thus I froze,
sanded, froze, sanded...until 99% of the flaws were gone. Finally, I dipped the
whole thing two more times to regain the shiny finish.
Here are my ending thoughts on yarn-wrapped cones:
- Minwax Polycrylic worked well once I figured out how to sand it. However, it is slightly milky even when dry, and multiple coats washed out the color of the yarn. Its pluses are that it is easy to use and cleans with water.
- Freezing the cone hardens the surface and make it easy to work with. I found only 5 minutes in my freezer was enough to work through a quarter-sheet of 150 grit sandpaper.
- Except for the large foam cone on my Great Googly Moogly, I don't think I've ever spent this much time on a homemade cone.
- Clear epoxy would probably look better, but...
- At the end of the process, dipping the whole cone provides the most uniform finish as you don't want to do any sanding to the final layers. This would require a lot of epoxy with a lot of waste (unless you had other jobs to use up the excess at each dipping).
- Finishing epoxy and a small "rocket rotisserie" might also do the trick.
- One answer may be to not fully fill the ridges between the wraps and try to maximize the color that shows through. I don't clearly remember the finish on the "commercial" yarn wrapped cones, only that the colors looked vivid.
- A rubbery finish may help survive hard impacts. Wouldn't a harder surface possibly show small fractures at the point of impact? On the other hand, shearing impacts might tear the softer surface. Only one way to tell...launch it!
- Back to the start: When you wrap the yarn, wrapping 'uphill' is a bit easier, however, starting at the base is good to keep the wraps perpendicular to the cone's axis. I will start at the base on my future experiments (I have a ton of yarn).
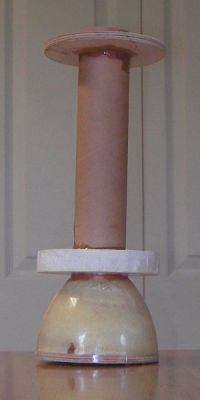
For the Engine Bell, I reamed out the neck of an Aquapod bottle to fit a 29mm tube, cut off the other end close to the middle, and test fit a 29mm-3" centering ring. I added some T-nuts to the ring and then assembled the motor mount with the engine bell. I only had 2 ply rings so I made one from Gatorboard.
I decided that I didn't want to laminate with anything and spoil the smooth finish and decided to try to fill it with 2-part foam. This is a risky proposition on a sealed unit but I went for it. I drilled a hole in the aft ring and filled the T-nuts with grease. I used 2 small batches and ended up filling about 80% of the bell. This leaves a few small weak areas but should do the trick. In the final design, this will certainly not make any difference.
I went with the window tint tube and kept with thin plywood fins to keep the weight down. When cutting the fin slots, I broke the drive (again) on my Dremel and had to use the Rotozip, which is like fishing with dynamite. Two of the slots were ugly.
The main fins are cut from 1/16" plywood and the ringtail is 2" of 8.25" Sonotube. I gave the ring one layer of glass. (Note to self: don't use 5-minute epoxy for even small glassing jobs if they are visible.) I made the small fin tabs on the outside of the ring from ¼" balsa but don't ask me why. This was all glued together with 5-minute epoxy.
It seems that I mess up at least one thing on every build these days. On this one, I forgot to attach the Kevlar® cord through the top centering ring. Instead, I attached it through-the-wall and covered the exposed cord with the other half of the Christmas tree ornament that I used for similar purposes on my AquaBottleBat. This looks just fine. In fact the teardrop shape is nice, but it may not be the strongest method. To hedge my bets, I epoxied a small piece of 3" phenolic coupler into the tube just above the motor mount to give an added layer of support.
Finishing:
I filleted/filled as required with Superfil epoxy filler. This plugged all the
gaps caused by imprecise Rotozip grinding.
I wasn't looking but ran across some pretty Krylon X-Metals purple paint for the already perfect tint tube. This paint look like anodized aluminum. I first masked off all but the fins and inside of the ring, which I painted with Testor's Gold. So far so good. Purple/gold is one of my favorite combinations for rockets.
After drying for a day, I masked the opposite sections and shot on a few coats of the X-Metals metallic undercoat. This looked great and for a few milliseconds I thought about leaving it that color and returning the X-Metals purple metallic paint.
After waiting the allotted time--over 30 minutes but under an hour--I started with the color coats. It was a beautiful day for painting: sunny, light breeze only, and low humidity (or so I thought). The first coat didn't look great, but I figured I just needed another. It looked splotchy with a 25/75 mix of nice purple color and a dull, almost white coating. On the second coat, I had the same thing but noticed the areas had shifted. Between the 2nd and 3rd coats, I shook the heck out of the can thinking maybe it wasn't mixed. I laid on a thick 3rd coat but not much changed. At this point the length of time between coats was exceeding their recommendation and I wasn't getting anywhere so I decided to wait the recommended 5 days before proceeding and I went to TRF for advice.
The consensus was that this was due to humidity. When I checked the weather, sure enough it was 56%...six percent over the recommended maximum. I guess it just felt dry relative to the very humid spell we had just experienced.
On the 5th day after this painting fiasco, which is the recommended drying time between coats of the X-Metals paint. The humidity was an acceptable 30% so I decided to try a few more coats. I am happy to report that the humidity did seem to be the issue, and the Ringer started looking pretty nice. I only had masking problems in a couple of places and I found the purple over gold could easily be removed with gentle scraping with the tip of a hobby knife. The coverage of the X-metals was not perfectly uniform, an artifact of trying to lay it on too thick the first time. When it comes to painting, you can't teach this old dog much of anything.
Flight and Recovery:
I loaded up a largish 48" chute with both dog barf and a chute protector.
The motor of choice was a G77 that I drilled down from 10 to 4 seconds of
delay. The flight was great and ejection was timed perfectly at apogee, but
there was minor damage on landing. There was just enough wind to ensure the
rocket landed at an angle and one of the upswept balsa fin tabs snapped off.
Luckily, the fix is trivial.
Summary:
This is one of my better looking, mostly scrap rockets made of handmade
"experimental" nose cone and engine bell, window tint tubing, etc. I
got plenty of nice comments on both the design and finishing on this rocket,
which always makes you feel good. The window tint tube finishes nicely, is
sturdy, and is heavy. Unless you are going to build something stubby, I
recommend it only for HPR. I also highly recommend the X-Metals paint but watch
out for that humidity!
 |
 |