Scratch SA-14 Archer Original Design / Scratch Built
Scratch - SA-14 Archer {Scratch}
Contributed by Johnnie Paul
| Manufacturer: | Scratch |
Brief:
NCR's SA-14 Archer was my favorite and my 1st 4" rocket. I needed a new
rocket to build and I wanted to try a scratch design using some 3" mailing
tube found at Office Depot. My obvious choice was to downscale my Archer. This
particular design was designed to fly on 29mm H motors. A special note about
the original NCR Archer; I modified the kit to accept 54mm motors, and extended
the kit by 10" for payload capabilities. My scratch design is based on
these mods.
Construction:
Here is a run down of my "Scratch" parts:
- (2) 3.0" mailing tubes from Office Depot
- (4) G-10 fins, and (4) G-10 Strakes downscaled from the original Archer.
- 28.5mm motor tube originally from the NCR archer kit. Will not accept single use motors, but will accept the Dr. Rockets 29/180-240 motor system.
- PML 3.0" nose cone is a perfect match for down scale.
- (1) Loc Precision 3.0" coupler and bulkhead w/ eyebolt.
- (3) 1/8" plywood centering rings 3.0" by 29mm.
- 20' of 1/2" tubular nylon.
- (1) 36" rip stop nylon parachute.
- (3) small quick links.
Building this rocket was a breeze; The (2) 3" mailing tubes were cut to (1) 28" length and (1) 12" payload length. The 28" length was slotted for Thru The Tube fin slots. (note: the mailing tubes come in 36" lengths). Then the tubes were fiberglassed with 2 layers of 2oz. glass. The motor tube was mounted with the 1st and second centering rings, the 3rd ring was left out until all fins were mounted and reinforced. The motor assembly was inserted into the 28" booster and epoxied in place. The fins were epoxied in and reinforced with inner and outer Fillets. The the 3rd centering ring was drilled for 2 blind nuts (motor retention) and epoxied in place.
The 3" coupler was next. (1) bulkhead was drilled for (4) 1/4" holes and epoxied into one end of the coupler. The other bulkhead was also drilled w/ (4) 1/4" holes, and mounted with the small eyebolt. This bulkhead was mounted in the other end of the coupler so that the (4) 1/4" holes were offset from the holes in the other bulkhead. Then the coupler assembly was mounted into the 28" booster tube. This allows for the "Zipperless" design for recovery.
The payload tube was the easiest to do, because the nosecone was inserted and was mounted down w/ 4 small screws.
The strakes were the toughest part of construction. Surface mounted and reinforced w/ 30min. epoxy fillets. The hard part was making sure that they remained in line, and perpendicular to the other strakes. There was a lot of "baby-sitting" each strake until the 30min epoxy set up.
Finishing was standard: Sand, sand, and sand, and just when you think you got it right, sand some more. The Archer was primed and painted to match the NCR version. One exception is I did not downscale the decals, using pinstripe tape I made the finished product resemble the NCR version.
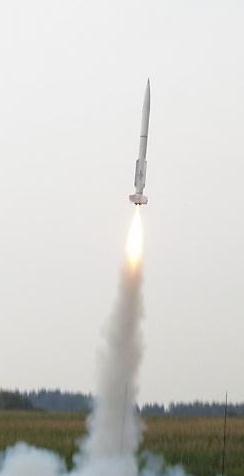 Flight:
Prepping this bird is nice; just attach the shock cord as normal, except the
parachute will assemble into the payload tube, so that at apogee your parachute
will be pulled out from the rocket instead of ejected. Also with the Zipperless
design there are no worries about those long delays. Remember the coupler was
built w/ a home-brew baffle system so no wadding needed either. This Archer was
built w/ the Aerotech H180 in mind, but will fly nicely on any H reload. Motor
was retained w/ (2) screws and some brackets I found in my Flight box. This
rocket flies as pretty as my 4" Archer, just on a smaller scale.
Summary:
No cons because this rocket is built to my standards and my way.
Other:
Incidently this rocket made it's debut at the NSL99 held in Ardmore, Alabama.
Homer Hickam was signing autographs there, so my 3.0 SA-14 Archer has the
Rocket Boy's signature on it...I was happy.
 |
 |