Scratch Saturn-Komarov Original Design / Scratch Built
Scratch - Saturn-Komarov {Scratch}
Contributed by Jeff Lane
| Manufacturer: | Scratch |
Brief:
It's the year 2015. Hillarycare has caused the economy to go belly up, IRS computers have become self-aware, the
United Nations is in charge of sub-dermal implants for our identity system, and NASA has been absorbed by the Russian
space program. Here flies the first triumph of that blessed union.
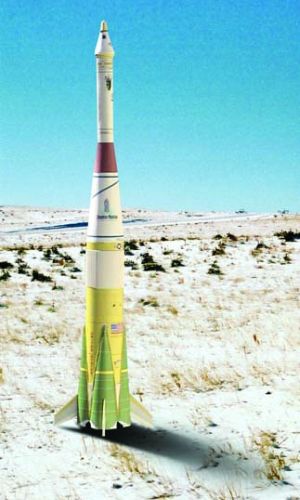
Timed for the release of a major Hollywood motion picture about rocket obsession, (The Astronaut Farmer, Brandango.us is proud to announce the launch of the largest free paper rocket in the known universe: The Saturn-Komarov. This is a very impressive 1/100 scale lightweight rocket that streaks into the sky on a column of flame and smoke with Estes D12-3 motors and can be flown on E, F, and G composite motors (and options for 24 and 29mm mounts are included). It returns to earth in two pieces via two parachutes. Estimated retail value of this monster when compared with similar sized kits is $185.00.
Construction:
Important: This rocket requires a printer that prints on 13x19” paper. Image area used is 12x18”.
Materials used:
- Two sheets of 13x19” glossy Ilford Galerie photo paper or equivalent
- Three sheets of 13x17” Brystol ply which rolls nicely into tubes (or, alternatively, cardstock which tends to crease)
- Two sheets of 11-17” (tabloid) plain copy paper
- Scrap sketch paper
- One sheet of 1/4” foamboard 20”x30”
- White corrugated art paper
- 2 empty 18mm engine casings
- 24” of 300lb Kevlar® or 1/16” nylon braided cord
- 36” of 100lb Kevlar® or carpet thread
- 1 Popsicle stick
- 12” of 1/8” wood dowel and round toothpicks
- 5 min epoxy, carpenter’s glue, and white glue
- Epoxy putty
- Super 77 spray glue or equivalent
- Hobby knife with several new, sharp blades
- Two 18” to 24” parachutes
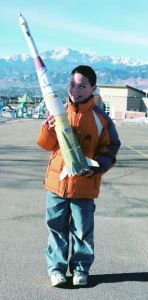
This build is rated Skill level 4.
Complete acerbic back story and 4 pages of instructions are part of the PDF downloads.
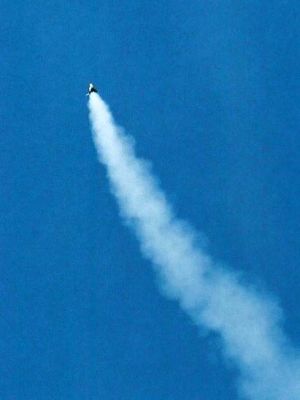
One design gotcha is the fins. When it lands, it tends to bend a fin. They can usually be bent back into place and flown like that, but, hey, just print out more fins and replace 'em. That's what we did. Otherwise, this is a very sturdy rocket. The prototype has flown four times (two D12-3s, an E18 and an F24) and it's still in great shape.
One of the COSROCS members is begging me to build another and use it for my level one flight.
Flight:
Flies 150’ high or so on a D12-3, 300-400’ on an E-18 Aerotech reload, or 600-800’ on an F reload.
Always use a six foot long 1/4 inch diameter launch rod or rail. Do not attempt to fly from a 3 or 4 foot long rod. Do
not attempt to fly on an E9. RockSim reports that twelve feet of launch rod would be required to stabilize with the E9.
Of course, this rocket begs for clustering. If you do that, add nose weight. The center of gravity should be at least 12.25 inches from the bottom of the side pods. We used a 1/2” rear masking tape bulkhead with one full wrap of clear tape for retention.
It also begs to be downsized. One happy flier has already resized it down for his letter-sized printer and 18mm motors.
Summary:
There are a couple of videos at cosrocs.org/htmlpages/2007photos.html. The biggest pro is
that it's free. It is extremely impressive to fly... The kids love it! It can be flown with an F or even a G at a small
venue. It's easy to see the whole flight.
Cons: The fins are a little weak and the escape tower is hard to keep attached, but that's the case with most models that have towers. It does take some time to build. If you want to go high and fast, you're out of luck.
[Important note: Adobe's Acrobat Reader could not be made to print these sheets the correct size (it printed at 95%, even though it was set to print at 100%). Setting Acrobat to print at 105% didn't help. Apple's Preview on the other hand worked perfect every time. If you’re working on a PC, we recommend rasterizing the PDF files into Photoshop (or similar) to better control the final size. Test print the 11x17” pages on plain copy paper to get the size right before trying the more expensive Brystol and Galerie papers. There are benchmark/reference rectangles with measurements on each sheet to make sure you’re printing the right size.]
 |
 |