Scratch Shai-Hulud Original Design / Scratch Built
Scratch - Shai-Hulud {Scratch}
Contributed by Dick Stafford
| Manufacturer: | Scratch |
 Brief:
I recently ran across the description of 'desert squids' on
Tripoli-Pittsburg's Website (look
under 'ARCHIVES/ROCKET CLASSES'). These are rockets that use dowel rods in
place of fins. They look cool and since I had some BT-80 tubes and rings, I
decided I'd build one pretty much like the model described on the website. My
model features a BEAUTIFUL poplar nosecone and a custom rear-centering ring
made by Gordon Agnello, a.k.a. sandman on
The Rocketry
Forum. I wanted a name to fit in the desert squid theme, and decided on the
name Shai-Hulud, after the giant sandworms in the Dune trilogy by
Frank Herbert.
Construction:
I was originally going to use a Fat Boy nosecone since that's what I had available. However, while I was thinking about getting sandman to quote the custom rear-centering ring, I started looking at the pictures of the cones he has made, and couldn't resist one for this rocket. You can find out more about this cone [here].
The body is two sections of BT-80 joined with a 4" coupler from Totally Tubular. Both tubes are 'pseudo-glassed' with nylon pantyhose and Minwax Polycrylic. Once tube has two layers of hose, and the other has three. I misplaced the hose that my wife originally 'donated', so the second tube was done with a different style. I discovered that different nylons have different weaves, similar to different weights of fiberglass. The first tube much rougher, which prompted be to add a third layer of a finer weave.
The motor mount consists of a 6" piece of LOC 29mm tubing, a double layer fiber ring in the front, and a 1/8" plywood ring in the back (I used this mix because it's what I had 'in stock'). This plywood ring is mounted 0.6" from the end of the motor tube, so that the end of the motor tube will be flush with the end of the custom ring after it is slipped on. The rings were attached with epoxy and the motor mount is glued in with Gorilla glue.
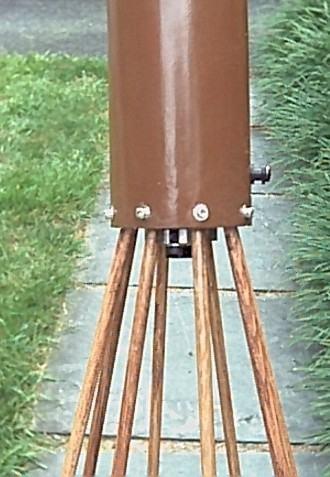
 The custom ring is thicker than most because it also serves to mount
the dowel 'fins'. Sandman made this from a thick piece of plywood that he
turned down to a little over half an inch. He drilled eight evenly spaced holes
at an angle of 15 degrees from the motor axis. I added two threaded inserts to
provide motor retention.
The custom ring is thicker than most because it also serves to mount
the dowel 'fins'. Sandman made this from a thick piece of plywood that he
turned down to a little over half an inch. He drilled eight evenly spaced holes
at an angle of 15 degrees from the motor axis. I added two threaded inserts to
provide motor retention.
At first, I was going to use this as the rear centering ring and glue in the dowels. However, when I dry fit the dowels, I began to worry that they may break on landing. So, I decided to make the rear ring removable and the dowels replaceable. The ring is held in with eight small screws, which also hold each dowel in place.
 The shock cord assembly consists of a 1/8" Kevlar®
leader, a long section of thin tubular nylon, and an anti-zipper device. The
latter is similar to Giant
Leap's Fireball. Mine is a small rubber ball that was slipped over
the Kevlar®
leader so that it touches the edge of the body tube when the cord is fully
extended. The ball is covered with Kevlar®
sock to protect against heat damage. To serve as an attachment point for the
recovery harness, I glued together two fiber centering rings also from Totally
Tubular. This assembly was attached to what would be the lower end of the
coupler. Two small holes were drilled through the ring close to the edge, and
the Kevlar®
was threaded through. The knotted Kevlar®
leader was then epoxied to the wall of the coupler.
The shock cord assembly consists of a 1/8" Kevlar®
leader, a long section of thin tubular nylon, and an anti-zipper device. The
latter is similar to Giant
Leap's Fireball. Mine is a small rubber ball that was slipped over
the Kevlar®
leader so that it touches the edge of the body tube when the cord is fully
extended. The ball is covered with Kevlar®
sock to protect against heat damage. To serve as an attachment point for the
recovery harness, I glued together two fiber centering rings also from Totally
Tubular. This assembly was attached to what would be the lower end of the
coupler. Two small holes were drilled through the ring close to the edge, and
the Kevlar®
was threaded through. The knotted Kevlar®
leader was then epoxied to the wall of the coupler.
I installed two buttons from railbuttons.com to complete the Sahi-Hulud.
The nylon/Polycrylic surface required quite a bit of finishing work. I applied numerous coats of Polycrylic, but when I laid on my first coat of primer, I realized it would take a fair amount of effort to finish these tubes. After several coats of fill-n-finish and 2+ cans of primer, the tubes weren't in too bad a shape. I also had to fill the transition between the two tubes as one was slightly thicker than the other. TIP: When pseudo-glassing a rocket, use the same nylons on all the tubes!
The body was painted using a Model Master brush on paint. The military brown was an appealing color next to the cone. As mentioned above, the nosecone came finished from sandman and is a beautiful golden color. Several coats of clear enamel finished the tube off.
The centering ring/dowel assembly was separately finished before installation. It is stained honey maple and has 2 coats of Polycrylic.
Flight:
I installed a home made, car air bag chute protector and a hefty amount of dog
barf wadding. Then in went the shock tether, and 36" nylon chute. A
clamp-on thrust ring and mirror clamp retainers retained the SU G40-4. The
flight was relatively slow and there was some wobble on the way up. The
anti-zipper device worked and the rocket recovered safely. I was amazed that
none of the dowels broke. Upon inspection, the anti-zipper ball took the brunt
of the ejection charge and burned through slightly. I'm going to cut a piece of
air bag and install a permanent protector below it.
 Summary:
This appears to have been the first desert squid type rocket flown at the MDRA
site, and it definitely caught the attention of everyone on the flight line.
The flight and recovery were good, however the wobble made me chicken out on a
'zero' launch (i.e. no launch rod). Supposedly, this type of rocket will fly
straight without a rod, but I don't want to test this conjecture. Next flight
will be on a G80...off a rail!
While the pseudo-glass technique isn't nearly as strong as fiberglassing, the results are definitely tougher than the stock tubes. However, I probably will not use it again.
The anti-zipper ball seemed to work fine, protecting the relatively thin tubing from the Kevlar® leader. Would the results have been the same without the ball? No one can say.
 |
 |