Paper Sirian Space Racer 5 [SSR-5] Plan
FlisKits - Sirian Space Racer 5 [SSR-5] {Plan}
Contributed by Clive Davis

B Construction: After shaping the wing-fins, I glue the leading and trailing edge portions of the wing-fins in place. They are conveniently located on the same sheet as the wing-fins and contain the necessary glue tabs. Once the body tube and motor are put together, I focus on the nose cone with tip and shoulder. Again, this is fairly easy. I then glue on the support plates onto the clipped delta fins and the wing-fins. After these are dry, they can be glued onto the body tube. Next, the tube fins and nacelles can be added. The launch lugs are folded rectangular boxes that act as a "landing skid" as well as launch lugs. The cool thing about this design is that one can opt to use the left or right launch lug. Since this is a paper rocket, no painting is required. If you are looking to put a finish on the rocket, you could put Future Floor Polish in an airbrush and give it two or three light, light, light coats. If you give it a heavy coat, the ink on the paper will run. Alternatively, you could use ModPodge, either painted on or sprayed on with an airbrush. If sprayed on, you will need to dilute it so that it can actually pass through the airbrush. I have tried both of these techniques with great success. Flight: I have flown the SSR-5 with B6-4 and C6-5 motors. On the prototype flights, I was still having issues with squirrely, corkscrew ascents. I found that this was due to the wing-fin/nacelle units having an unwanted warped design. Once I had achieved good construction of the wing-fin/nacelle unit, I really had a good time flying the SSR-5. The altitude achieved is actually quite admirable for something that probably has a lot of drag. On a scale of 1 to 5 for ease of construction, I would probably put this at a 2.5 due to folding paper and dealing with the wing-fins. Otherwise, it's a pretty easy build. Summary: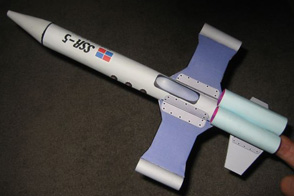 rief:
rief:
The Sirian Space Racer 5, affectionately called SSR-5, is one of the many paper rockets I have designed over the years. It is a simple sport flyer featuring a single 18 mm motor mount, but also features a wing-fin set with attached tube fins. Remember, if you are looking for a spaceship to fly through distant galaxies, the SSR-5 may be the vehicle for you. According to the brief bits of information gathered from a quick tour of the SSR-5, we have learned that Commander JÖ of the Sirian army promises not only to subjugate any alien race, but also to protect them.
In order to build this rocket, you need to visit the fliskits website and print the included documents. One of the pages needs to be "reprinted" so that the backing is red is the last page of the documents. I put an instruction guide together for this rocket so it should be fairly easy to put together. One needs the following:
Assuming one has a good X-Acto knife, a ruler, cutting surface, glue, an expended 18 mm motor casing and an empty ball point pen, one is ready to build this bird. It's fairly simple, if not tedious to put the SSR-5 together. Care must be taken to print the red nacelle sheet on the correct card stock featuring the nacelles.
 Construction begins by scoring the lines first then cutting out parts. I rolled the body tube, nose cone, the nacelles and the tube fins. I then shaped the clipped delta fins as well as the two large wing-fins. I glued the clipped delta fins together then worked on the two large wing-fins. These are really the trickiest part of the construction. If they are not done correctly, they could warp. We all know that warped fins on a rocket is never a good idea.
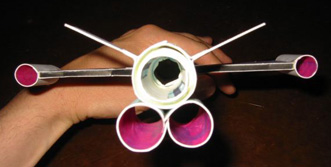 Meanwhile, I construct the motor mount and centering rings. This is an easy step involving shaping the motor mount around a spent engine casing and after the motor mount has dried, gluing centering rings around the motor mount. Centering rings are basically thin strips of card stock that are rolled/glued onto the motor mount. It is a good idea to test fit the motor mount periodically so that you don't add too much centering ring.
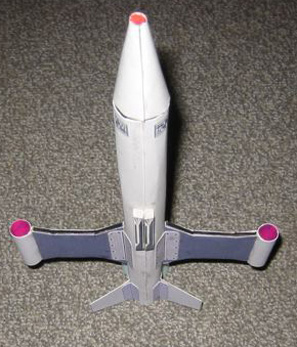 Once this is complete, I add the shock cord using the tri-fold method. I place clay in the nose cone and make sure the CG of the completed model minus a motor is 5.75" from the tip of the rocket. Make sure the shock cord is firmly glued into the nose cone. Secure the shock cord to the nose cone with a dab of epoxy, if necessary.
Flight and recovery on the SSR-5 is normal. I have used parachute and streamers for this model. I place wadding in the body tube, prep the streamer/parachute and place the nose cone on top. Since there is no engine hook, I friction fit the motor.
PROS:
CONS:
 |
 |