| Manufacturer: | Scratch |
Brief:
At one point, I had decided that I'd start building water rockets. I built a couple of very simple ones but then my interest waned. Someday I may yet move up to more complex ones.
This design was taken from Jimmy Yawn's site (who woulda thunk it?). Jimmy's site has detailed descriptions and photos of the basic construction process. However, I deviated slightly from his techniques.
I have included a few safety tips in the 'launch' section, however, if you are going to fly water rockets, you should research more detailed safety guidelines online. You know the drill: safety is your responsibility.
Construction:
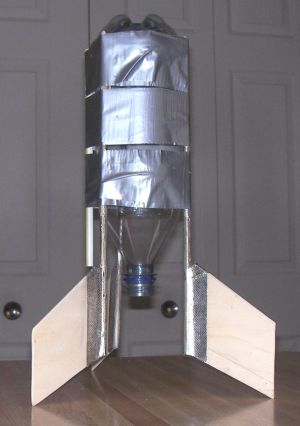
The airframe is a 1L Dasani bottle with fin sticks and a launch lug attached with duct tape. The fin sticks were recycled from my 4-stage rack rocket. They are just basswood fins epoxied to a dowel. I have also used square basswood sticks and foamboard fins. The lug is a soda straw.
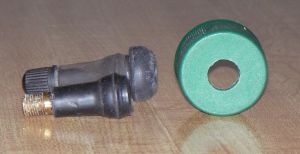 The bottle is pressurized with an electric tire pump that is adapted to the bottle-cap 'nozzle' with a car tire stem. I liberated some used stems from a local tire shop. You have to cut the bulb off of the tip of the stem, leaving only a tapered end. I cut the bulb off at its base, leaving about a 1/2" diameter, and trimmed around the inner brass tube. Jimmy cut his lower and cut through the brass tube. The nozzle is the bottle cap with a hole drilled in the center.
Flight:
Because there is no active recovery mechanism, these should only be flown where there is no risk of damage to people or property. You also must be aware that the bottle could burst and could hurt you. Never use a hand pump with this design! You should either remain behind a solid structure or turn the pump on and retreat to a safe distance (at least 10'). In either case, you should wear safety glasses.
I found an open area that could pull the car up to and could safely support 'boink' recovery. I used my standard mid/high power pad rod, sprayed down with WD-40 as I knew they'd get wet. Launch prep involved adding water to the bottle, inserting the tire stem from the inside of the cap and reattaching the cap. I would clamp the nozzle to the electric tire pump, turn it on, hide behind the blast wall (the car door) and wait.
First set of flights: Since the tire stem was larger in diameter than Jimmy's, I made the nozzle slightly larger also (~7/16"). The performance of the rocket was worse than expected.
Second set of flights: I made a new nozzle from a Coca-Cola cap, with a smaller exit hole (~13/32"). I used a Dremel grinder, which cleanly cut through the cap and the plastic washer. There was no leakage when I pressurized the bottle. In both cases, the pump ran for about 45 seconds before the Hydro-1L launched. I think the altitude shown in my logs is a bit optimistic.
Summary:
This is a simple way to get started in water rockets. The limitations are that you'll need an electric tire pump, a place to launch them, and you must adhere to the safety measures mentioned in the flight section.
A Google search will yield a pile of water rocketry links. My current favorite is Air Command Water Rockets. These folks are flying staged, clustered water rockets and are even building flight computers. I also like Bristol Water Rockets. This site provides plans for a 'sports cap' launcher and links to many other good sites.
 |
 |