Scratch Spikor Original Design / Scratch Built
Scratch - Spikor {Scratch}
Contributed by Dick Stafford
| Published: | 2010-08-15 |
| Manufacturer: | Scratch |

Brief:
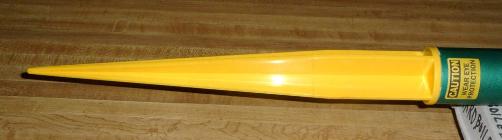
This was a quick build featuring a mailing tube, recycled 29mm motor mount and fins, and a long
plastic garden spike.
Construction:
When I spotted the yellow plastic garden spikes at Home Depot, I couldn’t resist getting one of each size. The spike on the bigger one, which was used here, is 15” long and the base matches a 2.125" mailing tube well. The smaller one is 10” and fits nicely in a 38mm tube. The latter will be the subject of a future review.
Please refer to the attached image to see how the spike was used. I made a coupler using the tried-and-true method of sectioning a piece of tube and joining it back together with the strip that was removed. This was then glued into a short piece of mailing tube. When I chopped off the hook that protruded from the spike's base, I left a slightly flat area. It turns out that the base of the spike fits well in the coupler as long as the joining strip sits on the spot where that hook was. So, I attached some 1/8" Kevlar® to an eyebolt that I installed in the spike's base, inserted it in the tube assembly and sealed the base, which is inset couple of inches, with Gorilla Glue. I had thought that I'd drill a small hole in the nose section's body and pour in some foam. However, once the Gorilla Glue set it seems sturdy and, since the hard-point is on the heavy spike, I left it it as-is.
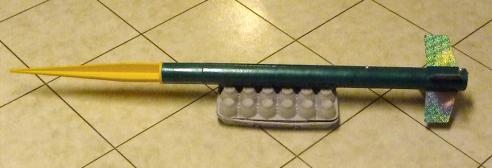
The body is a 23.75" long mailing tube. One good thing about saving bit and pieces of old rockets is you have bits and pieces. I found a recycled 29mm mount with rings to match this tube. It also had an attachment point for the shock cord. I attached some more Kevlar® to the mount and wrapped the lower 6" or so with a strip of car airbag. I sure wish I had more of this, but all that's left is a few scraps. I affixed it with a few twists of bare wire.
 I
used the G-10 fins from the now defunct
Stratoshpere. One of the bad parts about having an assembled mount is you can't install it sans rear ring, so inner
fillets are tough. I marked the mount so the fins would avoid the shock cord mount and motor retention hardware and
swabbed on some 5-minute epoxy. When it set just enough not to run, I swabbed some more in the tube and inserted the
mount. I slid all the fins in and babied it as the epoxy set. This means that I set it on end, eyeballed the alignment,
and adjusted the alignment as the glue dried. The results are not perfect but are pretty good. I then masked the fins
and added some Super-Fil fillets. I also added some epoxy clay between the base of the body tube and the motor mount
just to toughen it up a bit. This will likely take the force of landing since the fins are up-swept.
I
used the G-10 fins from the now defunct
Stratoshpere. One of the bad parts about having an assembled mount is you can't install it sans rear ring, so inner
fillets are tough. I marked the mount so the fins would avoid the shock cord mount and motor retention hardware and
swabbed on some 5-minute epoxy. When it set just enough not to run, I swabbed some more in the tube and inserted the
mount. I slid all the fins in and babied it as the epoxy set. This means that I set it on end, eyeballed the alignment,
and adjusted the alignment as the glue dried. The results are not perfect but are pretty good. I then masked the fins
and added some Super-Fil fillets. I also added some epoxy clay between the base of the body tube and the motor mount
just to toughen it up a bit. This will likely take the force of landing since the fins are up-swept.
I was a little concerned how the ribs on the cone would effect stability so I entered the design in RockSim. Although the ribs do seem to push the CP forward, the spike is heavy enough to make it very stable. It looks like this will get to around 1800’ on a G64-8.
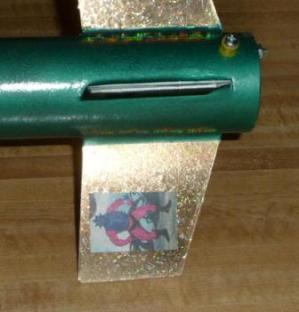
I treated the ends of the mailing tube with thin CA and primed the body with Painters Touch. I used a couple of coats and waited a couple of days before painting. The body is Rustoleum green hammered metallic and will no doubt appeal to Packers fans. The green will not help with recovery but I've never let that get in my way.
The blue painters tape that I used to mask the fins lifted some of the finish from the holographic stickers on the fins. Luckily, I had some scraps that I could use to cover the blemishes. I also printed a couple of stickers, one to pay homage to the rocket's name and one that just seemed appropriate. I sealed these with a clear coat and covered the edges with clear finger nail polish. I have found that stickers made from the Avery white label stock tend to peel up over time. This is mostly the case when it is used on curved surfaces like the body tube. Hopefully, the thicker polish will keep them tacked down.
Flight:
I used both a little dog barf and a small ‘chute pad. I decided on an undersized 18”
‘chute to keep the rocket in the same county. The G64-10’s delay was drilled to -8. The boost was fast and
high as would be expected. Ejection appeared to be at apogee, although it was hard to see. It recovered close by and
with no damage.
Summary:
The main point to this build is the garden spike nose cone. At $3.25, it was inexpensive. I
think it looks pretty cool and appears to fly nicely. Others at the launch seemed to share my opinion.
 |
 |