Scratch Sprike Original Design / Scratch Built
Scratch - Sprike {Scratch}
Contributed by Greg Deeter
| Manufacturer: | Scratch |
 Brief:
This is a simple 3" single staged rocket which I scratch built over the period of a few days. The rocket I used for my Tripoli L1 Certification was the BSD Canadian Sprint (38mm motor version of their 3" Sprint), which is a large upscale of the Estes Astron Sprint circa late 60's and early 70's. Ever since I have retired that rocket due to it's sentimental value, I have always missed flying it because it flew so nice. So I decided to replace it with something very similar but unique, for frequent simple H flights with very little prep needed.
Construction:
- 3 - Elliptical fins (from BSD)
- 1 - LOC 3" Airframe
- 1 - 6:1 Fiberglass Conical -Spike Nose Cone from Curtis Turner
- 1 - 38mm Motor Tube from LOC
- 2 - 3" x 38mm Centering Rings from Quickburst.Net
- 1 - 3" Bulkhead plate from Quickburst.Net
- 1 - 38mm Giant Leap Slimline Bell Cone Retainer
- 2 - Stainless Steel Quicklinks
- 2 - Stainless Steel U-Bolts
- 6 - Snap Rivits from Public Missiles
- 2 - Delrin rail buttons from Railbuttons.Com
- 1 - TAC-1 36" Chute from www.Motorman.US
- 1 - Kevlar Heat Shield from Quickburst.Net
- 45 Feet of Tubular Kevlar from www.Motorman.US
Construction was quite simple and fast and I only used about 1 ounce of epoxy on the entire rocket. This is the lightest 3" build I have ever done.
The name Sprike was derived by Challenger 498 club member Chase Hrncir when he saw it in it's build phase. It's half Sprint / Half Spike (Same Nose Cone as a Polecat Spike), thus a "Sprike" . Sprike was also an item in the classic video game Doom, and it is also a term related to digital audio meaning "Noise".
I started by removing the glassine layer from the 38mm motor tube to get some prime adhesion and used a tiny amount of 28 minute epoxy to seat the centering rings onto the motor tube. I then cut the fin slots with a Dremel disk cutter, inserted the motor tube yet used no glue at all to hold it in. It fit very tight when test fitting and I could never get it back out, so I simply inserted the through the wall fins with a small amount of epoxy at their root edges to the motor tube. I then epoxied the bulkhead plate into the coupler for the payload bay and that's all the glue I used on this rocket! Less than 10 minutes working with epoxy, not even a whole ounce and that was it. I secured the nose cone and payload bay with snap rivets from Public Missiles.
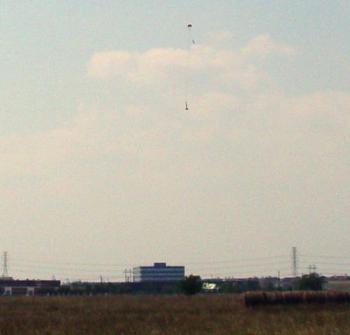
 The recovery system consists of a Stainless Steel U-Bolt in the fore motor mount centering ring, another Stainless Steel U-Bolt in the bulkhead and everything is held together with 45 feet of fireproof Tubular Kevlar, a few Stainless Steel Quick-links and a nice strong TAC-1 chute (protected by a Kevlar Heat Shield) brings it all back safe.
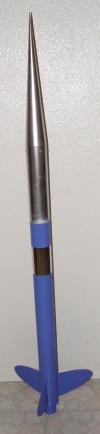
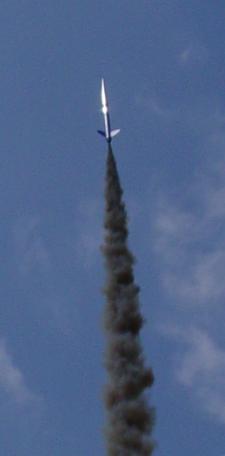
I painted this rocket with a nice soft flat Satin Blue yet with that color being so close to the color of the sky I added a wrap of adhesive backed chrome Mylar tape. As you will see in the launch photos that does real well at lighting it up in the sky by reflecting off the sun. To give a little color matching I painted the nose cone with some chrome paint that rocket pal Tim Berg gave me before moving to Scotland. That came out real well too and it's a nice looking bird.
Flight:
The first (test) flight was on September 11th 2005 at Rushing Park in Katy Texas with the Challenger 498 club. It was a little windy but I really wanted to launch it. Used a Cesaroni Pro38 G79SS Smokey Sam with the delay manually set to 6. That was perfect for nailing apogee deployment. Landed in a parking lot to add some -character- to my nice new paint job.
Second and third flights were this morning at NASA's Johnson Space Center. This bird likes H motors. It flew just beautifully on an H153-8 and then an H143SS-8. Both delays were manually set with the CTI tool but apogee deployment looked so perfect it was as if it were altimeter deploy. And both times the rocket recovered very close to the rail for some very short walks.
 Summary:
This is a great flyer and I am quite pleased with it. Even with the very small amount of glue used in the build it's strong as an ox. At some point in the future I plan on adding an electronics bay for dual deployments and letting her rip on some "I" motors like a LOKI Research I-405. And eventually I can see launching it with a nice tame CTI Pro38 J400SS. :)
 |
 |