Scratch Talos Original Design / Scratch Built
Scratch - Talos {Scratch}
Contributed by Dick Stafford
 Brief:
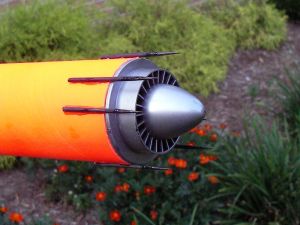
This is a almost-kinda-semi-scale model of the Talos missile. When I converted my 21st Century Toys F-104 for flight, I had the jet engine turbine component left over. I found it fit a 2.125" mailing tube perfectly and realized it (almost) resembled the Talos nose cone. The real Talos is 2-stage, but mine combines both stages in a single stage 29mm model.
Since this is made from non-standard parts, I assume no one will ever build it. However, it can be used as yet another example of how to use scrounged parts.
Construction:
Parts list:
- Jet engine turbine extracted from from a 21st Century Toys F-104
- 2.125" mailing tube with telescoping inner tube
- Lead shot
- Eye-bolt
- 8/32" bolt with 2 nuts
- balsa fin stock
- buttons from railbuttons.com
- tube from First-Fire igniter
- 29mm motor tube
- Giant Leap centering rings (two)
- 3/16" Kevlar
- Wood glue, 5 minute epoxy
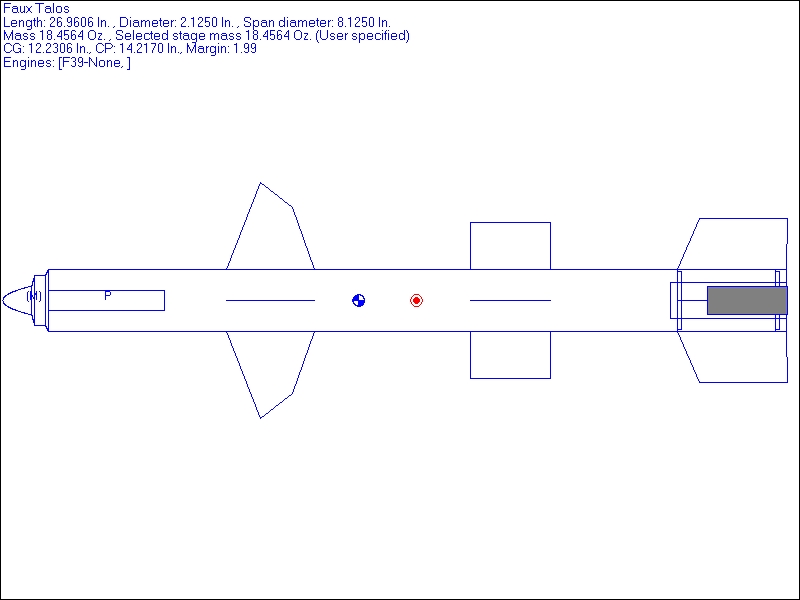
I based the length of the body tube and the fins dimensions on a scale drawing by Pete Alway. The dimensions can be found in my RockSim file (in the title header of this review).
The bottom TTW fins went on first and then I sequentially attached each set using a ruler and clamps to make sure the fins were aligned with one another. It sports both a 1/4" lug and rail buttons. The motor mount is unremarkable with 2 rings, a tube, and a single bolt as an attachment point for a motor retainer.
The plastic 'cone' has a central hole and a 1/16" deep ridge that fits perfectly in the 2.125" mailing tube that I'm using. This ridge needed to be augmented to make sure the cone stays on. To form the shoulder, I cut a short piece of cardboard tubing that telescopes into the main tube. I also cut a circle of foamboard that fits in this shoulder and also inside of the ridge on the cone. The eye bolt passes through the foamboard ring and is epoxied into the aforementioned hole. I could have added lead shot and epoxy into the tip of the cone, however, on ejection this mass would pulling against the eye bolt/cone bond. Instead, I added the weight to the inside of the shoulder. Thus, it surrounds and is bonded to the neck of the eye bolt. It took ~6oz of nose weight--about the same as the rest of the rocket.
Finishing:
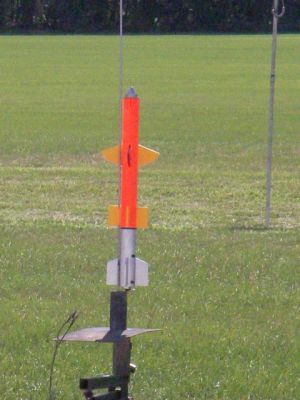
I painted it with a combo of Rustoleum day-glow orange spray, Krylon X-metals metallic primer, and Testor's metallic green and yellow brush-on. Basically, 'use what ya got'. I also used some black vinyl pinstriping. I added some toothpicks to the front of the body tube to look like the antennae on the real thing.
Flight:
The first flight was on an F39-6. The boost was lazy with lots of coning. I wasn't sure whether there was a simulation error or there was something amiss with the motor. The rocket should have been stable prior to leaving the rail. Anyway, it survived for a second flight.
I decided to submit the review before the second flight since I've started building again and don't know when this will fly again.
 Warning: Do not assume my RockSim is correct. If you build a Talos, independently determine the proper CG/CP relationship!
Summary:
I thought this was an interesting way to reuse an otherwise useless remnant from my Starfigher PMC. I think it looks cool considering my choice of color schemes.
 |
 |