Scratch Tarkus II Original Design / Scratch Built
Scratch - Tarkus II {Scratch}
Contributed by Dick Stafford
| Manufacturer: | Scratch |
 Brief:
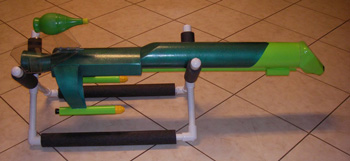
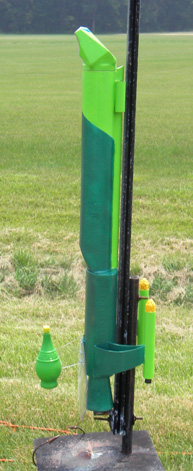
The motivation for this 29mm, sci-fi-inspired rocket began with a container from a bottle of Highland Park
single-malt scotch. The truncated oval tube screamed spaceship. From there, the rocket design proceeded in
‘real-time’. The name arose part way through the build and came from Emerson, Lake and Palmer's 1971 album.
Construction:
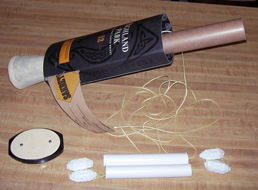
 Motor mount - A 29mm motor tube is mounted in a section of
BT-60 tubing. The front of the motor tube is centered by a Giant Leap 29mm-38mm phenolic ring. It's a bit small so I
shimmed it with some scrap tubing. The rear is attached to a ply centering ring that matches the lower diameter of a
cardboard cone. I forget where I got that cone. The top of the cone was trimmed to fit the BT-60. T-nuts are installed
in the aft ring for motor retention. Later in the design, as it grew in size and weight, I reinforced the BT-60 with
some heavier scrap tube.
Motor mount - A 29mm motor tube is mounted in a section of
BT-60 tubing. The front of the motor tube is centered by a Giant Leap 29mm-38mm phenolic ring. It's a bit small so I
shimmed it with some scrap tubing. The rear is attached to a ply centering ring that matches the lower diameter of a
cardboard cone. I forget where I got that cone. The top of the cone was trimmed to fit the BT-60. T-nuts are installed
in the aft ring for motor retention. Later in the design, as it grew in size and weight, I reinforced the BT-60 with
some heavier scrap tube.
 Main wings - I guess these reflect a Star Trek influence. The curved main
wings were cut from 8" diameter Sonotube using a RotoZip cutting wheel. They are inserted through slits on the aft
body. The top section of the wing is one piece whereas the lower tier is two-part. The nacelle tubes are 24mm LOC. The
front of the nacelles are bomblets from the Estes BLU-97B Cluster Bomb. The back of each nacelle has a plastic nozzle
centered in a piece of BT-5 tubing. I also forget where these nozzles came from.
Main wings - I guess these reflect a Star Trek influence. The curved main
wings were cut from 8" diameter Sonotube using a RotoZip cutting wheel. They are inserted through slits on the aft
body. The top section of the wing is one piece whereas the lower tier is two-part. The nacelle tubes are 24mm LOC. The
front of the nacelles are bomblets from the Estes BLU-97B Cluster Bomb. The back of each nacelle has a plastic nozzle
centered in a piece of BT-5 tubing. I also forget where these nozzles came from.
Top stabilizer – This part looks more like it came out a Roadrunner cartoon than a Star Trek film. I'm referring to the green plastic doohickey (a lime juice bottle). For some reason, I really like that shape and when another made itself available, I decided to add it on. It's mounted on a piece of Lexan, which is sandwiched between two dowels and epoxied to the main wing where it passed through the body. As it turned out, this part set the color scheme for the entire rocket.
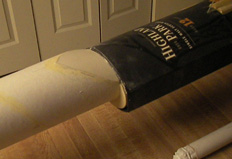
Aft body - I cut holes in the top and bottom of the scotch container to fit the BT60. I also used tiny bolts to attach an oval piece of plywood to the container's plastic top. As mentioned earlier, the body is slotted for the curved wings and for the top stabilizer fin. A 3/16” Kevlar® shock tether is attached to the main wing internally.
Fore body – This is made from 3” mailing tube. The tube is offset with the main body with the BT-60 epoxied to the lower tube wall. I also cut a section off of the back end of the tube. This gives a smoother transition and proved useful when attaching the two body sections. I added a Gatorflex® cover for the gap. This worked great! The thin Gatorflex® has a tough (but brittle) plastic layer and over a sheet of dense foam. It is slightly flexible, which made it perfect for this application. That is, the front of the plate is fairly flat but the back needed to conform to the curve on the aft body. I based the rough cut on the section of tube that was cut off and added a little slop to account for changes as I bent the back end to fit. I also trimmed the foam to fit the hole but allowed some overlap of the plastic layer over the tube. It was glued in place with 5-minute epoxy and was held in place with tight wraps of blue masking tape. Once the epoxy was set, I ground the overlap off.
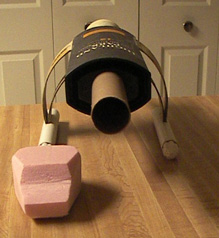 Nose cone - I wanted a non-standard nose cone design and started
carving pink foam. I came up with something, but wasn’t satisfied. The 'eureka' moment was when I realized that if
I flipped my cockpit-style nose cone over and tilted it down, it looked like what I wanted! I slipped it over some
3" coupler stock and twisted the coupler so it dug into the foam. I filled it, sealed it, added a plywood bulkhead
and an eyebolt - I had my nose cone. This reminds me of the cone on the Star Wars
Lambda-Class
Shuttle.
Nose cone - I wanted a non-standard nose cone design and started
carving pink foam. I came up with something, but wasn’t satisfied. The 'eureka' moment was when I realized that if
I flipped my cockpit-style nose cone over and tilted it down, it looked like what I wanted! I slipped it over some
3" coupler stock and twisted the coupler so it dug into the foam. I filled it, sealed it, added a plywood bulkhead
and an eyebolt - I had my nose cone. This reminds me of the cone on the Star Wars
Lambda-Class
Shuttle.
Misc.:
- I wasn’t sure there was enough horizontal fin area so I screwed on a bug chunk of Lexan® at the base of the horizontal stabilizer fin.
- I also didn’t like the fore body offset and thought I’d add a smaller tube below the main tube. As I was test fitting various tubes, I ran across some half-oval balsa stock and decided it was just what I was looking for.
- The final issue was stability. I didn’t want to add weight to the cone. Being unglassed foam, it is pretty soft. (It will come down on it’s own ‘chute.) So, I added two spent 24mm cases underneath the front of the fore body adjacent to the balsa runner. If needed, I’ll could add lead shot and cap them off. As it turned out, no extra weight was added.
 Finishing:
To follow the color scheme set by the lime juice bottle, I painted the nose cone and nacelles with Model Masters Lime
Green®.
I used yellow trim Monokote®,
and some other miscellaneous stickers to form a snake-like cockpit design. Well, the results look more like Puff the
Magic Dragon or Cecil (or was the Beanie?) than the front end of an alien space ship. If it flies, I may re-work the
design. I also accented the lime green nacelles by painting the ‘cones’ yellow. I finished the rest of the
rocket with Rustoleum Hammered Green®
paint.
Flight:
I flew the Tarkus II on a G71 drilled down to a 5 second delay. I used a large Kevlar®
pad and 42" chute for the body section. The nose came down on its own 36" chute to give the foam a nice soft
landing. As expected, I had to invert the nose cone to clear the rail. The boost was a little wobbly and it arced
towards the direction of the upper stabilizer. It was stable! Ejection was a little late, but it recovered undamaged.
Summary:
So, this odd-sci-fi-roc is a amalgam of Star Trek, Star Wars, Looney Tunes, Beanie and Cecil, and Highland Park
scotch. Everyone who saw it seemed to like it and it received a fair amount of chuckles also.
 |
 |