Scratch Taurus 1.65x Upscale Original Design / Scratch Built
Scratch - Taurus 1.65x Upscale {Scratch}
Contributed by Bill Eichelberger
(Contributed - by Bill Eichelberger - 02/09/06) 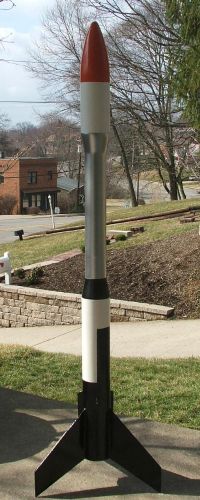
Brief:
This project was started with the intent of putting the legendary Centuri Taurus more in line with the way I had imagined/remembered it back in the late '70s. While cloning the Taurus recently, one thing I was surprised about was the rocket's size relative to the Centuri Super Kits.
In short, I had expected the Taurus to be quite a bit bigger than it actually was, but the size of the components and the subsequent dry-fit told the real story. With this project I set out to change all that. Using parts from BMS, Red Arrow Hobbies, FlisKits, and Thrustline, I scaled up the Taurus up so that it could claim it's rightful place as one of the Super Kits. (In my mind at least, and when you get down to it, what else matters?)
Construction:
The parts list:
- BNC-70AJ nose cone (BMS)
- 2 TA-6070 transitions (BMS)
- 3 BNC-20B pod cones (BMS)
- 3.7" T-70 upper body tube (BMS)
- 9.5" BT-60 center body tube (Red Arrow)
- 13.2" T-70 lower body tube (BMS)
- 3 6.6" BT-20 pod tubes (Red Arrow)
- 3 x 18mm cluster motor mount for BT-70 (Thrustline)
- 36" length Kevlar® shock cord
- 36" length 1/8" sewing elastic shock cord
- BT-60 sized ejection baffle (FlisKits)
- 1/8" balsa fin stock
- Medium screw eye
- Large snap swivel
- 18" nylon parachute (Thrustline)
- decal
Construction began when the BT-70 tube, transitions and cones arrived from BMS. I immediately started to work hollowing out the transitions with my Dremel tool. I managed to get two fairly decent looking holes with the Dremel while at the same time stirring up enough balsa dust to make the front steps looked like they'd been hit by a sudden snowstorm of talcum powder. When the hollowing was finished, I dry fit the collected parts together. The result was pretty much what I had hoped for: a Taurus sized along the Super Kits.
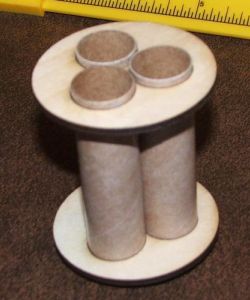
At this point I assembled the Thrustline 3 x 18mm cluster engine mount. The holes on this mount are laser cut and the tubes slip in without any trouble whatsoever. The fit is firm, and the best part is that there are no holes to stuff with the messy glue and recovery wadding mixture that I've used on my other clusters. Another advantage is the unit's great looks, which are almost too good to consider covering up with a body tube. The Thrustline kit comes with two laser cut centering rings, three motor tubes, three engine blocks, three engine hooks, and a length of Kevlar®. I used everything except for the engine hooks, which I put aside for use on future vintage projects, and the Kevlar®, because I was also incorporating a baffle from FlisKits.
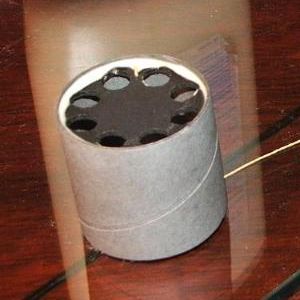
The FlisKits baffle is sized for a BT-60, so I planned to fit it into the center section of the rocket. The recovery system was completed with a 36" length of 1/8" sewing elastic and a medium sized screw eye, which was epoxied into the nose cone. The 18" nylon chute, also a Thrustline product, was attached using a large snap swivel.
I attached the fins to the bottom tube, dry fit the pieces together, and sprayed the whole structure with a coat of Valspar primer to toughen it for the sanding and sealing to come. Sealing was done using several coats of thinned Elmer's Fill 'n' Finish and the rocket was sanded after each coat.
The fins and pod supports were cut from a sheet of hard 1/8" balsa and attached using gel CA, then given a double fillet treatment with Elmer's wood glue. After this I sprayed the whole rocket with another coat of Valspar primer, then several coats of Valspar gloss white. (Because of the trouble I had masking my 1:1 clone I decided to wait until after the painting was finished to mount the finished pods onto the supports.)
With the white base coat in place, I masked off the appropriate areas on the bottom section using good quality masking tape, then sprayed the remainder of the section with Valspar Gloss Black. The center BT-60 section, including one of the TA-6070 transitions, was sprayed with Valspar Silver Metallic, while the other TA-6070 was sprayed Gloss Black. This left only the nose and pod cones, all of which were sprayed with Valspar Harvest Orange. After the masks were removed from the bottom section I prepared to begin final assembly.
Then the whole project went into the toilet.
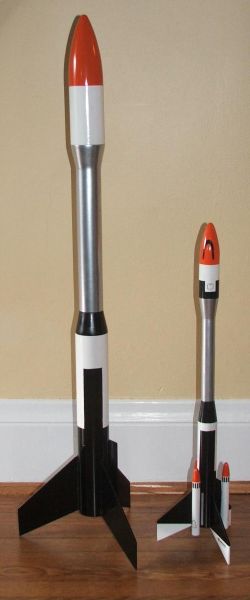 While walking through my room in the basement after retrieving a can of paint for some touch-up on the project, I noticed my Taurus clone sitting on the old Hoosier cabinet. As my foot touched the first step on the way upstairs, a horrible realization hit me like a club. The original Centuri Taurus had been built with a combination of ST-8 and ST-13 body tubes, but somehow I had figured all of the numbers for my upscale out using the Estes BT-60 to BT-70 size difference as a starting point for figuring out the tube lengths involved in the upscale. Worse yet, I had also sized the fins using this number. What made this so disastrous was that the Taurus was originally built using the ST-13 (Estes BT-56) instead of the BT-60. This meant that instead of a 1.36x upscale, I should have been building a 1.65x upscale. My tubes and fins were all too small.
Luckily my house was only two stories high so jumping wasn't an option (although retaking math obviously should have been at some point.) As you might imagine, this set me back a bit, and I considered just adding on to the existing pieces, but in the end I decided to cut all new BT-70 parts from the section of tube I had remaining. I added a piece to the existing BT-60 center section, mostly because I had already installed the FlisKits baffle and glued the topmost transition to the tube. It was easier and quite a bit less heart wrenching to just add the small piece of BT-60 and do a reseal/resand. I set the original bottom section aside with the intention of buying another TA-6070 transition and making a Taurus-inspired "supply ship" out of it. I was able to squeeze out new upper and lower BT-70 sections from the piece of BT-70 I had left over. (I checked these measurements three times. I hadn't paid such close attention to measurements since Miss February of 1968 and I didn't understand them either.)
Flight:
After waiting for what seemed like an eternity, I finally found myself with a slim weather window to get the big Taurus flying. Conditions were far from optimal with a cold 10+ mph wind strafing the VOA field, but as long as I wasn't the only one to show up for the Quark launch that day, I was flying.
 For the inaugural flight of the day, I decided to err (if I were to err) on the side of caution and chose a trio of B6-4s. Though it was planned as my first flight that day, a little blind spot of mine involving launch lugs kept it from its leadoff spot in my launching order. When the time came to launch I double checked everything before heading out to the pad with my clip whip.
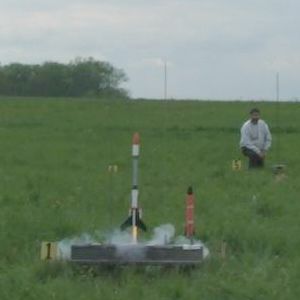
When the time came to launch, I had another club member push the button so that I could get a picture of the liftoff. (In case it was the only chance I ever got. A possibility considering how unlucky it had been up to this point.) The liftoff was slow on the three B6-4s and every bit as cool as I had hoped it would be with plenty of smoke and flame. It tipped into the wind off the pad, and I was surprised at the height it attained. Ejection occurred quite early and for a second the big Taurus looked like it had been jerked from a Vaudeville stage by a cartoon hook. The large Thrustline nylon chute unfurled and it rode the breeze out into the vegetation...and toward the access road. For a moment I thought that the bad luck streak was going to continue, but it took a fortuitous turn away from the road and landed well back in the weeds. Weeds I could deal with. Roads I couldn't.
 Flight two was the 3 x C6-5 flight I had planned from the start. The Taurus left the pad noticeably quicker and topped out quite a bit higher than on the three Bs. This flight went due west into the breeze as it accelerated off the pad, arcing toward a large grove of trees but never appearing to be threatened by them. The ejection charges were closer to true this time as they fired just as the rocket tipped over. It rode the breeze back, still quite high as it passed over the flightline. The recovery walk was a long one, and I found it stuck in a tree. Luckily it was a waist high tree.
The third flight came at NARAM 47. Flying on a 3 x C6-5 load alongside the Semroc SLS Laser X prototype, the flight itself was beautiful. The recovery was a different story. While the cameras rolled, the big Taurus popped the chutes right on the money after a textbook flight. Then came the drama. From my spot near the LCO tent I could see that the landing would be close in respect to the access road. (By close, I mean that I could see that it was going to land dead center on the access road.) The jarring impact splitered one fin, loosened another, broke off two pods, and partially crushed the upper section of BT-70. (The SLS Laser X wound up with a comparitively soft landing on the field and was spared any damage.) I've since tried to make the repairs, but the damage is extensive enough that it will always be noticeable. It kind of takes the wind out of my sails, so as of today, it remains in a heap in my shop. Maybe someday.
Well, someday arrived in late 2011. I ordered parts to rebuild the Taurus without checking the condition of the heap in my shop. The nose cone, both transitions, and the whole center section of the rocket were able to be salvaged, which meant that I only needed the two sections of BT70 to do the rebuild. Since the fins and pods had been all but destroyed in the NARAM 47 access road incident, I scrapped the whole lower section and started over. I did save the cluster mount, just in case the urge to cluster ever returned, but I had already decided that the rebuild was going to be Estes E9-4 powered. I cut the new fins and pod mounts from 3/32" basswood, glued in the E engine mount, replaced the short upper section of BT-70 up top, and with the exception of paint, the big Taurus was ready to go again.
Summary:
PROs: Overall bulk. The Taurus lines upscale well. Cool cluster performance.
CONs: The apparent curse that has been cast on the project.
 |
 |
Flights
|
|