Scratch The Demon Original Design / Scratch Built
Scratch - The Demon {Scratch}
Contributed by Kyle James Yawn
| Manufacturer: | Scratch |
Brief:
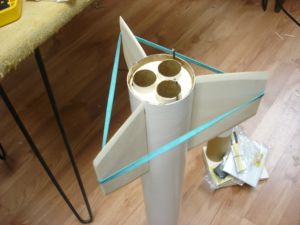
This is a three 24mm motor cluster rocket with large payload section. It is
made for E9-4s but may be flown on D12s or some 24mm Fs. The payload bay is 12
inches long after the coupler and nose cone shoulder are accounted for. It has
through the wall fin configuration and gives it a rock solid fin can. It's a
real solid mid power cluster rocket.
Construction:
The parts used in constructing this rocket were:
- 1 30" long BT-80 tube
- 1 18" long BT-80 tube for payload bay
- 1 9" long BT-80 nose cone
- 1 sheet of aircraft plywood to construct the fins from
- 3 24mm motor mount tubes
- 3 24mm engine blocks
- 3 Estes "E" sized motor hooks
- 2 centering rings to center 3 24mm tubes in a BT-80 tube with an 1/8" gap between each motor tube
- 2 1/4" diameter launch lugs, 1.5" long
- 1 6" long tube coupler
- 2 BT-80 bulkheads
- 1 screw eye
- 12' long x 1/2" thick elastic shock cord
- 1 30" X-form parachute
- 1 9" x 9" Nomex® blanket
The most of the major airframe parts such as the body tubes, nose cone, coupler, bulkheads, and shock cord were from LOC/Precision. The body tubes were just thick cardboard tubes and the nose cone is plastic.
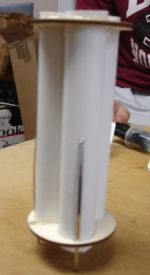
There are 3 fins on this design and they have fin tabs for through the wall fin construction. I designed clipped delta fins that were 6 inches on the bottom and 3 inches high. The centering rings were made from 1/8" plywood. The motor mount tubes were cut 6 inches long, and the shock cord was kept at its original length of 12 feet. The nose cone was placed on top of the payload compartment so an eye screw was placed in the bottom bulkhead of the tube coupler to attach the shock cord to the main airframe. The Nomex® just takes the place of normal wadding to protect the recovery system.
First I built the fin can and motor mount. I began by cutting three 6 inch long motor tubes, cut slots, and epoxied the engine blocks just past the slots. I then inserted the motor hooks. Using epoxy, I bonded them to one of the centering rings 1/8" from one end of the tubes. I used 30 min epoxy and applied it to both sides of the ring. The other centering ring was epoxied on after the fins and I was sure to make slots in the aft ring for the engine hooks to fit through.
 Next, I cut
out three fins from a template I made. They were a clipped delta style that
measured 6" long and 3" tall with the back 3" of the top flat.
They also had fin tabs measuring 1.25" deep and 4.5" long.
Next, I cut
out three fins from a template I made. They were a clipped delta style that
measured 6" long and 3" tall with the back 3" of the top flat.
They also had fin tabs measuring 1.25" deep and 4.5" long.
Epoxy was then applied to the inside of the tube past the fin slots and the motor mount was slid into the tube with the bottom of the motor tubes flush with the bottom of the airframe. After the epoxy set, the fins were fit into the slots and more epoxy was applied between every joint of where the fins met the motor tubes, where the fins met the airframe tube, the aft centering ring and the airframe tube, and in the gap between the three fins where they meet in the middle of the tube. Epoxy was then applied to the bottom edges of the fin tabs and around the bottom edge of the airframe and the other centering ring was slid onto the rocket over the three engine tubes. Finally, another epoxy fillet is applied to the centering ring and the inside of the airframe from the bottom end of the rocket. This provides a rock solid fin can!
Then I drilled a pilot hole in the middle of one of the bulkheads and inserted a screw eye into the hole. I placed epoxy on both sides of the bulkhead on the screw eye, then epoxied a bulkhead to each end of the coupler tube, with the screw eye facing out. After the epoxy on the bulkheads set, I epoxied the three inches of the coupler tube with the flat bulkhead without the screw eye into the bottom of the payload tube.
The shock cord mount was constructed by using 200lb test Kevlar® cord and tying knots at each end and covering the knots in a pool of epoxy inside the main airframe. This was done deeper into the tube than the coupler shoulder will reach so that the coupler will slide all the way down.
Tie the shock cord onto this mount and place the Nomex® cloth onto the shock cord. Then I tied a loop in the shock cord about 2 feet from the other end. I use this loop so I am able to change out the parachute used in this kit based on if it has a fragile payload or if the wind is blowing very hard, although I like the 30" X-form chute. Next, I tied the other end of the shock cord to the screw eye on the coupler tube.
I drew a line between two fins and epoxied one launch lug 1.5" from the base of the rocket on the line and the other one 14" from the base of the rocket. You could also apply rail buttons or another type of guidance as you please.
The nose cone needed a few layers of masking tape wrapped around the shoulder to ensure a tight fit into the top of the payload bay so that the nose cone does not come off during ejection.
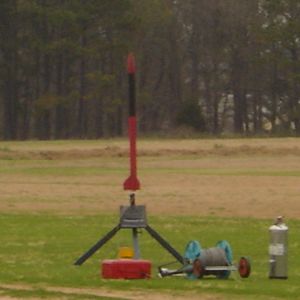
Flight:
If the payload compartment is empty, this rocket could fly on three D11s or
D12s with an adapter for them, but I used 2 E9-4s for its maiden flight. The
prep was easy since no wadding is needed due to the Nomex®
cloth attached to the shock cord. I just installed igniters and plugs in the
three motors, placed them in the rocket and was ready to go. The engine hooks
provide motor retention.
I used a clip whip on the pad to ensure the ignition of all three engines. (I need to be careful with this rocket when it has a heavy payload while flying it with E9s because if only 2 engines light, it won't have a stable flight.) The ignition of this rocket was magnificent. I had an altimeter and some other payloads in it. All 3 E9-4s ignited and it rocketed off the pad. You could clearly see all three individual flames which made for a great show at the club launch. It flew straight up until the ejection charge deployed just slightly before apogee at 840'.
Recovery:
The parachute pulled out and fully opened and the shock cord held everything
together with that strong Kevlar®
mount in the main airframe and the screw eye in the payload bay.
The recovery speed was perfect and brought the rocket gently back to the ground and landing with a soft thud. The 36" X-form works well on this rocket. With the Nomex® cloth in there, neither the parachute nor the shock cord were even harmed at all by the hot ejection gases.
Summary:
This is a very well built 3 engine cluster rocket with a large payload
capability. It is rock solid upon completion and has incredible flights with
three beautiful flames. I have wanted to build a large, high performance
cluster and payload kit for a while so I combined the ideas and it works
wonderfully. I can't find any cons in it at all.
 |
 |