Scratch TriBar Original Design / Scratch Built
Scratch - TriBar {Scratch}
Contributed by Brian Mardirosian
| Manufacturer: | Scratch |


Introduction:
This is the rocket that started it all, my first scratch-build of my BAR career. I wanted to use BP motors, but also felt the desire to build something more than just a 3FNC rocket. Clustering seemed the perfect way to go.
Nose Cone:
An old friend of mine who is now on the opposite coast somehow left an Estes payload section and nose cone in my range box over 10 years ago. How do I know? His name and phone number were written on it. Certainly a blast from the past, and not the last either.
Recovery System:
3/8 braided nylon elastic, tied in a loop around a single 1/4 wooden dowel mounted thru the airframe about 6" from the top. I've since used a similar, beefier set-up for my mid-power rockets. Check out the VSOS2 picture to get a better idea of what it looks like. Parachutes are two classic 12" Estes chutes attached via snap swivels to the nose cone and the bottom of the payload section.
Body Tubes:
One section is actual Estes tubing, the other is an aluminum foil tube.
Motor Mount Tubes:
Actual motor mounts are from a damaged wizard and some scrap tubing from the range box. Coupler that holds motor mounts and attaches to rest of rocket is a toilet paper tube. It gets better! It had already lived one life as a stubby little rocket, and the sight of it with just glue fillets marking the location of fins, a blob of glue and paper showing where the shock cord was mounted, and the blown-out motor mount was too much for me to take... It needed to fly again! A layer of paper/wood glue made it possible, and it fit the three 18mm tubes perfectly.
Fins:
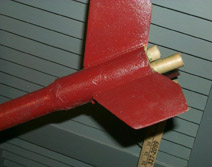 Talk about oversized fins! I wasn't exactly up to speed on how big the fins needed to be. I used 1/8 balsa stock. You can almost make out the grain in the picture, a hint as to how much time I prepped them, tehe.
Fin Can Mounting:
The fins are mounted between the motor tubes, and the TP roll was cut for thru-the-wall mounting. Two centering rings were used to attach the body tube to the fin can/motor mounts, with a layer of drywall mud smoothing the transition.
Launch Lugs:
In the ultimate gesture of this first BAR effort, I used soda straws for launch lugs, much as I did over a decade ago. One mounted on the TP roll, another on a stand-off around a half-foot above. Flies well off a 3/16" rod.
Painting:
Quick layer of spray paint... I wanted to fly!
First Flight:
I brought along TriBAR while visiting a friend up in New Hampshire. Drove around in his convertible on a beautiful, calm late summer morning looking for a field to launch it from. As you can tell by the Rocksim pic (yes, I discovered the software after building), TriBAR is very overstable. Not sure if I want to launch her in any wind over 5 mph or so. I could chop down the fins a bit, but that just wouldn't seem right.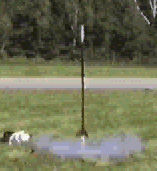
Conclusion:
I'm pleased with the results, certainly neat flying a bit of my first rocketry career in the rocket that started off my second one.
 |
 |