Scratch Tube and Ring 2-Stage Rocket Original Design / Scratch Built
Scratch - Tube and Ring 2-Stage Rocket {Scratch}
Contributed by Howard Smart
| Manufacturer: | Scratch |
Brief:
This is a custom 2-stage rocket with no traditional fins. The booster has a large ring fin, and the sustainer has
tube fins.
Construction:
The body components for this rocket came from an old Quest Zenith staged rocket kit. The fin tubes are from Apogee.
The inspiration came from seeing Todd Mullin launch an all-tube-fin staged rocket a couple of weeks ago.
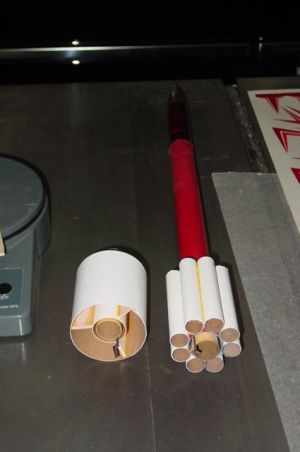
Components:
- 1 BT-50 12in
- 1 BT-50 2.75in
- 1 Red plastic payload section 4in
- 1 BT-50/BT-50 Tube coupler
- 4 Centering rings 20/50
- 2 Motor hooks
- 2 Motor mount tubes 18mm
- 1 Stage coupler BT-50
- 1 Nose cone 3in
- 1 Shock cord elastic
- 1 Shock cord Kevlar®
- 1 Parachute 12in
- 3 Ring fin pylons, balsa 5/8in tall, cut from Zenith fin stock
- 1 Ring fin, BT-70, 2.75in
- 8 Tube fins, BT-5, 3in
I started with the construction of the sustainer while I was still considering details of the booster design. The payload section is constructed straight from the Zenith parts. In this older kit, the payload tube coupler is paper with a flimsy cardboard bulkhead. I wanted to launch an altimeter as a payload so I really didn't want the bulkhead tearing out. I reinforced it with a piece of cardstock sanded to the right diameter. I roughed up the inside of the plastic payload tube and glued the coupler in using epoxy. I drilled a small hole through the payload tube and coupler to allow air pressure equalization for the altimeter. I also drilled a small hole through the payload tube and nose cone shoulder for a small screw to retain the nosecone.
The motor mount was constructed with the hook reversed end-to-end so the hook extension would not interfere with the booster. The aft centering ring is moved forward a little to allow space for the stage coupler to insert into the aft end of the body tube.
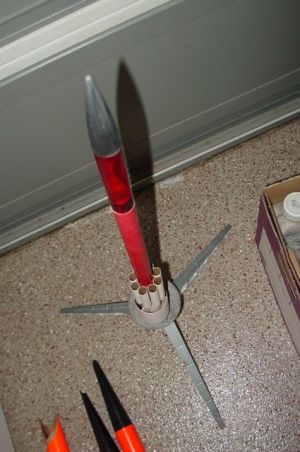
Eight 13mm tubes do not fit around a 24mm tube exactly. There is a little room left over. To achieve nearly even placement, I started by attaching the launch lug. Then I glued the 3 inch tubes together in pairs. Gluing them together on a flat surface guarantees that each pair is in exact alignment. When these were set, I glued one pair on either side of the lug. In pairs, the tubes are self-aligning on the body tube. Once these two pairs were set, the other two pairs were glued with even spacing between themselves and between them and the other attached fins. These are all flush with the aft end of the sustainer body tube.
A second launch lug is glued in line with the aft lug near the forward end of the sustainer body.
I started the booster by assembling the motor mount, this time with the motor hook in the usual orientation. The forward centering ring must leave enough room for the stage coupler to fit into the tube I cut the stage coupler down to 1/2-inch. The stage coupler goes in with about 3/16-inch left to insert into the sustainer tube. There will be a small gap between the booster and sustainer motors. To relieve the overpressure when the booster combustion chamber breaks through the grain, a 3/32-inch hole is drilled into the booster near the forward end.
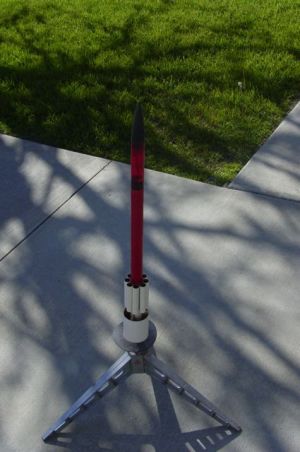 A little calculation shows that the pylons for the ring fin need to be 0.62 inches tall. I
used the die-cut Zenith booster fins and cut them to 5/8-inches parallel to the root edge. This left them a little too
tall so I could sand them down to fit. I glued them to the booster tube using an Estes fin-setting jig. After a little
sanding at the sanding center the ring fin slid right on. I glued it in place and reinforced it with interior fillets.
The Zenith fins have a little sweep to them, which is not represented in the RockSim file.
A little calculation shows that the pylons for the ring fin need to be 0.62 inches tall. I
used the die-cut Zenith booster fins and cut them to 5/8-inches parallel to the root edge. This left them a little too
tall so I could sand them down to fit. I glued them to the booster tube using an Estes fin-setting jig. After a little
sanding at the sanding center the ring fin slid right on. I glued it in place and reinforced it with interior fillets.
The Zenith fins have a little sweep to them, which is not represented in the RockSim file.
Flight and Recovery:
RockSim said this design was pretty solidly stable. Looking at it though, I was not so sure. I had a hunch that the
ring fin and the tube fin might interfere with each other's effectiveness. For this reason I decided to make the first
flight with a fair amount of ballast in the payload bay. I put a AA battery in the payload compartment.
The first flight was on an Estes B6-0 staging to a Quest A6-4. The boost seemed a little underpowered, but it was straight. The sustainer was also stable but not very high due to the mass of the battery. The booster actually landed in the trash can at the launch table.
Encouraged by the first flight, but wanting more altitude, I removed the battery for the second flight. I also used an Estes B6-6 for the sustainer. The combination of less nose weight and more motor weight was not good. Both the booster and the sustainer were unstable under thrust and tumbled wildly but harmlessly.
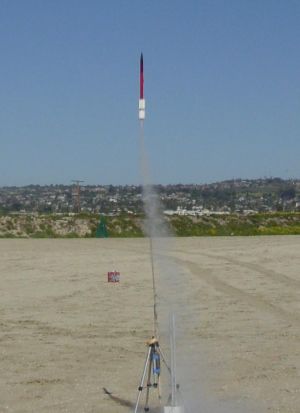 For the third flight I knew I needed the nose weight back. I put my PerfectFlite Alt15K in
the payload bay and loaded up once again with Estes B6-0/B6-6 motors. The booster was unstable and tumbled until the
sustainer ignited. The rocket was horizontal at upper stage ignition. Luckily it was pointed directly away from the
flight line because it was stable and straight as an arrow. It landed in the sand about 200ft away with very little
damage and no harm done.
For the third flight I knew I needed the nose weight back. I put my PerfectFlite Alt15K in
the payload bay and loaded up once again with Estes B6-0/B6-6 motors. The booster was unstable and tumbled until the
sustainer ignited. The rocket was horizontal at upper stage ignition. Luckily it was pointed directly away from the
flight line because it was stable and straight as an arrow. It landed in the sand about 200ft away with very little
damage and no harm done.
Summary:
This was a very interesting build. My gestalt about the stability problem is that the tube fins directly ahead of the
ring fin reduce its effectiveness at correcting perturbations from vertical travel. I believe that air passing through
the tube fins is forced into traveling along the body tube no matter the orientation with respect to the angle of
attack of the body tube. This reduces the ability of the booster ring fin to create a torque to return the body tube to
zero angle of attack. Since almost no part of the ring fin projects outside this laminar flow, the booster fin in this
case does not add stability to the booster-sustainer combination.
I may have to add actual fins to the outside of the ring to fix this problem. The sustainer is stable enough with a payload that it doesn't need to be modified.
 |
 |