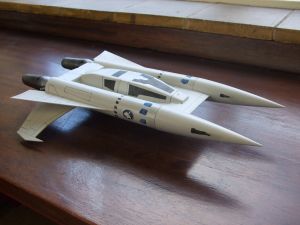
Scratch Twin Jet TR5 Fighter Original Design / Scratch Built
Scratch - Twin Jet TR5 Fighter {Scratch}
Contributed by Matt Gillard
| Manufacturer: | Scratch |
 Brief:
This is my second attempt at building a rocket to match a picture. This time for the 2008 EMRR Challenge and my first cluster where the motors are significantly apart from each other.
Construction:
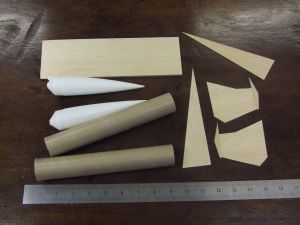
Parts include:
- 1 launch lug for 3mm (1/8 inch) rod
- 2 parachutes (Estes 12 inch)
- 2 3-foot lengths of knicker elastic
- 2 Snap swivels
- 2 18mm engine block
- Kevlarthread
- 2 Body tube 8.5 inches in length
- 2 18mm motor mounts
- 3/16 inch balsa sheet
- 3/8 inch balsa sheet, 3 by 8 inches
- 2 cones shaped nose cones
- 4 Motor mount centering rings
- Polymorph
- Green floral foam block
To build the rocket I used:
- Bostik glue
- White PVA glue
- Sanding sealer
- Modeling filler
- Model knife
- Aluminum oxide sand paper
- Primer
- Spray paint --window grey
- Spray varnish
- Future floor polish
- CA gel glue
The motor mounts were constructed form two old Estes motor mount kits in the standard fashion.
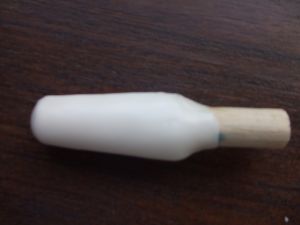
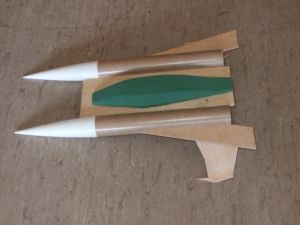
After measuring the photo from the web site, the body tube came out to be a BT-55 that was 8.5 inches long. The nose cone was a NC55AC (or as near to AC as you can get).
The motor mount was glued into place after a 16-inch length of Kevlarwas first added. 3 feet of knicker elastic was then added to the Kevlar, and a snap swivel was added to that. Two 1.5 square inch swatches of Nomex® heat shield was then added to the shock cords.
Given the model looks as if the CP is going to be high and with two rear motors, a significant amount of modeling clay was added to both nose cones. The nose cones were then added to the shock cords. A twelve-inch parachute was added to each tube.
The central platform was made from 3/8 inch balsa measuring 3 by 9.5 inches. This was sanded to profile at the front and then sealed. The two body tubes were then added to either side. Heavy fillets of PVA glue were then added.
Again from measurement from the picture, the 4 fins were made using quite stiff 3/16 inch balsa. The upper fins were cut from a triangle measuring 1-5/8 by 6-3/4; inches. The fins were then sealed and glued into place on the body tubes. I filleted the fins three times. These four fins will be the point of contact with the ground and I doubted in the planning stage on the fragility of the fins.
The two rear engines on the rocket were built for decoration only and were not to be part of the flying model. This was because these engines were where the motors for the flying model were going to be in my original plan but this would have lowered the CG to low and would have been out of scale.
 To build the rear engines I used polymorph, a thermo softening plastic that can be made very pliable at temperatures around hot water (70-80 degrees C) but hardens at room temperature. The plastic when set can be sanded, drilled, painted, etc. Its density is similar to the plastic used by Estes for its nose cones. The polymorph was molded around a 16mm balsa rod, which proved to be more difficult than I imagined. The polymorph cools and goes from clear and colorless to a white plastic. This was then sanded into shape and then painted silver gray. The engines hooks get in the way of the rear motor engines so a slot had to be cut out so they sat straight.
One of the design flaws of this model is the canopy. Its shape will create lift and given its size if its construction is made of anything with a density of balsa or higher, it could cause the center of gravity to come out of line with the center of thrust.
After spending time making a few hollow cardboard canopies--which failed. I decided to use green floral block. Not being a flower arranger, I purchased some from a craft shop. Floral block has a very low density and cuts very easily. Within minute a canopy was cut. The canopy was glued with PVA to the rocket.
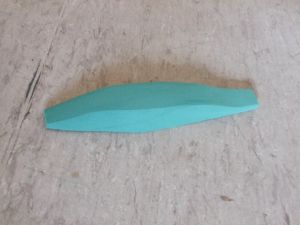 The floral block is porous and would give a terrible finish. I thought that a few coats of thick sealer would help fill in the gaps. As the solvents in the sealer evaporated, the sealer coat shrank and peeled a layer off the floral block. The canopy was ruined. Another canopy was cut and glued into place. This time layers of PVA glue was added to the floral block until it was smooth--this took 6 days. The fins and canopy joints were then filleted and then had two layers of sealer added. After sanding with fine sandpaper the whole rocket had 3 layers of primer, sanding between coats.
Finishing:
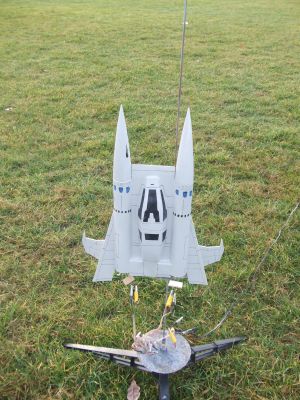
It was nearly impossible to find a spray paint that matched the color on the picture. In the end I went for window gray. Three coats were added, sanding with fine sandpaper between coats.
 The details were added using a black ink pen for the lines and black stickers for the windows on the canopy. The circular emblem on either side of the body tubes were a deviation form the original. I used the EMRR "Write A Review" circular emblem, which I thought was a nice touch! The rocket was then sprayed with clear varnish and then two coats of finish was applied.
Flight and Recovery:
I had lots of concerns about this rocket, it looks as if it would arch on boost. The motors are far apart and Estes rocket motors are not always exactly the same, which would give asymmetric trust. The fins are the first point of contact with the ground, and the rocket is rather heavy for 18mm motors.
Due to drag the coast phase would be short, and with two parachute there would be drift. The trees around my flying field have enjoyed the company of my rockets too often. To overcome this I decided upon two different delays for each tube, the first short delay would deploy a 12 inch chute, and the second delay would deploy a 24 inch chute 4 seconds later. This way there would be a slow and hopefully soft landing, but cut down on the drift.
 Each parachute was protected by two swatches of Nomex cloth, but a few sheets of Estes wadding were used as extra protection. A standard Estes 3mm rod was used.
For the first flight, two Estes B motors were used, a B6-2, and a B6-6. There was a wind of about 5 miles per hour. This was a nervous moment, with a rocket that broke so many design rules a lot could go wrong. I was expecting an arched boost, with a possible power prang. However, both motors lit simultaneously and the rocket lifted at a decent rate.
The flight was underpowered and gave a lower altitude, wobbly flight. After the burn phase she almost glided in (a very long 2 second delay). The first eject went off about 30 foot from the ground, which was just enough to slow her down. The second ejection went off on the ground. Fortunately, only minor damage occurred with one fin popping off, which I expected. There was some charring to another rear fin.
Flight two: After a quick re-gluing, about 1 hour later she was prepped again and ready for flight, this time powered by a C6-3 and a C6-7. She ripped off the pad and climbed to a good height of about 800 feet. There was quite a lot of barrel rolling towards the end of the boost phase, which increased during the coast phase. She must have done 7 complete rolls. The boost had a slight arch to the right side of the rocket, which I put down to unequal thrust from the motors. Ejection was bang on apogee. She drifted over the small strip wood by the side of the field, and then the second parachute deployed. With the rocket gods smiling on me, the rocket slowed down enough for it to just drift clear the wood. I however did not fare so well, running through the wood, looking up at the descending rocket, I managed to find a trench that was dug during the Second World War. Ironically, I had had a group of cadets re-dig this trench out only a few months earlier. There was no damage to either the rocket or to me (except pride --which comes before a fall).
I prepped the third flight the same as I did for flight 2. This flight was straighter and had a lot less roll. The wind was near calm by now. After ejection at apogee, the rocket descended quickly until the second parachute deployed, and another soft damage free landing was observed.
Summary:
I am pleased with the overall rocket. She flies well and is a bit different from a standard cluster.
 |
 |