Scratch WASP (1:42 Scale) Original Design / Scratch Built
Scratch - WASP (1:42 Scale) {Scratch}
Contributed by Chan Stevens
| Manufacturer: | Scratch |
Brief:
This is a clustered 2-stage scale model with all sorts of "stuff" going on that is really not too tough a
build and can be a competitive sport scale model. This particular model was small enough to enter in NARAM-51's Peanut
Sport Scale event.
Construction:
OK, I'll admit I approached this project almost completely backwards. While thumbing through Rockets of the
World supplements for Peanut Sport Scale ideas, I happened upon the WASP. I was mainly looking for opportunities to
stage and cluster for the added complexity and points in judging and with 2 strap-ons and two stages, the WASP met that
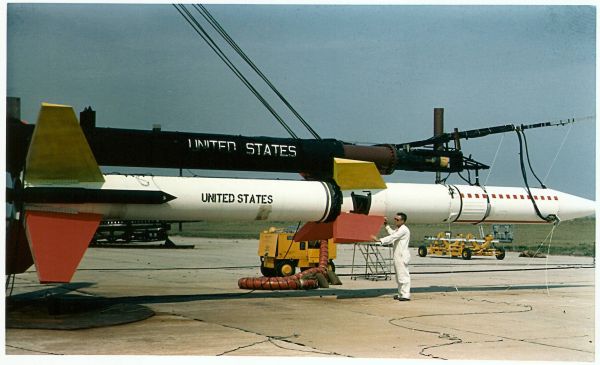
requirement, but it had one little problem. The upper stage carried a volatile liquid compound, and since the fins are
canted to induce spin, they needed to stabilize the payload, so on the real sounding rocket a sort of lazy Susan type
structure was added to enable the upper portion to remain steady while the lower portion spun. Of course, when you're
dealing with a 20mm diameter limit and have only about 6 inches of body tube to work with for the upper stage, it's
absurd to consider modeling the spinning payload feature, so naturally I decided to take on that challenge.
I browsed through the engineering version of Victoria's Secret, the McMaster-Carr catalog and found just the widget: a set of roller bearings with an OD just about right for a BT-20 and an ID just big enough to accommodate a T-2 stuffer tube for pushing the ejection gases through. The item number is 6383K12 if you're interested in building one of these, and it set me back about $5.
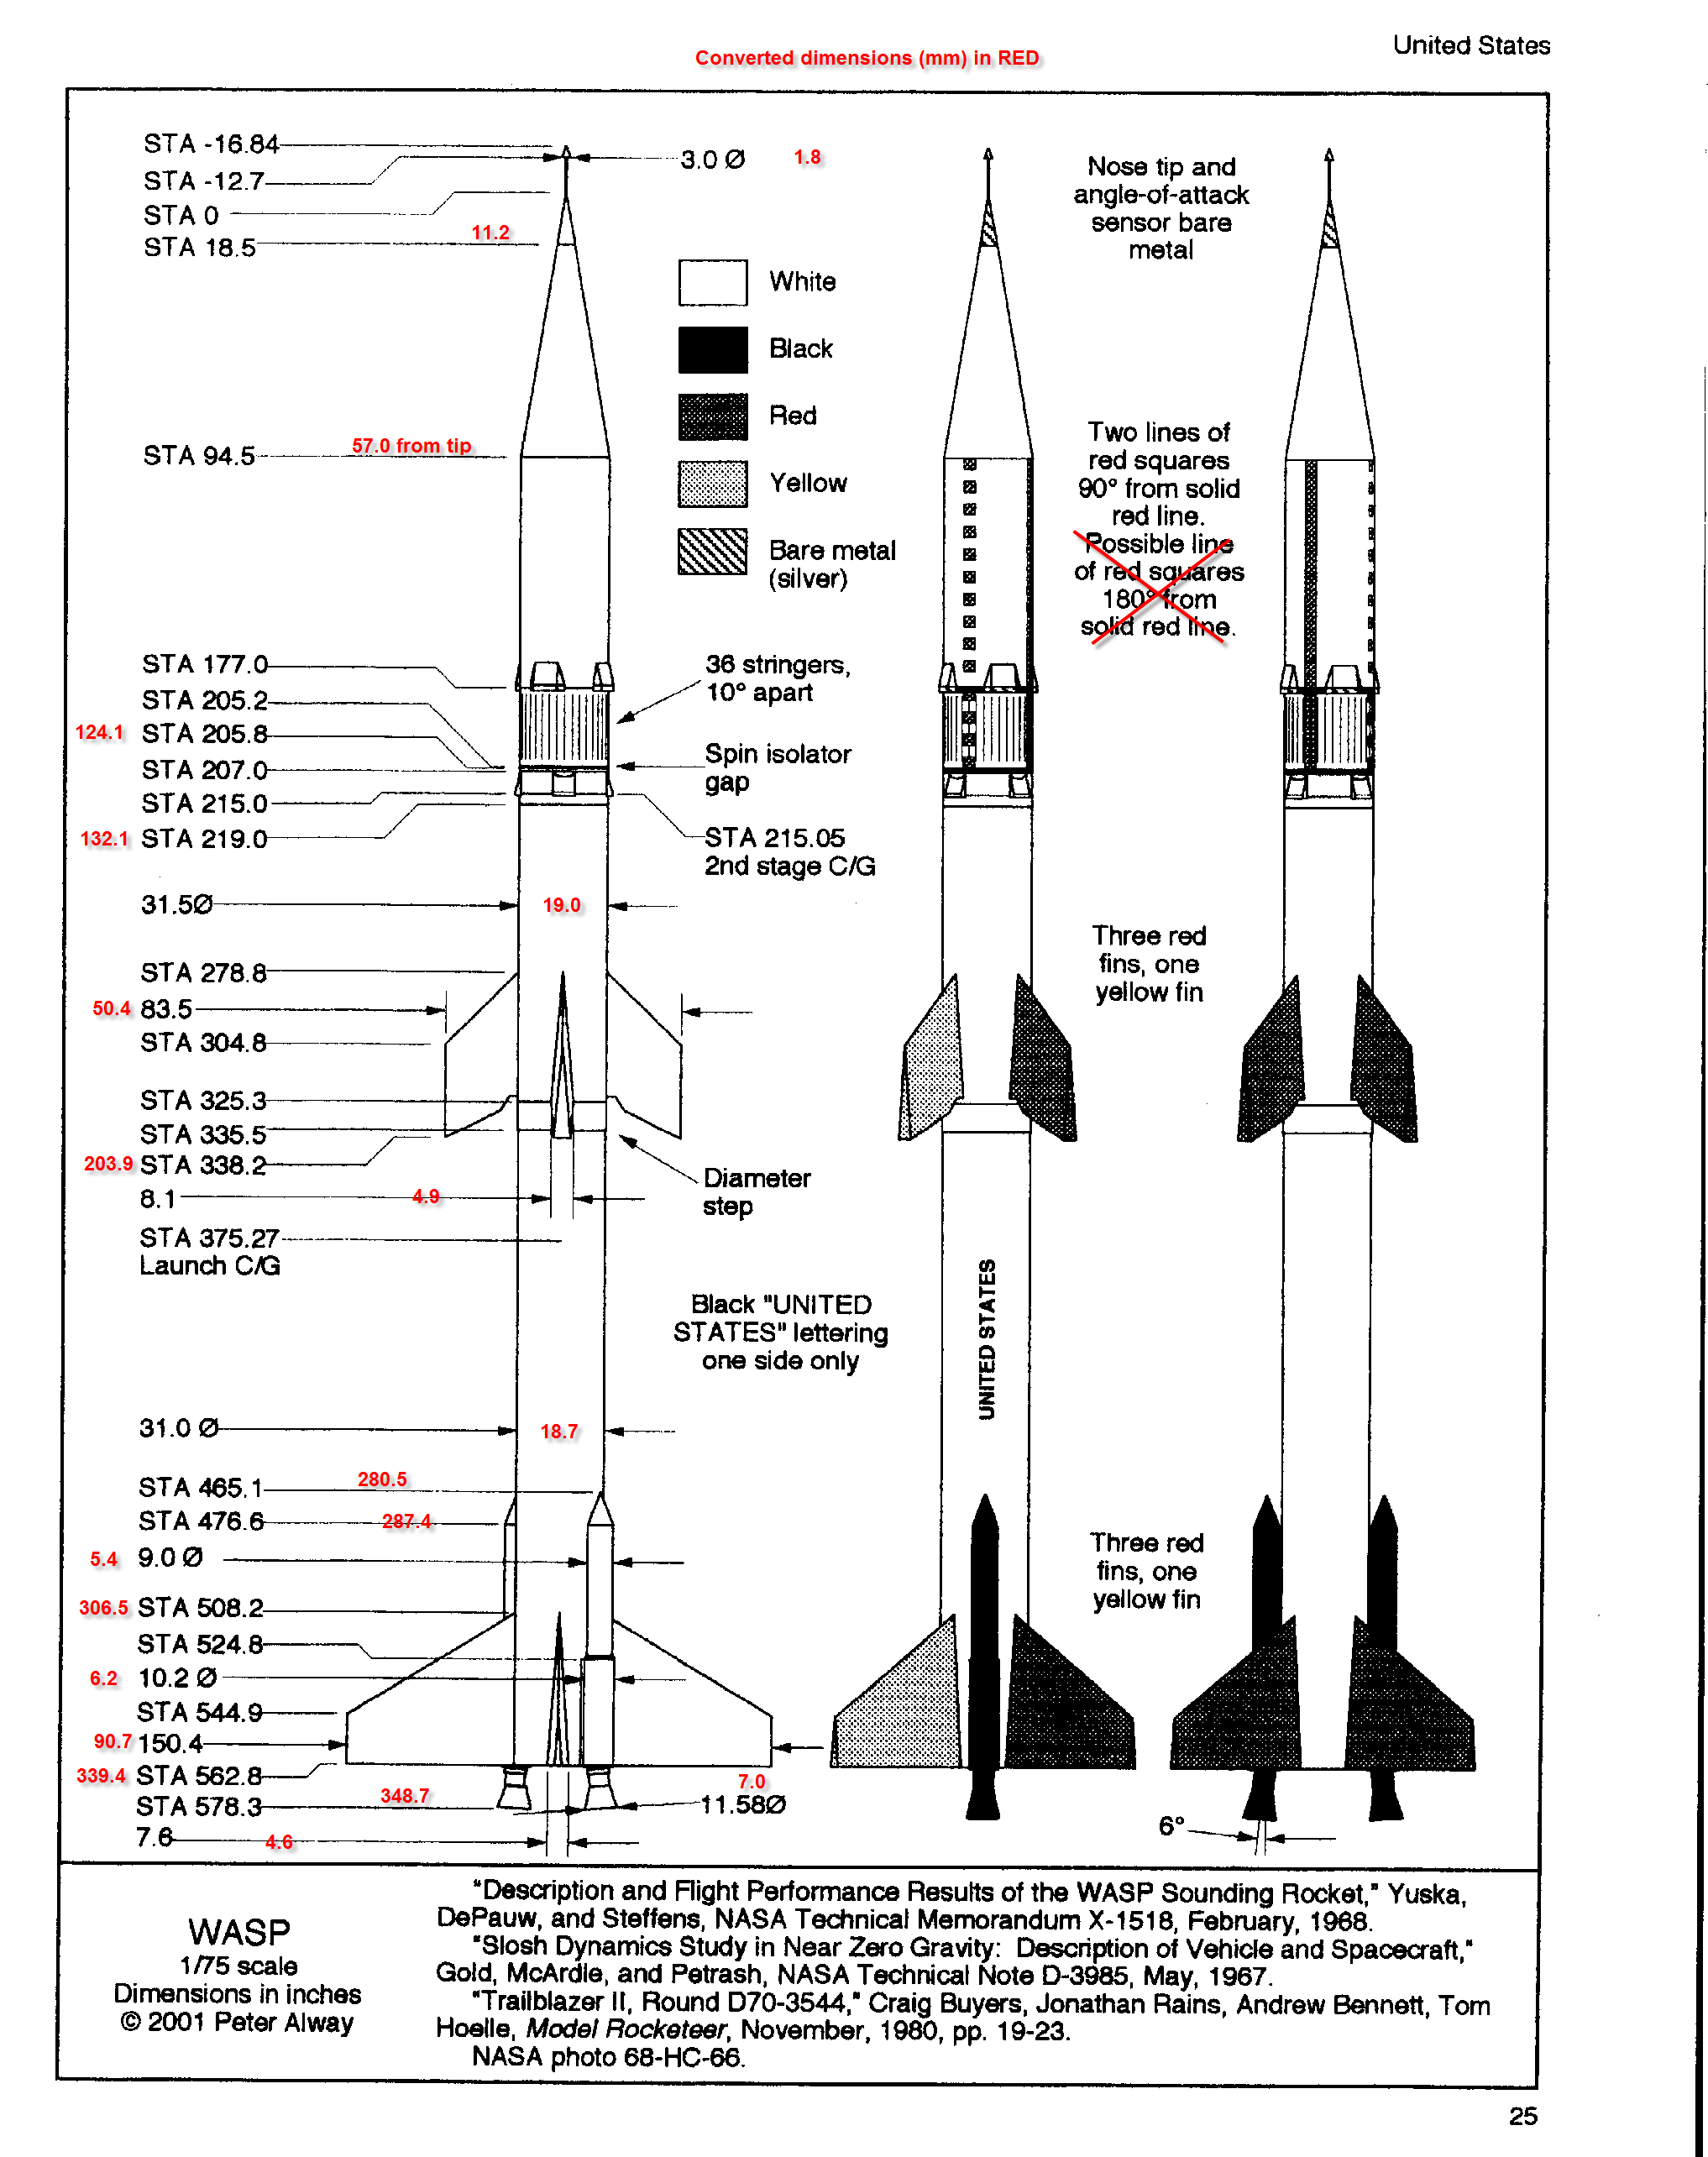
The rest of the materials are pretty common stuff and almost all are detailed in the attached RockSim file. I will note that the second stage is supposed to be a larger diameter than the booster, which made this tricky to scale. Since Peanut is limited to 20mm and I was going with a BT-20 booster, the next standard body tube size is Quest's T-20, which exceeds the 20mm limit. I instead used Semroc's Series 7 tube, just a smidgen bigger than a BT-20 and just under 20mm when painted.
The attached file does not include the tower detail, which I formed from 2mm carbon rod and a tip from a toothpick, nor does it include the 32 stringers which I cut from 0.020 Plastruct. It also omits a few other details such as the covers. These are all pretty easy to model if you use the attached drawing.
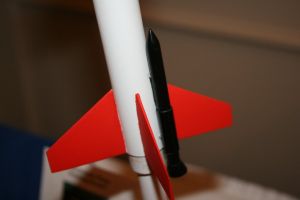
The Recruits are a lot trickier than they look, mainly because they're functional strap-ons that break away in flight. The nose cones are straight conical hardwood turnings. The body tube is a T-2, which is 6mm tubing. That's not a typo (T-2 tubes won't hold a MMX motor). Drill a vent hole about 1/4" aft of the nose seam. There is a sleeve that wraps around that's supposed to look like a holster tube to contain it, which runs about 1/2" beyond the end of the T-2 and serves as the motor mount for the MMX. The tiny aft shroud actually slips over the MMX motor, not a body tube, making the motor itself part of the structure (and in the photos, the motor was painted black to match the Recruit). Now the fun part: to hold the Recruits to the booster, I CAed two tiny pieces of 0.010" music wire 1" apart and formed little Z-bends, then drilled pinholes in the booster corresponding to these. The wire hooks then slip into the booster and are held tight when a motor is inserted into the BT-20. The trick is to make them so short that they just barely penetrate the BT-20, so that when the MMX ejection charges kick, the music wire hooks are pulled out and the Recruit falls away.
The booster is pretty straightforward. BT-20 marked for 4 fins flush with the aft end. Since this is gap staged to a 13mm sustainer, I wanted to use a stuffer tube so put a BT-5 into a 13/18 centering ring and used a spent motor to push it up the BT-20. I had added a forward centering ring about 1/2" back from the end and punched a couple vent holes at the top. The booster can generally tumble, but if you want a token streamer, it can fit in between the BT-5 and BT-20 if you leave a little more room by setting the forward 13/18 ring back more than 1".
The sustainer is similar to the booster--Series 7 tube marked for 4 fins but a MT-5 motor tube using 13/18 centering rings. The rings might need a wrap of paper added to them to fit snugly inside the series 7 tube. I built up the OD of a piece of T-2 tubing through paper and centering rings so that the end fit snugly into a 13/10 centering ring motor block, which seals off the sustainer motor tube. This T-2 is actually the stuffer tube that vents the ejection charges through the roller bearing assembly and deploying the streamer from the upper section.
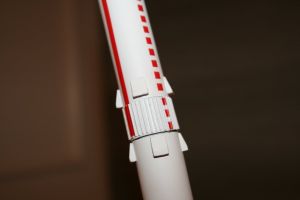
The spinning mechanism is actually pretty simple. The sustainer body should be cut into two sections, lower and upper. The roller bearings are mounted flush inside the aft end of the upper section and probably need a couple wraps of paper for a snug fit. Once that's completely dry (I'd consider using epoxy, but only if you can avoid any drips or runs onto the bearings themselves), apply a little epoxy to the T-2 and slide the bearing assembly down until the upper section is just a hair above the lower section. When cured, this should now allow the upper section to spin freely while the lower section remains fixed.
The sustainer mounts to the booster by loading a 13mm motor that extends about 1/2" aft of the motor tube, which in turn slips into the stuffer BT-5 tube in the booster. The sustainer body tube should rest on top of (but not overlapping) the booster.
I'll leave the other detailing up to the more serious builder to sort out on his own, although I will offer one tip on a very easy way to deal with the stringers. I used the template widget on EMRR to print out a 32-fin pattern wrap for the series 7 tube (0.759"). I then cut it to the stringer length and glued it to the sustainer tube. With the pattern in place, I then brushed on a thin CA and with careful use of tweezers laid each stringer in place over one of the fin pattern lines. The whole thing is painted over with white anyway, and the paper wrap is not at all noticeable.
Finishing:
Paint notes: Recruits are solid black. WASP is base white on everything, then follow up with fins--one yellow on each
stage, 3 red on each stage. The antenna is silver.
I also printed out a set of decals (see attached pattern) for the United States lettering and for the red stripe/box patterns.
Flight:
I had made a couple test flights on a boilerplate of the model, making sure the basic design would work, each of
which went fairly well. I had some issues with the Recruits--too tight and they would not come off in flight, but when
they did come off in flight, it tended to be so high that they basically disappeared, making them practically a flight
consumable item. I wound up painting them day glo orange for tracking, which helped, but would hardly be useful for the
finished model.
For the NARAM flight, I loaded up a B6-0 in the booster, the lowest certified booster motor available and way more power than I wanted to give this, especially since I was forgoing the launch lug in favor of a piston to improve my scale score (lugs tend not to match the real rocket and lead to point deductions). The Recruits each got MMX's with the new Q2 no-pyrogen igniters. The sustainer was flown on a 1/2A3-4T, although it would do just fine on a 1/4A as well, given how high the booster would be going.
The first stage went beautifully with all 3 motors lighting and clean, straight boost off the piston. It zipped almost instantly up over 200 feet, straining eyesight to track. The second stage lit fine but hung on the stuffer tube just a hair too long and tipped off for about a 45 degree slant. It fired the ejection fine, and the streamer brought it down safely.
Recovery:
I managed to locate the booster and the sustainer, but only one of the two Recruits. The Recruit I found was very
close to the sustainer, indicating that it probably didn't separate in flight and popped off upon landing. The other
one probably same off in flight as designed, as there was a definite scorch mark on the booster where the charge vented
out. I was too pressed for time that day to try to find the 4" piece of black T-2 tubing in the grass area the
roughly 60 yards of flight distance from launch to landing, so I will have to make a replacement Recruit before it
flies clustered again. It is still a perfectly fine flier without the clustered strap-ons, however, it's just not
nearly as cool.
 |
 |