Scratch Which Ways Up Original Design / Scratch Built
Scratch - Which Ways Up {Scratch}
Contributed by Douglas Gardei
| Manufacturer: | Scratch |
Brief:
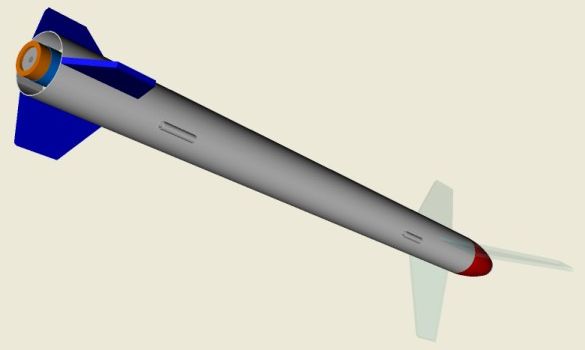
It's an upside-down flying rocket! Features "Rear" eject (or should I
say "front" eject?) recovery system. This was a BRS Contest Entry
Construction:
To build the Which Ways Up, you will need the following components.
- 1 18" length of BT-55 body tube.
- 1 2.75" length of BT-20 tubing (standard 18mm motor tube used as a fake motor mount)
- 1 12" length of BT-20 Tubing (powered motor tube)
- 3 CR-2055 centering rings
- 2 CR-2050 centering rings
- 2 EB-20 18mm thrust rings
- 2 regular motor hooks (optional)
- 1 spent 18mm motor.
- 1 sheet clear plastic "fin" material. Available at Hobbytown USA.
- 1 sheer 1/16" balsa fin material
- 1 18" plastic parachute
- 1 1/8" x 36" long elastic shock cord.
- 1 length of Kevlar® string.
- 1 or 2 1/8" launch lugs.
For the "nose cone", you can use any BT-55 based nose cone. It may be tricky to drill out a core for the BT-20 motor tube. Another option is to use a BTC55Z V2 boat tail with bored BT-20 hole available from Balsa Machining Services. That is what I used.
Construction starts with the body of the rocket. You will build it just like a regular model rocket. Motor mount with centering rings, thrust ring, and the optional motor hook. 4 balsa fins. Two launch lugs. nothing fancy. However, there are a couple things different. The tail of this rocket is actually the nose. So, the nose of the rocket is actually its tail... I know, sounds confusing!
Anyway, the shock cord mount for the rocket is the typical length of Kevlar cord fastened to the motor mount. Make sure you have enough length so you can easily attach the shock cord. Remember, after frequent flights, it may become necessary to replace the shock cord.
Complete the assembly of the body of the rocket by gluing in a spent black powder motor in the "motor mount." (Do not even think about using a live motor.)
Now here is the creative and tricky part: the "nose" of the rocket. Start off by assembling the "live" motor tube. Glue a thrust ring into one end of the motor tube and install a motor hook if desired. Glue the motor end of the motor tube into the "nose cone." Get another piece of Kevlar® and tie it to a CR-2050 centering ring. Tie a loop to the other end. Glue this centering on top of the motor tube about 3/4" from the end of the tube that does not have a nose cone glued on top of it. Next, glue on the remaining CR-2055 centering ring followed by the remaining CR-2050 centering ring. Set aside to dry.
While the glue is drying on the motor mount, it is time to cut out the fins. This is easier than it sounds. I used Corel Draw to lay out the fin pattern like you would when cutting out fins on a sheet off balsa. Then I printed this out on label stock, and stuck it on top of the protective coating on the plastic. Taking a metal edge and a hobby knife, I scored lines into the plastic tracing the pattern. After this was complete, bend the plastic and it will snap where the scores are.
When all the glue on the nosecone (the real motor mount) is dry, install it onto the body of the rocket. You will want to use the same lines you used on the body’s fins to mark the location of the clear fins on the nose cone. Carefully extend those lines onto the nose cone. Use a hobby knife to cut slots into the nose cone. Test fit each fin, but do not glue them in yet. Primer and paint the rocket with your favorite technique. Once all the paint is dry, attach the fins to the nose cone using CA.
The recovery system of the WWU is finished by attaching a length of shock cord to both Kevlar® loops and tying a twelve inch parachute to the nose cone (motor mount) loop. Cut a little V on the outer circumference. This will allow the Kevlar® to pass between the centering ring and the wall of the body tube.

Flight:
To fly the WWU, install the motor of your choice in the "nose cone"
of the rocket. Recommended motors are B6-2, B6-4, C6-3, and C6-5. Once the
motor is installed, pack the recovery system so the parachute and shock cord
material can fit in between the motor tube and the body tube. It is important
to note that only the Kevlar®
attached to the body tube should be exposed to the ejection charge gasses. This
means that the booster sections loop also is packet between the motor tube and
body tube.
One thing to note, the ejection charges on Estes motors tend to be on the powerful side, so it is important to have a generous amount of shock cord to help prevent the motor mount from snapping back into the body tube.
Enjoy a video by clicking HERE
Summary:
This rocket was an interesting project. It required some trial and error and
working with materials I would normally not use. This rocket always brings
interesting conversations and has turned more than one head at launches. Flies
great on small fields with B motors, can get some altitude on Cs. The
"rear" eject recovery system is cool.
 |
 |