| Construction Rating: | starstarstarstarstar |
| Flight Rating: | starstarstarstarstar |
| Overall Rating: | starstarstarstarstar |
| Diameter: | 1.04 inches |
| Length: | 17.20 inches |
| Manufacturer: | Semroc  |
| Skill Level: | 1 |
| Style: | Clone, Sport |
 Brief:
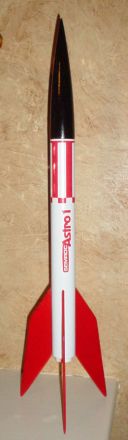
With more and more old rocketeers rediscovering the hobby and Estes seemingly intent on remaining a shadow of its former self, it was only a matter of time before other, more BAR friendly companies arrived on the scene to fill the void. One of the more recent of these companies is Semroc. More "experienced" fliers will recognize the Semroc name from their brief stint in the rocketry world 30+ years ago, but it would be a mistake to think of them based on this alone. The new Semroc is a self contained model rocketry history lesson, with planned offerings from as far back as Orville Carlisle's 1957 Roc-A-Chute Mark II and from long lost companies like Model Missiles, Flight Systems, Canaroc, Rocketry Development Corporation, Centuri, and their own Semroc products. (They even have a token Estes kit, the Sky Hook from the Astron days.) Like many others, when the new Semroc lineup of rockets was announced a few months ago, I quickly put the Laser X at the top of my "can't wait to build" list. While the Laser X project turned out to be an enjoyable one that produced a great looking rocket (despite my efforts to the contrary), I was surprised to find that I enjoyed building the Astro-1 quite a bit more. I had always assumed that the Astro-1, a stocky, sturdy, 3FNC rocket, was in the same ballpark as the Estes Alpha from a size standpoint, but I was surprised to find that it was considerably bigger than it's Estes counterpart.
Construction:
The kit contains:
- ST-1095 body tube
- ST-730E engine tube
- BC-1052 nose cone
- FV-30 laser cut fins
- 2 CR-710 centering rings
- TR-7 thrust ring
- LL-122 launch lug
- EH-28 engine hook
- SE-10 screw eye
- EC-124 shock cord
- SCK-24 Kevlar cord
- RC-12 parachute
- TD-6 tape discs
- SLT-6 shroud line
- DKV-30 decal
The Semroc version of the Astro-1 comes in the traditional hanging bag with the parts clearly visible through the bag back. The instruction booklet doubles as a face card and inside the instruction sheet, one finds a mini-history lesson on both the rocket and the company that originally produced it, something I consider a nice touch. There's also a well detailed assembly guide and an exploded view of the rocket (in a "centerfold" that only a BAR could love.) The parts are nicely done and include what has become a mod-roc staple of late; laser cut fins and a Kevlar-based shock cord system. The fin sheet is the most impressive part of the unbuilt kit, almost an art piece unto itself with the laser etched Semroc logo and kit name. The balsa itself is fairly hard, shapes easily, and needs little in the way of cleanup after removal from the spar. Overall the feeling of quality permeates this kit and the three other Semroc offerings that I've built. The rocket is a legitimate skill level one project with the most complicated step in the instructions being the installation of the motor mount and Kevlar shock cord, not a step likely to cause a panic attack even in a beginner. After this is completed the project is a simple 3FNC build and it progresses quickly, but I did things a little backward for a change.
Finishing:
Following the advice of a fellow OldRockets poster, I sprayed the body tube with a coat of Valspar primer before I attached the fins or started the sealing or sanding process. Theoretically this was supposed to toughen the body tube for the sanding process. Turns out it works. Even at the top of the body tube where I had become accustomed to some fraying the tube held together well. The primer was followed by the requisite two coats of thinned Elmer's Fill 'n' Finish with each coat followed by a brisk sanding with very fine grit sandpaper. Not only did this hide any tube spirals, it also roughened up the body tube and gave the fins a little more to bite onto once they were glued in place. The fins were attached using the double glue method using Elmer's Wood Glue and were also finished as the body tube was with Fill 'n' Finish. After the fins were sanded, the entire rocket was re-sprayed with primer, then with a base coat of ValSpar gloss white. Once dry, the fins were masked and sprayed with ValSpar Cherry Red, while the nose cone was sprayed with ValSpar gloss black. After a light coat of acrylic clear the decals were applied. They went on with ease and nicely completed the look. Once everything was dry I applied another coat of clear and called the project finished.
Construction Rating: 5 out of 5
Flight:
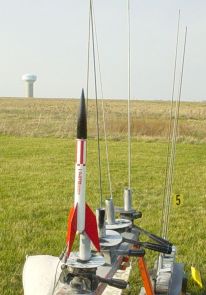
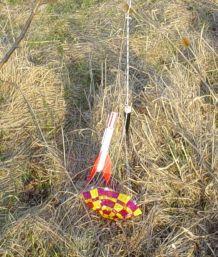
The first launch was a rarity, a Leap Day launch, but that fact passed me by until that evening when I was entering the flights into the flight log. Like I said earlier, I expected the Astro-1 to be much like the Estes Alpha in it's flight characteristics, but as it turned out, I liked it even better. For the size of the field I was flying on, the Astro-1 is tough to beat. The added size cuts down on the height while making the whole flight visible. Flying on a B6-4, the rocket flew to a respectable height and managed to recover on the field despite the full chute and constant breeze. Having proved it's small field worth, I looked forward to a chance to try it out with a C engine on a big field. A month later I finally got around to launching it on the big field at VOA with the Cincinnati Quark group. Since I had a lot more room to work with, I loaded up a C6-5 and let 'er rip despite the relatively heavy breeze. The Astro-1 arced into the wind and flew to a nice altitude with ejection coming right before apogee (so a C6-7 might have been a better choice.) Again under a full chute, the rocket began drifting with the wind to the northwest, well away from our launch site. From where we stood it looked like it might land near the park's edge, so I decided to drive to the landing site instead of plowing through the thistles and swampy spots that lay between me and the rocket. I drove to the site and began walking along the sight line, but found no rocket. Thirty minutes later I disappointedly decided that I had indeed been beaten, but on the drive back I realized that the row of cars I had been using as a point of reference were not parked on the Quark flight line, so I decided to try again. Again nothing, so then I really gave it up. Apparently that was what did it. I hadn't moved the van 100 feet when I saw the Astro-1 hanging from a thistle a mere 25 feet from the road, but completely on the opposite side of the access road. I guess the drift only looked extreme from where I stood because I was a good 1/4 mile away from where I had been searching.
Flight Rating: 5 out of 5
Summary:
PROs:
- Great flier with a range of engines that make it a good choice for fields of varying sizes.
- Classic simplicity of the paint and decal scheme produce a great looking, uncluttered kit.
- Updated version of a classic beginners kit.
CONs:
- None
Overall Rating: 5 out of 5
 |
 |
Flights
|
|
|
|
J.T. (April 2, 2004)