Semroc Constellation (xKit)
Semroc - Constellation {Kit} (XES-K35) [2008-2014]
Contributed by Robert Koenn
| Construction Rating: | starstarstarstarstar_border |
| Flight Rating: | starstarstarstarstar |
| Overall Rating: | starstarstarstarstar_border |
| Diameter: | 0.98 inches |
| Length: | 16.50 inches |
| Manufacturer: | Semroc  |
| Skill Level: | 1 |
| Style: | Futuristic/Exotic |
 Brief:
I picked up a Constellation at the Semroc booth at NARAM 50 this year. I had planned on picking up a couple of Semroc
kits while at NARAM but didn.t know for certain which ones I would buy. I didn.t even know they had released this old
Estes kit until I noticed it hanging in the display. I also purchased an OOP Centuri Taurus and Carl, being the great
guy he is, threw in a free OOP Estes Mark and Golden Scout. The main reason I went for the Constellation was that I
remember back about 1970 getting a free one with one of my Estes orders. Nowadays young rocketeers can go out and
purchase rockets and engines at the local Walmart, albeit they would probably be only Estes toys. But back in those
days you typically had to mail order rockets. By the way, this is another review I had in work when I noticed that Chan
Stevens beat me to the punch again. Chan makes it difficult to get in a review before he writes one with all the
building he is doing!
Construction:
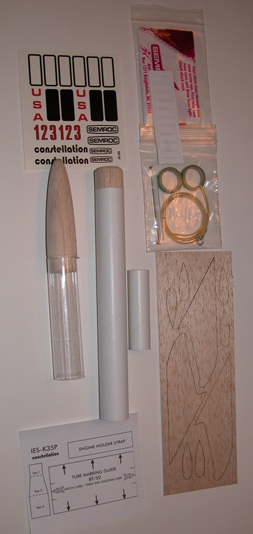
The parts came in a typical Semroc plastic bag which was also reminiscent of the old Estes packaging. The parts
included:
- BT-50 size main body tube
- Balsa nose cone
- Balsa nose block
- (2) CR-2050 centering rings
- Engine hook
- Screw eye
- Laser cut balsa fins
- Launch lug
- Wooden dowel launch lug standoff
- Rubber shock cord
- 12. parachute
- Decal sheet
 The Constellation is constructed fairly much the same as any standard model
rocket. The only unique construction necessary are the pods on the tip of the fins and the clear payload section. To
start however you will need to download the plans. This is one of the new X kits from Semroc which are exact twins of
discontinued Estes and Centuri kits. The X kits require that you download the plans from JimZ or any other source on
the web you may know of.
The Constellation is constructed fairly much the same as any standard model
rocket. The only unique construction necessary are the pods on the tip of the fins and the clear payload section. To
start however you will need to download the plans. This is one of the new X kits from Semroc which are exact twins of
discontinued Estes and Centuri kits. The X kits require that you download the plans from JimZ or any other source on
the web you may know of. The first thing to do is build the engine mount. It is a standard engine mount for an 18 mm engine in a BT-50 tube. The first step is making a small slot in one end of the engine tube for the engine hook which also doubles as the engine block. The hook is then inserted into the slot so it runs the length of the tube. I then wrapped a couple of wraps of tape to secure the hook to the tube. Next one of the CR-2050 centering rings is slotted for the engine hook and the centering rings are then glued to each end of the engine tube. The completed engine mount should be set aside for the glue to dry.
The fins are the most work for this model. They include scifi type tip pods which give the Constellation its. unique character. All the fin components are laser cut so start by punching them out. I then carefully trimmed the pod pieces with my X-Acto™ knife so the edges were curved down to the flat surface on the opposite side. I then sanded them to a smooth curve. This would make it much easier to finish the fins after the tip pods were glued on. I then glued the pods to the tip of the fins with Titebond®. I clamped them until the glue had dried. After the glue had dried I trimmed a round leading and trailing edge on the fins as well as integrating the tip pods smoothly into the fin. This was done by trimming with the X-Acto™ followed by careful sanding. I then applied 3 coats of Coverite Balsarite® balsa surfacer to the fins and nose cone and sanded lightly between coats.
Returning to the now dry engine mount I glued it into the body tube with the tube ends flush using Titebond®. The fins were then glued to the body tube spaced evenly around it. I attach my fins for this size rocket using CA glue to first hold them in place and then filleting the joints with 5 minute epoxy. This gives a strong, smooth fin to body tube joint. I also glued the launch lug and lug standoff to the body at the same time using the same method. Finishing off the basic build was the clear plastic payload section. While finishing the fins and nose cone I had also given the balsa coupler a couple of quick coats of the balsa sealer and sanded it smooth. I then sprayed it lightly with a coat of Krylon black keeping the paint minimal so it would not prevent the balsa coupler from sliding relatively easily into the plastic tube. After it had dried overnight I checked the fit and carefully slid it into the plastic tube half its. length. Once I was certain it was in correctly I ran a bead of CA thin glue around the aft joint which locked the balsa coupler into the plastic tube. The nose cone base should be set up to fit snugly in the plastic payload tube after finishing in a similar fashion.
The completion of the Constellation involved installing the screw eye into the balsa coupler and glueing the elastic shock cord into the tube using the paper tab that was included. I did not use the rubber band shock cord Semroc which was included to keep the kit authentic.
Finishing:
I painted the kit to match the old Estes paint scheme. I had already sealed the balsa parts so first painted the body
with two coats of Rustoleum®
gray primer sanding between each coat. I then painted the body tube with Krylon®
white. The nose cone was painted Krylon®
red with the shoulder painted Krylon®
black since it would show inside the clear plastic payload tube. I then masked off and painted one fin Krylon®
black. I applied the decals basically per the Estes scheme but found that on the black fin the decal was not going to
show well. I painted a scrap of decal material with Krylon®
white and after it dried, cut it to a rectangular shape for a backing for the fin number. This gave a good contrast for
the fin number to show nicely on the black fin.
Construction Rating: 4 out of 5
Flight:
I took the Constellation out on a calm evening to a nearby recreational field along with 4 other rockets to give it a
test flight. I used an A8-3 since the field was not too large. Being a very basic and highly stable rocket it flew
perfectly on the A engine to about 300 feet. This rocket would really gain some altitude if flown on either the B or C
engines recommended.
Recovery:
The Constellation included a standard Semroc 12. plastic chute. After assembling it I did cut out a 2. diameter hole
in the middle to prevent too much wind drift. On this first flight the chute deployed perfectly and the model floated
gently into the grass with no damage.
Flight Rating: 5 out of 5
Summary:
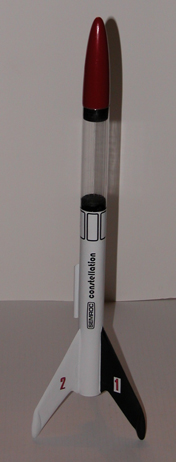
I purchased the Constellation to add to my fleet mainly because I had fond memories of my original Estes freebie. It
is a basic payloader with the unique clear plastic payload section and fin tip pods. This makes it a bit different than
just a 3 fin rocket and a nice display model. The decals add to the appearance as well. And as always, Carl and Semroc
have produced another high quality kit duplicating the old Estes line, this time even to the point of the original
Estes construction plans.
Overall Rating: 4 out of 5
Other Reviews
- Semroc Constellation (xKit) By Chan Stevens (September 6, 2008)
Brief: Another of the clone/parts kits, this one a replica of the Estes K-35 Constellation. This one features a clear payload tube and cool futuristic fin styling complete with mini pods. Once nice upgrade in this modernized version is the laser-cut fins, saving a bit of hand cutting. Construction: Parts are standard Semroc quality, top notch. Your $13.50 (retail) gets you: ...
 |
 |
Flights
|
|
|
|
D.G.R. (September 19, 2008)