| Manufacturer: | Semroc  |
Brief:
The Cormes Shuttle is a kit bash rocket based on parts from the Semroc
SST-Shuttle 1. I got the kit last year during a great Semroc sale along with a
bunch of other rockets. After months of not getting around to the kit, I
realized it would be perfect for the EMRR 2006 Challenge.
Modifications:
I have to say the SST-Shuttle is one cool rocket and it was almost a shame to
kit bash this rocket. On the other hand, I don't think I have ever done a kit
bash (other than doing a Goony interpretation from Excelsior Rocketry), so I
took this as a new challenge. The Semroc parts are all great quality, and it
was fun to put together a bunch of different combinations of parts until I came
up with the shape of the Cormes Shuttle.
I began by gluing the two main body tubes together through the use of the tube coupler. In addition to this, I put the motor mount together complete with Kevlar® thread and installed this inside the main body tube.
Next, I glued a nose cone front and nozzle rear to each end of the ST-525 body tubes. In addition to this, I had one other external pod that required a little planning. I glued the smaller balsa nose cone into one end of the ST-730, and then created a small shroud from the shroud sheet, glued this on to the small coupler and glued the coupler into the back of the ST-730 with another plastic nozzle sitting out the back.
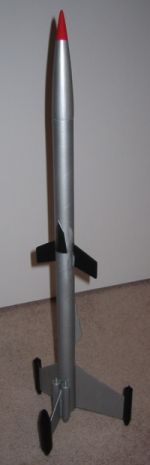
 Then I selected my 7 fins (3 pairs and a single fin) and prepped
them for attachment onto the main rocket. As you can see from the picture,
there are two front canards (10.5" from the base of the lower body tube),
and two smaller "canards" (5" from the base of the lower body
tube). There are also two main fins in the back and an alternate fin also at
the back that are all 120° apart. I attached a ST-525 to the tip of each
main fin as well as one on each side of the root edge of the alternate fin. At
the tip of the alternate fin, I glued on the larger small body tube (ST-730)
complete with small balsa nose cone, nozzle, and shroud.
Then I selected my 7 fins (3 pairs and a single fin) and prepped
them for attachment onto the main rocket. As you can see from the picture,
there are two front canards (10.5" from the base of the lower body tube),
and two smaller "canards" (5" from the base of the lower body
tube). There are also two main fins in the back and an alternate fin also at
the back that are all 120° apart. I attached a ST-525 to the tip of each
main fin as well as one on each side of the root edge of the alternate fin. At
the tip of the alternate fin, I glued on the larger small body tube (ST-730)
complete with small balsa nose cone, nozzle, and shroud.
The final touch for the rocket was to put on the cockpit canopy and add the nose weight to the main nose cone. I finally attached the two parachutes and shock cord to finish the rocket.
Construction:
I ended up scavenging the following from the SST-Shuttle for use in my Cormes
Shuttle:
- 1 Body Tube ST-10105
- 1 Body Tube ST-1080
- 4 Body Tube ST-52
- 1 Body Tube ST-749
- 1 Tube Coupler HTC-10
- 1 Tube Coupler HTC-7
- 1 Balsa Nose Cone BC-1050
- 1 Balsa Nose Cone BC-715
- Complete motor mount system
- Screw eye and washer weights
- 9 Plastic nose cone sets PC-5RJ-2
- Shroud and canopy sheet (for cockpit and rear nozzle)
- 2 Parachutes
- Various fins from the fin stock
Finishing:
The Semroc parts are really good, but there was still some grain that showed
through on the fins and seams visible on the body tubes. If you want that great
look, I would recommend Fill 'n' Finish to properly seal the rocket before
painting.
Flight:
I flew it unpainted Cormes Shuttle three times (since this was an untested
design, I didn't want to put lots of work into a paint scheme only to find out
that the bird might not fly), using the following motors: C6-5, C6-5, and B6-2.
The first flight of the untested design was superb. It had great boost, and the rocket was very stable. Only one parachute opened and the rocket landed hard, but there was no damage (other than neighborhood kids grabbing at the fins while running back to the launch site).
The second flight, I decided to use only one parachute. Again, the boost and deployment again were fine, but the rocket came in too fast and snapped off a fin. In addition to this, I got one of those famous "Questes Dents". Fortunately, I had not painted the rocket yet, so I was able to patch up the dent in the nose cone and reinforce the upper portion of the body tube with Fill 'n' Finish and CA glue.
On the third flight, I elected to use a B6-2. I figured that the thrust is the same between a C6 and a B6, but the B6 just has a shorter window of performance. Thus, I selected a motor with a very short delay. Boost was great, deployment of parachute was fine, rocket landed without any injury.
Now I was ready to paint the rocket and afterwards write up an EMRR report.
Recovery:
Recovery is good with either two chutes (hopefully they both deploy) or with a
larger parachute. The Kevlar®
system is really good. One other thing that would make this great would be the
use of a Nomex®
heat shield, but according to the EMRR challenge, I was not allowed to add
anything to the rocket.
Summary:
This rocket is a bit bulky, but it has that kind of cool sci-fi classic look to
it. At 3 to 4 ounces, it is perfect for B and C motors. In addition to this,
the parts from Semroc are great. With the SST-Shuttle kit bash, there are so
many parts that an unlimited amount of rocket bashes are possible.
The only con to this design is that the two parachute deployment is a bit iffy. I would recommend switching to a larger single parachute.
Recommended motors: B6-2, C6-3, C6-5.
 |
 |