| Construction Rating: | starstarstarstarstar_border |
| Flight Rating: | starstarstarstarstar_border |
| Overall Rating: | starstarstarstarstar_border |
| Diameter: | 1.64 inches |
| Length: | 23.90 inches |
| Manufacturer: | Semroc  |
| Skill Level: | 2 |
| Style: | Cluster |
Brief:
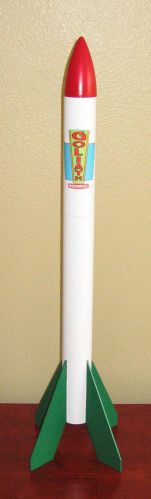
The Semroc Goliath is a 4FNC LPR that allows you to build it with your choice of 3 different motor mounts: 1 18mm motor, 1 24mm motor, or 3 18mm motor cluster. The Goliath design, as explained in the instructions, is part of Semroc's RetroRepro line and according to the historical information in the instruction manual, was originally inspired by the Estes Ranger.
Construction:
The kit includes the following parts:
- 1 Balsa ogive nose cone (reminds me of the FlisKits' Deuce's Wild!)
- 1 Balsa bulkhead
- 1 6" BT-60 body tube
- 1 12" BT-60 body tube
- 4 laser cut balsa fins (3/32" thick)
- 4 laser cut centering rings (2 for 18mm MMT and 2 for 24mm MMT)
- 3 3" BT-20 tubes
- 1 3" BT-50 tube
- 2 12" parachute kits
- Screw eye, launch lug, 4 motor blocks, Kevlar thread, elastic, and 1 motor clip
- Waterslide decal
- Instruction manual
The kit arrived from BRS Hobbies well packaged with all parts present and no damage. The front of the packaging is first rate and on par with any of the leading manufacturer's kits on the market. The header card is ingeniously the front page of the instruction manual. The instructions remind me of the classic Estes-style instructions (even down to the font used) containing plenty of illustrations and even an exploded view of the kit in the center pages of the manual. I also thought it very cool that the instructions contained historical background information about Semroc and the Goliath kit.
The build starts with marking the body tube for the fins and sanding the fins to be uniform (although with the precision laser cuts, there is very little to be done!) I also lightly sanded the 12" BT-60 to give the fins something to bite into when I glued them on.
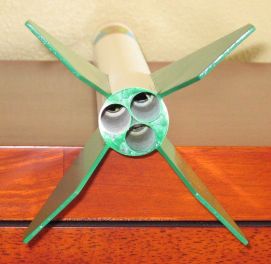 Then it is time to make a major decision: which motor mount are you going to use? I, like many folks, am a big fan of the Estes Big Bertha/Ranger design but I at least felt that the Big Bertha was sometimes just underpowered...so I built mine with the 3 18mm cluster. Clusters rock! No centering rings are needed for this configuration as the 3 tubes fit snuggly together inside the main BT-60 airframe. I did however, find it odd that only one motor hook was included, so I was left to friction fit the motors for use. I glued the tubes together with aliphatic resin (yellow wood glue). A generous length of Kevlar thread is tied around one of the motor blocks and then the 3 motor blocks are glued into place before inserting the entire subassembly into the BT-60. The instructions recommend using glue soaked tissue to fill in the gaps around the motor tubes, however, I used polyurethane glue, which expands as it cures not to mention makes the aft end of the rocket solid as a rock.
One gotcha (that in fact got me) is that the BT-20 MMT tubes are 3" long, not the 2.75" tubes that you normally find. The extra tube length is compensated for with wider (3/8") motor blocks, however, it still requires the motor block be inserted 1/8" from the end instead of the typical flush-with-the-end-of-the-tube mount. I didn't catch this until the glue had already had a pretty good chance to cure. That left me with only 1/8" of exposed motor to pull the used motors out. Difficult but not impossible...
Next is attaching the fins. I tacked them to the airframe with yellow wood glue before adding generous fillets 2 at a time. The launch lug is attached to the rocket by lying in a fin fillet giving the rocket cleaner lines.
The rest of the build goes quickly in gluing the bulkhead into one end of the 6" BT-60 tube, screwing the screw eye into the bulkhead, and friction fitting the nose cone into place. I waited until after I finished the rocket before assembling the parachutes and attaching the shock cords.
Finishing:
Nothing unusual here. Apply diluted Elmer's Fill 'n' Finish to all balsa pieces. Sand. Prime with Krylon. Sand. Paint Krylon gloss white. Let dry. Wet sand. More gloss white. Let dry. The paint scheme on the packaging had a black nose cone, white BT, and blue fins but I wanted to use colors that complimented the large decal. So I painted the nose cone Krylon red followed by taping off the body tube and painted the fins Krylon green. Let dry. Apply single, large waterslide decal. Done. Let's go flying!
Construction Rating: 4 out of 5
Flight:
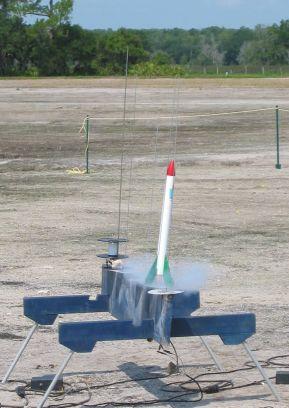
Recommended motors for the 3 18mm cluster configuration is 3 C6-7s. It's also worth mentioning that Semroc includes projected altitudes with each MMT configuration. The 3 C6 motors should put the Goliath up to 1350ft! Plugging the design into RockSim, I wanted to see how it'd do with 3 B4-4s, plus I wanted to make certain that I wasn't going to have any instability issues. RockSim showed that I should expect about 800ft with 3 B4-4s (although ejection might be just a hair early) and when built stock, the design is still plenty stable with 3 C6-7s loaded. Excellent!
First flight was on a trio of B4-4s. Even with these motors, the Goliath didn't waste any time in getting going! Straight flight to ~750ft. Ejection was just a hair early but could clearly hear the "pop-pop-pop" of the ejection charges! The motor exhaust did peel most of the paint off the first inch or so on the "inside" edge of the fins. If you want a small field cluster, this is the right motor-rocket combo.
Second flight was a week after the first flight but with 3 B6-4s. I did bring a pack of C6-7s too but I thought it was a bit too windy to attempt a flight with them. Again, the Goliath didn't waste any time on the pad after pressing the ignition button. With a 3 x 18mm cluster, you can forget about any images of a majestic liftoff that'd you'd see when the same rocket is powered by only a single motor...
Recovery:
I wasn't overly crazy about having a 3oz rocket recover separately under a pair of 12" chutes at least on its first flight. Besides, there was a steady but slight breeze and I didn't feel like chasing rockets all over the field. I typically fly at soft, grassy locations so I can usually afford a quick recovery, however, I felt it best that I still make the recovery system as flexible as possible in case I want to use either one or two chutes in the future. This conversion was very easy to do--I merely added swivels to each of the chutes and tied small loops in the end of the elastic attached to both the main airframe and payload sections. If I want to use one chute, I hook both elastic loops with the single swivel, effectively making for a very long shock cord. And if I want both chutes, I can clip a chute to each piece of elastic allowing the upper and lower parts recover separately. Going with the one chute configuration, it did come down quickly as expected under one chute, however, there was no damage.
I really wanted to give the dual chute recovery a chance so I cut spill holes in both chutes to help minimize drift for its second flight. However, with the 8-10mph winds, again I was not in the mood to go chasing rockets all over the field. This time I swapped out the stock chutes for a 15" nylon one from my range box. With the B6-4s, ejection was one the early side although not by much. I would recommend using B6-6s in the future though. Recovery went smoothly and safely but drifted quite a ways from the pad.
On a calm day in the future, I will keep those C6-7s and the twin stock chutes for the designed recovery method.
Flight Rating: 4 out of 5
Summary:
I have always been fond of the Big Bertha styling but felt that it sometimes needed a little more oomph than a single 18mm motor. With the Semroc Goliath, I really enjoyed being able to have the choice of which motor mount configuration at the time of the build and without the hassle of having to request anything at the time I placed my order. The combination of the old school design mixed with all the modern LPR components and techniques made this a super rocket to build and fly. I would strongly recommend the serious LPR builder consider picking up this kit.
Overall Rating: 4 out of 5
 |
 |
Flights
|
|
|
|
T.D.A. (September 6, 2004)