| Construction Rating: | starstarstarstarstar_border |
| Flight Rating: | starstarstarstarstar |
| Overall Rating: | starstarstarstarstar_border |
| Diameter: | 1.17 inches |
| Length: | 22.10 inches |
| Manufacturer: | Semroc  |
| Skill Level: | 3 |
| Style: | Futuristic/Exotic |
Brief:
This is a 70% downscale of Semroc's popular Hydra VII, which is a 7-motor cluster design. This is a greatly simplified single-motor version, although it still shares most of the design characteristics that make the Hydra VII a fun and challenging build.
Construction:
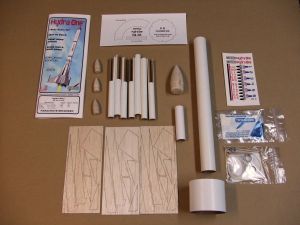
The good news is this smaller version sells for about $20 less than the Hydra VII. The bad news is that still makes this list for $26, which would make it one of the most expensive rockets I've ever flown on an A motor. Still, for that $26 you get plenty of top-quality parts:
- Balsa nose cone (main)
- Kraft paper body tube (main)
- BT-80 ring tube
- BT-20 motor tube
- ST-560 stuffer tube
- 6 slotted body tubes (trim)
- 3 balsa nose cones (trim)
- Laser-cut fins (lots)
- Kevlar elastic shock cord
- waterslide decals
- 12" plastic chute
When Carl announced this kit at NARCON 2009, he mentioned that he built the prototype in about an hour. He's apparently a lot faster than I am--I think I had maybe 7-8 hours into it plus finishing, and finishing is a lot of work on this compared to other models of similar size.
The instructions are well written, easy to follow, and use Semroc's new format with pre-punched holes and fold-out instructions designed to be retained in a binder. It's rated a skill level one, but I think that's pretty optimistic and would rate it at least a 2, possibly a 3 on the 5 scale. This is not a simple beginner's model.
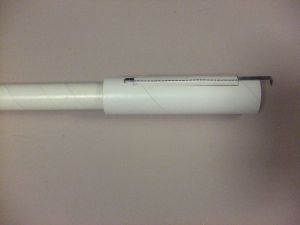
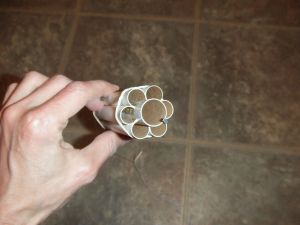
The motor mount is simple enough--a BT-20, slotted for a metal hook. The stuffer tube is a bit unusual. It gets a thick wound centering ring on one end, which in turn is bonded inside the forward end of the motor tube acting as both a centering ring for the stuffer tube and a motor block.
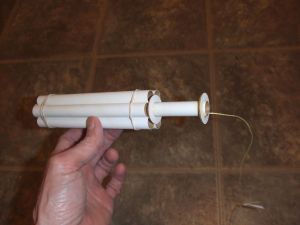
Next, the outer trim body tubes go on surrounding the motor tube and sitting flush against the stuffer tube. These fit perfectly as they are pre-slotted. That's a big time-saver and one of the reasons the price for this kit is not too bad once you get into it. The 6 slotted tubes fit perfectly around the perimeter of the inner tube.
 After the tube glue joints have cured out, you add a couple of centering rings to the inner/stuffer tube with the forward of these also serving as the anchor point for the Kevlar shock cord. The upper body tube fits over these.
As with the Hydra VII, you get to split some balsa nose cones in half to mount flush around the outside of the inner tube. I used a very thin razor saw for a clean cut then wrapped some 180 grit paper around the body tube to sand a curved contour onto the backside of each cone. I held off bonding these though until after painting (see finishing notes).
The fins on this wind up being a lot of work, especially if you're anal-retentive about cosmetics and fill the grains on each before bonding.There are 6 main inner fins, 3 larger outside fins, and 12 smaller fins flanking the larger outside fins. 21 total fins to sand, seal, sand, fill, etc. On top of that, I painted them separately before bonding to save masking trouble later.
You'll want to read the directions carefully before working the fins. In my case, between my deviation from the routine/plan of painting some parts offline first, combined with a cursory reading of the instructions resulted in a goof I didn't catch until the very end when I noticed 3 leftover smaller fins. I'd botched the fin alignment marking, however, my finished bird looks fine.
In a nutshell, there are 6 inner fins that go in the joints between trim tubes. These also act as braces/supports to which the BT-80 ring fin is bonded. In my case, the fit was a bit sloppy, so the ID of the BT-80 ring fin is about 1/16" larger than the diameter of the braces' outer surfaces, so I had to pinch it in just a little to get it to properly bond. With the ring fin in place, you then mount the 3 main fins aligned with 3 of the inner braces and 12 of the outer fins per the marking guide provided with the kit. The marking guide does not show the position of the 3 main fins, just the 12 trim fins, and I didn't catch that the outer trim fins were not supposed to line up with any of the inner braces.
Anyway, once all the fins are on, there are just a few simple steps left. First, a tail cone shroud made from a cardstock pattern sheet goes on the aft end, then the screw eye goes in the nose cone, followed by attaching 3 little wood dowel "guns" as trim to the main fins.
Sure seems like a bit more than an hour's work...
Finishing:
The cover art depicts a decent gray and white contrasting color scheme. To achieve that though would require some pretty challenging masking. I wimped out and opted to pre-paint many of my detail parts to eliminate the more difficult mask jobs.
I started by sorting the parts into two piles--one to wind up gray, the other to wind up white. The gray pile included the nose cones (split and main), BT-80 ring with 3 main fins already bonded, and 6 inner fin braces. The white parts included the body tubes and 12 outer/trim fins.
I then sanded/scraped off the bond surfaces and attached the inner/brace fins. While those were drying, I tacked on the outer trim fins to the BT-80 ring tube. That finished assembly then went on to the inner braces. I tacked the gray split nose cone halves into the exposed forward end of the little body tubes.
I finished up by hand painting the guns gloss black and the tail cone a metallic silver.
I wrapped up by applying the waterslide decals. As usual, they were terrific quality and texture, very good to work with, and drying absolutely clear.
Construction Rating: 4
Flight:
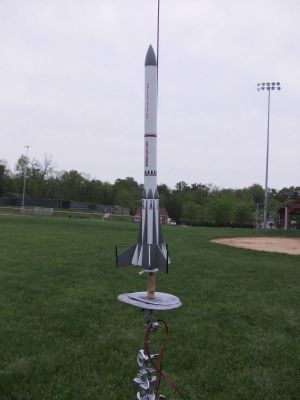
For the maiden flight I was a bit limited, flying it on a small field roughly 250 square yards surrounded by dense tree growth. Even though the winds were light, I didn't want to chance losing all my work to a tree so I went with a B6-4.
The flight was dead straight, and the 4 second delay was just right as it deployed while still hanging at apogee horizontally aligned. The altitude was a good deal less than the estimated 300 on the kit's header card. I'd say I was more like 150-200 feet, although my finished model weighed in at 2.3 ounces (without motor and wadding) versus the 1.9 on the header.
Recovery:
The 12" plastic chute furnished with the kit worked fine and brought it gently back down. No trees involved. It landed on the very short grass, suffering no damage. Even the little dowels sticking out beyond the fins survived fine.
Flight Rating: 5
Summary:
This turned out to be a pretty nice little build project, and the finished rocket is certainly more appealing than 3FNC designs. I do find the gray/white paint scheme a bit boring and would suggest something more along the lines of the original Hydra VII with red and blue accents though.
Overall Rating: 4
 |
 |
Flights
|
|