| Construction Rating: | starstarstarstarstar_border |
| Flight Rating: | starstarstarstarstar_border |
| Overall Rating: | starstarstarstarstar_border |
| Diameter: | 1.33 inches |
| Length: | 19.80 inches |
| Manufacturer: | Semroc  |
| Skill Level: | 1 |
| Style: | Clone, Sport |
 Brief:
Centuri Engineering Company was started in the early 60s and was one of the early pioneers in the model rocket industry. Centuri was sold to Damon Corporation in the late 60s and maintained their product line separately from Estes until 1983. The Magnum Hornet was produced by Centuri from 1980-1983 and is unique in that it was one of a handful of Centuri kits comprised entirely of Estes parts.
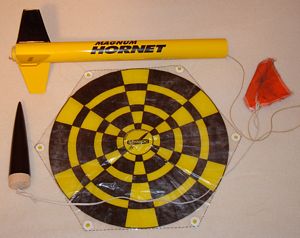
The Magnum Hornet is a basic 4 fin and nose cone (4FNC) sport flier with a 24mm motor mount. Released in March 2009, the Semroc reproduction of this classic kit includes a few modern upgrades, such as laser cut balsa fins, a balsa nose cone, Kevlar shock cord, and a 12" parachute. One of the nicest features of this kit is that an 18mm motor adapter is included which makes the Magnum Hornet a very versatile flier.
Construction:
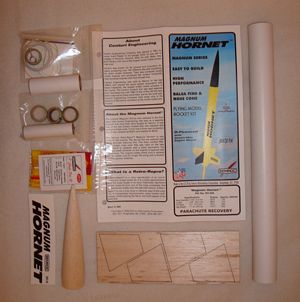
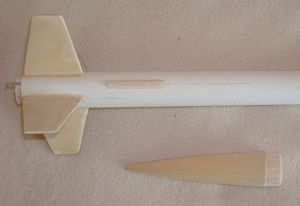
As with every Semroc kit I've encountered, the quality of the parts is first rate. The kit come packaged in the standard "hang-tag" plastic bag, and the full color header card is actually the first page of the instructions, which includes not only the cover artwork but a parts list with an exploded view of the rocket and a nicely detailed history of Centuri Engineering and the Magnum Hornet. The following parts are included:
- BT-55 Body Tube – 14"
- Balsa Nose Cone BNC-55AC
- 24mm x 2.75" Motor Tube
- 2 Centering Rings CR50/55
- Thrust Ring CR20/50
- Standard Engine Hook
- 3/32" Laser Cut Fin Sheet
- Kevlar Shock Cord 18"
- Elastic Shock Cord 24"
- Launch Lug – 3/16"
- Small Screw Eye
- 12" Parachute Pak – Unassembled
- 18mm x 2.75" Motor Tube
- 3x Centering Rings CR20/50 (one ring split)
- Thrust Ring
- Standard Engine Hook
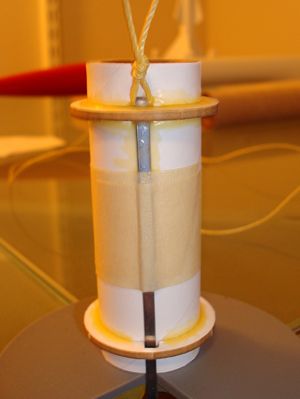
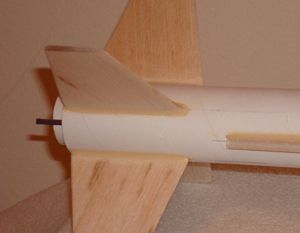
As stated right on the front of the kit, the Magnum Hornet is "Easy to build". The 2 pages of instructions are simple, effective, and very well illustrated. The construction steps are familiar to anyone who has built a low power rocket before with a couple of steps unique to Semroc and/or this kit. The motor mount is assembled first. The centering rings are laser cut and must be detached from the supporting material. At first I thought they were made of a lite-ply material, but closer inspection showed them to be made of a very sturdy paper matte board. The only unusual step in constructing the motor mount is that the Kevlar shock cord is tied around the upper end of the motor hook and then secured with the aft centering ring and a fair bit of glue. At 18" the Kevlar included with the kit is only a few inches longer that the body tube and is shorter than I would have liked. It will probably do the job, but I replaced it with a piece about twice as long.
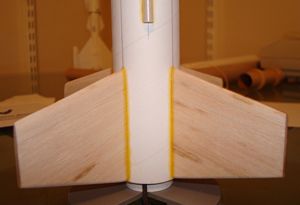
The fins are laser cut but still need to be removed from their balsa sheet. After getting them loose the fins require minimal cleanup, and I decided to round the leading and trailing edges. The instructions do not make use of a wraparound marking guide but rather the stand up type, where you set the end of the body tube over a circle template in the instructions and mark the fin positions. I use a length of small aluminum angle stock to extend the fin placement lines on the body tube. The template in the instructions does not have a mark for positioning the launch lug, so I just eyeballed a line between two of the fin lines.
By now the motor mount had dried sufficiently to install in the body tube. The installation is a little unique in that the motor mount does not slide all the way into the body tube but rather only until the aft centering ring is flush with the end of the body tube. This leaves about 1/4" of the motor tube extended aft of the body tube and actually creates a nice look.
The fins are attached next. My standard routine is to tack them on with a double glue joint and then add a second fillet of wood glue. The launch lug is attached in a similar fashion. The instructions mention that this rocket can be built with either a 1/8" or 3/16" launch lug, but only a 3/16" lug is included. For a rocket of this size and weight, I think a 3/16" lug is overkill so I dug out a 1/8" lug. In my opinion it gives the rocket a slimmer look and of course knocks down the drag coefficient just that fraction of a percent...
At this point the rocket is ready for finishing and there are a couple of steps that happen later, such as installing the screw eye in the nose cone. This is accomplished by screwing the eye part way in, removing it, adding a generous drop of medium thick CA glue, and then screwing the eye all the way down. Finally the elastic shock cord is tied to the Kevlar® cord and to the nose cone with a drop of CA glue on all the knots.
Even though the rocket is essentially complete, there is another assembly job to tackle. Parts for an 18mm motor adapter are included with the Magnum Hornet, and the assembly steps are part of the instructions. The adapter is a little different from a standard engine mount in that there are three centering rings, one of which has a gap cut in it to accommodate the motor hook. Two of the centering rings are glued flush with each end of the motor tube with the third in the middle. In essence this creates an 18mm motor mount which loads up like a 24mm x 2.75" engine.
Finishing:
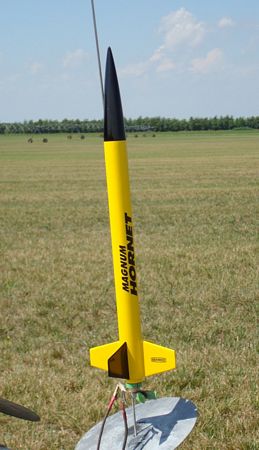
Finishing the Magnum Hornet is fairly simple. My standard routine involves laying down nice smooth fillets along the fin and launch lug joints using Elmer's Wood Filler and then sealing the balsa fins and nose cone with one or two coats of wood filler thinned down with water. When I'm happy with the surface, I start with two coats of primer followed by two coats of gloss enamel paint, working down to 400 grit sandpaper in between coats. The Magnum Hornet gets a yellow base coat on the rocket, then one fin and the nose cone get gloss black. The decals included with the kit are first rate and do not require any special treatment. I had no trouble applying them. They laid down well and looked great after they had set. I did apply a coat of Future Floor Polish to the finished rocket to give it a little extra shine, and I am very happy with the way this particular rocket turned out.
Construction Rating: 4 out of 5
Flight:
Obviously with a 24mm motor mount and a finished weight of 2 ounces or less, this is a screamer of a rocket. Including a motor adapter with this kit is a stroke of genius since it allows you to fly the Magnum Hornet in just about any type of weather on any size field. I have flown my Magnum Hornet on a B motor in a small schoolyard, a C motor on windy days, and a D motor on the sod farm. It flies fast and straight every time, and keeps coming back for more. It could easily handle composite E motors if you had the room and the courage.
Recovery:
The Magnum Hornet comes with an unassembled 12" Chute Pak. I'm afraid I must take away cool points here because when I dumped out my parts the chute was red and yellow, which just doesn't sit right with my idea of a yellow and black rocket, I mean style counts after all (say what you want but you can stuff a big motor in an ugly rocket and it still comes back ugly...) What puzzled me the most was that I know Semroc produces a nice black & yellow chute pack... It just didn't make sense. Luckily I needed to order some stuff from Semroc anyhow (probably their plan all along) and with my black and yellow Semroc chute in hand, all was right with the world. The 12" chute is about right for this bird, although I have swapped it out for a 9" chute on windy days. I also added a small Nomex heat shield to protect the chute in place of wadding. In all cases so far, I've had no issues with deployment or recovery and the Magnum Hornet has come through without a scratch.
Flight Rating: 4 out of 5
Summary:
PROs: Classic 4FNC rocket with a great look, simple construction, and an awesome range of flying potential with the included motor adapter. This is a well thought out design, and Semroc has fielded another winner with this addition to their "Retro-Repro" fleet.
CONs: Kevlar shock cord is too short for my taste, and what's up with the red and yellow chute?!
Overall Rating: 4 out of 5
Other Reviews
- Semroc Magnum Hornet By Eldred Pickett (August 1, 2009)
This was my first Semroc kit, so it was all new. It's a reproduction of an old Centuri kit with a few updates. There is an exploded-view diagram so you can see how the pieces go together. It also serves as a parts list showing how many of each part should be there. The parts were well laid out. The fins came on a laser-cut balsa sheet. This rocket also has a balsa nose cone for all your ...
- Semroc Magnum Hornet By John "MAX" Venable (June 25, 2009)
Brief: A lightweight, fast flier possibly capable of supersonic speed. Construction: This baby was a fun build. I loved every minute of it. The kit contains high quality parts. A straightforward build, but I tweaked it. This kit was built entirely with epoxy with microballoons for added strength and sandability, so she can fly on AeroTech E-30s. I replaced the balsa fins with ...
- Semroc Magnum Hornet By Jason Orosco (May 31, 2009)
Brief: I'll try and repeat what's in the other reviews, the Semroc Magnum Hornet is Retro-Repro of the Centuri Magnum Hornet with a 18mm motor adapter and 12" cute replaces the Streamer and Kevlar ® thread/elastic shock cord replaces the rubber band from the old Magnum Hornet. Construction: The instructions are well written and easy to follow with quality parts, what ...
- Semroc Magnum Hornet By Peter Stanley (May 24, 2009)
Brief: The Magnum Hornet is a Semroc Retro-Repro of a Centuri model. It is designed for 24mm motors but includes an 18mm adapter. Recovery is via 12" parachute. I ordered my kit from Semroc directly and had it within two days. Construction: The kit includes a balsa nosecone, one BT-55 body tube, a 3/16" launch lug, water slide decals, an elastic shock cord, Kevlar ...
- Semroc Magnum Hornet By Jeff Lane (May 12, 2009)
Brief: Chan's build experience exactly fit my own so I'll try not to repeat. The Magnum concept is simple: large motor, small rocket, and it actually makes more sense today than it did when originally marketed. I got my kit from Apogee, and it was damage-free. Construction: It is extremely easy to build and all the components are of high quality. Smooth, perfectly formed nose ...
- Semroc Magnum Hornet By Chan Stevens (April 26, 2009)
Semroc has gone "retro repro" again, bringing out a modern reproduction of one of the last Centuri designs before the Damon Corporation consolidated their product line under the Estes brand. The kit, although a Centuri model, featured Estes parts in its day. The Semroc reproduction features laser-cut fins, a balsa nose cone, and upgraded Kevlar/elastic shock cord, plus includes a chute ...
 |
 |
Flights
|
|
M.G. (August 12, 2009)


|
|
D.F. (June 21, 2009)