| Construction Rating: | starstarstarstarstar |
| Flight Rating: | starstarstarstarstar_border |
| Overall Rating: | starstarstarstarstar |
| Diameter: | 2.34 inches |
| Length: | 39.70 inches |
| Manufacturer: | Semroc  |
| Skill Level: | 3 |
| Style: | Sport, Upscale |
Brief:
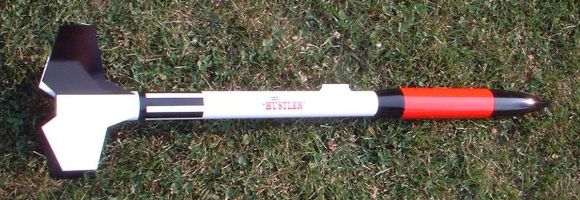
Just in time to grace the Arizona skies again at NARAM48, Semroc has brought back another classic Centuri design. This one was originally introduced in 1965. Like most of Semroc's other SLS (Semroc Large Scale) kits, this one is packed with features that make the kit much more of a value than one would think merely looking at the finished rocket and the $53 price tag. Featuring removable/interchangeable motor mount, baffled ejection gas containment, rip stop nylon chute, and interlocking fin design, this is a joy to build and fly.
Construction:
My kit arrived 2 days after I ordered online, carefully packed and in fine shape. Very impressive service, especially when the gang must have been busily packing for NARAM at the time.
Components are excellent quality (slightly more rugged than their modroc materials) and include:
- Balsa nose cone
- Payload tube
- Balsa Transition
- Baffle system
- Thick-wall body tube, pre-slotted for fins
- Laser-cut basswood fins
- 24mm motor tube assembly with metal hook (E-sized)
- Waterslide decals
- 24"nylon chute
- Kevlar and elastic shock cord
- 3/16" launch lugs
The thing I keep noticing as I build SLS kits is that they're so darned easy. I don't know if that's a pro or a con. On the one hand, for $30-$50 I expect to be busy for a while, and I really enjoy building complex kits. On the other hand, I really appreciate some of the time saving principles that have been engineered into these kits. There's also the giddiness of being able to fly something just a couple days after receiving it for the instant gratification crowd. For a great construction project, get a Mars Lander. For a cool rocket you can build and fly right away, go for this or the SLS Laser-X.
That said, instructions are typical Semroc, well written with plenty of decent illustrations and construction notes/tips. This is no worse than a skill level 2 on the 5 scale although using the mid-power motors certainly keeps this out of the kiddie market.
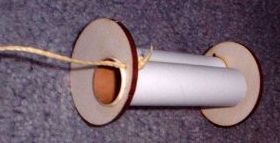
The motor mount assembly shares the same principle as the SLS Laser-X: removable via twist-lock so you will have plenty of options depending on conditions and field size. Unfortunately at initial release, there is only a single 24mm option. Surely 29mm and 3x18mm cluster options are right around the corner. Also, while this is the same basic idea as the Laser-X, these are not compatible. One would hope that there will be some standardization down the road, so that you don't have to keep springing for extra motor mounts with each kit.
To construct the motor mount, you follow the basic tube plus a couple of centering rings approach. In this case, the forward ring is notched to line up with the four fins and gets a couple tabs bonded to serve as stops when twisting. See my SLS-Laser X review for more detail on this concept.
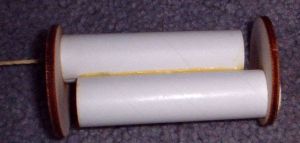
The baffle assembly is at least the third different design I've seen out of Semroc--they never stop innovating--although I've never had any problems with any of the previous designs either. This version consists of a pair of BT-20s bonded side by side but offset by 1/2". A centering ring slips down each one. Because the holes are so off-center, particles bounce off the centering ring while the gasses continue through the gap between the BT-20s and the body tube, eventually going back out the forward BT-20 and deploying the chute. It is very simple to construct and certainly effective.
As anyone who's ever built two-piece fins will attest, getting the two parts perfectly aligned and bonding flat can be an exercise in futility. Not so with the SLS series. The basswood pieces are laser-cut to precision and have interlocking tabs to prevent alignment problems. I love working with virtually grain-free balsa, but I still found it a pain to clean up the seam caused by a heavy glue line. I went with a yellow glue double-glue joint approach, but CA might have been a better choice, as it's certainly easier to sand and clean up.
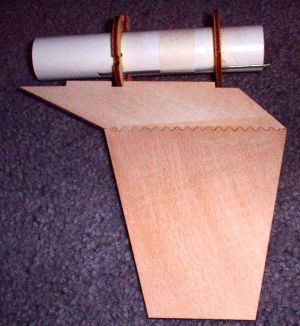 Fins are sort of through-the-wall but not the conventional approach where they tack to the motor tube. In this case, the tabs go through just enough to support the twist-lock motor mount. In order to make sure you get a solid bond, you'll not only need to fillet the outer seams, but also apply light fillets to the inside seams (but be careful not to get carried away and prevent the twist-lock from fitting). Believe it or not, Semroc even provides an extra long Q-tip just for this purpose. Nice touch.
The rest of construction goes pretty quickly--mount a couple of launch lugs on standoffs, anchor the Kevlar/elastic cord to the baffle assembly and glue in place, then piece together the transition/payload assembly. I invested quite a bit of time into filling the grain on the balsa cone and transition plus filling the relatively heavy spirals on the payload tube. This was well worth the time, as the finished product looks superb.
Finishing:
After lots of diluted wood filler applied to balsa and tube spirals, I started out with two light coats of Plasti-Kote primer, which sands off easily and has great filler properties, then two coats of Krylon white primer, which has a much thinner, and a smoother finish.
I followed up with a wet sand using 600 grit sandpaper then two coats of Rustoleum gloss white on the main body and fins. The payload, nose and transition got sprayed with Rustoleum gloss red. I then left everything to dry for 3-4 days and came back to finish up with the black on the two fins, the transition, and the nose cone. Three colors, two days, and only one masking session to get the job done.
Since the white was already fully cured at that point, I only needed to let the black dry overnight before removing the masking and applying the waterslide decals (while still careful not to handle the black areas). These decals are excellent quality--tough enough to work with a little although they really grab hold and stay put once you smooth them out. The clear portion is practically invisible, just the right blend against my gloss background.
Construction Rating: 5 out of 5
Flight:
The kit spec says 9.5 ounces but mine weighed in at 10.5 ounces (must have been all that filler). I decided a D15 might be a little wimpy, so went with an E28 white lightning, hoping to avoid the smoke buildup that tends to come from Black Jacks.
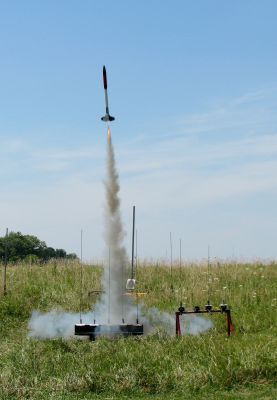
In the stiff 10-12 mph winds, this very overstable design weathercocked quite a bit, arcing over to almost 30 degree angle after leaving the rod. Had it flown purely vertical, the -4 would have been a bit too early, but given the weathercock it was OK albeit it cruising along pretty fast as it mostly arced over.
It was surprisingly fast liftoff, but I guess the Hustler name should have clued me in. However, I'd expected the 10.5 ounces and big fin area to result in a slower ascent.
Recovery:
Despite the weathercocking, I got a zipper free recovery. While I generally think the baffle would work fine, I'm still a bit paranoid and slipped in a little dog barf for insurance (having bought a bale a few years ago, I even sprinkle it on my breakfast cereal just so I stand some chance of using it before I die). The neon green chute sprang into action and brought the rocket gently back. Even with the weathercock, this wound up being my longest walk of the day, as the 24" chute is plenty for this kit.
Flight Rating: 4 out of 5
Summary:
PROs: Terrific materials, plenty of subtle innovations such as the interchangeable motor mount, interlocking fins and baffle system.
CONs: Lack of alternate motor configurations (for now).
Overall Rating: 5 out of 5
 |
 |
Flights
|
|
|
|
M.H. (May 15, 2009)