| Construction Rating: | starstarstarstarstar |
| Flight Rating: | starstarstarstarstar |
| Overall Rating: | starstarstarstarstar |
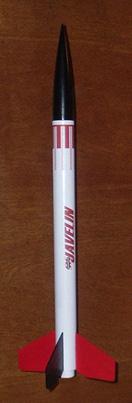
| Diameter: | 1.34 inches |
| Length: | 22.30 inches |
| Manufacturer: | Semroc  |
| Skill Level: | 2 |
| Style: | Sport |
Brief:
Centuri's original "Large Scale" rockets were called "high
power" kits in the late 1960s and early 1970s, which used thicker-walled
body tubes along with hard balsa fins and nose cones. Semroc's "SLS"
series, which we now call "mid power" rockets, is based around these
sturdier parts allowing "much more robust construction designed to last
for years of flying," as Carl McLawhorn puts it in the SLS Javelin's instruction
booklet.
Carl announced at NARAM 46 that he was preparing to release 175% versions of several of his current model rockets. The SLS ("Semroc Large Scale") Javelin was the first of Semroc's upscale line.
Construction:
Parts list:
- Body Tube LT-125157, 15.75" L
- Body Tube LT-11555, 5.5" L
- Balsa Nose Cone BC-12561, 6.125" L
- Laser Cut Fins FLV-16
- Thrust Ring TR-115
- Launch Lug LL-330, 1/4" dia., 3" L
- Screw Eye SE-10
- Elastic Cord EC-236, 1/4" W, 36" L
- Kevlar® Thread SCK-24
- Nylon Parachute PN-18, 18" dia.
- 24mm Engine Mount EM-9115 (includes ST-950, 5" L)
- Decal DKLV-16
- Snap swivel (not included) for parachute
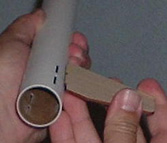
The default 29mm engine mount will fit F25-9 motors and up. After losing my original Semroc Javelin on a C6-5 I decided to stick with a 24mm engine mount, which would enable me to fly with C11-5 through E9-8 motors. Yellow glue is my fixative of choice, even for A-C powered rockets. I assembled the engine mount, which has an "E" length engine lock (a major bonus, as far as I was concerned). A spacer tube allows 2.75" (70mm) long C and D motors to be used, and when removed, makes room for 3.75" (95mm) long E motors.
While I was waiting for the motor mount to dry, I sanded the nose cone smooth. I applied Minwax Wood Hardener and let the nose cone dry. The 29mm engine mount (the LT-115 body tube) used the standard Kevlar®/elastic cord shock cord attachment, but I trimmed the Kevlar® thread to 14 inches long, to avoid "zippering."
I sanded the basswood fins smooth and decided to skip the filling and sanding steps, since the finish seemed very smooth. One of the fins didn't seem to fit into the laser-cut fin slots in the LT-125 body tube, but since the fins were all identically cut, that final set of fin slots may have been cut a tiny bit differently than the others.
The instructions say to first install the 29mm engine mount and then install the fins right away. I tried that procedure but while the fins seemed to go on okay, I ended up pulling the engine mount out of the body tube not once, but twice because the yellow glue didn't have enough time to "grab" the body tubes. It seemed as though the body tubes didn't fit into each other as tightly as I expected them to.
I had assumed the slotted body tubes would provide a perfect fin alignment, given the "Into The Wall" fin tabs, but that wasn't the case at all. I recommend that you glue the 29mm engine mount into the main body tube and allow it to dry for 24 hours. (WARNING: If you want to commit to a 24mm engine mount like I did, glue it into the 29mm engine mount before installing it in the main body tube.)
I ended up squirting a substantial amount of yellow glue inside the LT-125 between the fins installed in their slots, to ensure there would be plenty of "gripping," despite the apparent amount of play (looseness) in the body tube tolerances. After the engine mount was installed for the third time, I once again used my "old school" Estes fin alignment guide to straighten the fins out. I dipped the launch lug in thin CA, let it dry, and then cut the ends of the lug at a 45 degree angle before gluing it on the body tube.
I sanded the excess Minwax Wood Hardener from the nose cone, then filled and sanded the cone. I sprayed a coat of primer and sanded it, following with two spray coats of Krylon gloss black paint.
Finishing:
Because Semroc's "LT" body tubes have a wall diameter of 0.40",
nearly twice that of their standard "ST" tubes, I dispensed with the
usual pre-assembly primer coats. I painted the body tube and fin assembly with
one coat of Krylon gloss white paint, and sanded the fins before masking them
off. I replicated the paint scheme from my original Semroc Javelin, which
appears in the 1972 Centuri catalog, applying Krylon gloss black to 2 opposing
fins, and Krylon gloss red to the 2 remaining fins.
When it came to applying the decals, only a 1/4" square of the backing paper was resistant to soaking up water at one corner of the roll pattern. Thankfully, Semroc's decal film is exceptionally beefy and easily stood up to my persistent pulling. I sprayed a final clear coat of Premium Decor Clear Acrylic (Gloss) from True Value Hardware.
Construction Rating: 5 out of 5

Flight:
I packed the car, left Twin Falls, Idaho, and headed for the late August 2004
Tripoli Idaho launch in Fairfield. On the way, I stopped off in Shoshone to
pick up my 18 year old nephew Jeremy Haught, who was to be my secondary
tracker.
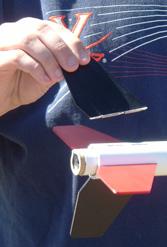
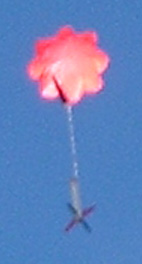
I was concerned that the 18" 1.9 oz rip-stop nylon parachute might be a little big for the SLS Javelin, but with a total weight of 3.3 ounces, the chute proved to be just the right size. And since I wanted to make sure I got this Semroc Javelin back, I limited its first 3 flights to C11-5 motors. After prepping, the rocket put in a perfect first flight except it landed on a packed dirt road, which broke a black fin off.
 I wandered
among the gathered Tripoli rocketeers and they steered me to "Idaho
Joe" Bowen of Idaho Rocketry. Joe was kind enough to introduce me to the
wonders of "Zap-A-Gap CA+" by Pacer, which is medium viscosity CA
that "allows 7-10 second for part positioning" and "averages 20
seconds [for] curing." This proved to be absolutely ideal for this repair
and I used the CA for fillets on the broken fin as well.
I wandered
among the gathered Tripoli rocketeers and they steered me to "Idaho
Joe" Bowen of Idaho Rocketry. Joe was kind enough to introduce me to the
wonders of "Zap-A-Gap CA+" by Pacer, which is medium viscosity CA
that "allows 7-10 second for part positioning" and "averages 20
seconds [for] curing." This proved to be absolutely ideal for this repair
and I used the CA for fillets on the broken fin as well.
After letting it set for about half an hour, I prepped the Javelin for its second flight. While it was waiting on the pad, a gust of wind which must have been 25 miles an hour blew the entire "Estes" size launch rack over, which broke a neighboring red fin off the Javelin. Another CA repair and I returned the rocket to the launch pad...where I discovered the launch lug was still on the launch rod! I burst out laughing, looked up "Idaho Joe" again, and glued the launch lug back on.
The bond took almost immediately, and while the lug was somewhat crooked, the second flight was great, too. The wind had picked up slightly, but the third flight was also very nice. I got plenty of encouraging comments from the gathered rocketeers and the C11-5 flights were all low enough that everyone could see the entire flight profile.
Recovery:
PROs: 1/4" elastic shock cord is perfect size, engine lock prevents
ejection charge from kicking motor out.
CONs: Fin attachment somewhat fragile for landings on hard surfaces.
Flight Rating: 5 out of 5
Summary:
PROs: Mostly sturdy construction (except fin joints), excellent flights even
just on C11-5s, and a real beefy upscale of the classic Centuri Javelin!
CONs: Body tube tolerances seem somewhat large, allow plenty of drying time for 29mm engine mount before installing fins, and the Kevlar® cord length a bit long (but easily trimmed).
I had to learn some new construction techniques for this size of rocket, but the experience reminded my of my initial Centuri days.
Oddly enough, in my former incarnation as a rocketeer, I never bothered to spend a lot of time in the "Large Scale" section of the Centuri catalog. Now as a BAR, I think Semroc's "SLS" upscale series has addressed my frustrations with sometimes flimsy model rocket body tubes. Already, Bill Eichelberger is itching to build a 1.48X upscale Centuri Groove Tube using Semroc's "Large Scale" parts, starting with a 20" long LT-125. While I haven't asked Carl McLawhorn directly, I'm sure he'll eventually begin offering a full line of SLS parts...and then the fun will begin.
Overall Rating: 5 out of 5
 |
 |
Flights
|
|
|
|
P.M. (January 26, 2007)