| Construction Rating: | starstarstarstarstar |
| Flight Rating: | starstarstarstarstar |
| Overall Rating: | starstarstarstarstar |
| Diameter: | 1.84 inches |
| Length: | 29.80 inches |
| Manufacturer: | Semroc  |
| Skill Level: | 2 |
| Style: | Payload, Sport |
Brief:
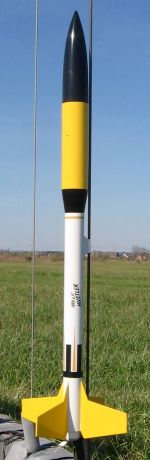
Depending on how you look at it, this is either a downscale to the upscale SLS Huster or an upscale to the downscaled Centuri KF-8 Lil' Hustler. Either way you're gonna want to look at it, as it's a beautiful mid-sized rocket and at $35, it won't hit you quite as aggressively in the wallet as some of the other SLS series kits.
Construction:
The components for this are top notch quality and include some very nice features for the price. Comparing it to the larger SLS Hustler, you basically get the same stuff although the Lil' Hustler lacks a baffle system, single piece fin construction, and instead of a twist-lock motor mount, the kit offers a 29/24mm adapter instead.
Parts include:
- Balsa nose cone
- Balsa transition
- Payload bay (1.84")
- Body tube, slotted (1.34")
- Laser-cut basswood fins (4)
- 29mm motor tube with block
- 24/29 adapter kit
- Kevlar/Elastic shock cords
- 18" nylon chute
- Waterslide decals
Instructions are excellent--clearly written, easy to follow, and contain plenty of illustrations. This would rate about a skill level 2 kit on the 5 scale and can be built fairly quickly--maybe a long afternoon plus a couple days for painting. There are 20 construction steps listed, spanning about two 8.5" x 11" pages.
The motor adapter is a pretty simple job, consisting of two short outer tubes that slide over a 24mm motor tube. These in turn fit snugly in the 29mm tube. Worth noting though, is that the 24/29 adapter includes a metal retaining clip, while the 29mm tube does not--you'll need to friction/tape either this adapter or a 29mm motor in place to fly.
For the 29mm motor tube, you basically just anchor the Kevlar line to a thrust ring, glue it inside the end of the 29mm tube, and you're done.
Fins are already laser cut and mount through the wall in the pre-slotted tube. All that's needed is a little light sanding for finish, then some decent wood glue fillets. The tabs are about the same length as the body tube thickness, as the motor tube mounts directly inside the body tube without needing centering rings.
Launch lugs are mounted on the lower body tube using laser cut standoffs to clear the payload.
The payload is standard--glue the payload bay tube to the transition then either friction fit or glue the balsa nose cone to the top. I went with friction fit so that I could actually use the payload bay.
Mount the screw eye anchor to the transition then rig the nylon chute, and you're ready for painting.
Finishing:
This was a breeze to finish even though it's a three color scheme. I went with three light coats of primer, sanding in between to get a nice spiral/grain free appearance. Between the basswood and the fantastic tubes, there's very little prep work needed (although the balsa nose and transition sucked down some Fill 'n' Finish).
The main base coat was Rustoleum gloss white. After allowing plenty of time to cure, I masked off the body tube for painting the fins yellow, painted the payload bay yellow on its own, and painted the balsa nose and transition black on their own (gluing the transition to the payload bay after painting).
There's a little roll pattern waterslide decal along with a name label. Semroc decals are great to work with--tough enough to slide around a bit for alignment and their clear seems to be invisible on just about every paint I've used.
Construction Rating: 5 out of 5
Flight:
For the first flight, our club was graced with one of those absolutely perfect spring days that almost compensate for the months of canceled launches due to rain, snow, wind, and plagues of soccer moms. Winds were dead calm by Midwest standards (3-5 mph), and I went with the relatively modest E9-4 (the -6 was recommended).
According to the altimeter I slipped into the payload bay, my flight was 839 feet versus the predicted altitude of 1150, which indicates to me that Semroc uses RockSim predictions without drag compensation/adjustments. My rocket weighed in at 6.1 ounces versus the spec'd 6.0, and flew dead straight with no spin. Knowing it won't quite hit the altitudes listed on the header card will give me the confidence to start moving up to full Es and what I think will be a magnificent motor for this: the AT-F12 reload.
Recovery:
The 18" nylon chute brought her down gently without a scratch. It was a nice day-glo yellow and looks so sharp in the sky.
Flight Rating: 5 out of 5
Summary:
This is just a great all around rocket. If it weren't against the rules, I'd even say it's a fine design for the TARC egg lofting challenges, capable of carrying a couple eggs safely, and designed for either 24 or 29mm motors for maximum flexibility. You TARC kids out there would do well to look over this and model yours after it.
Overall Rating: 5 out of 5
Other Reviews
- Semroc SLS Lil' Hustler By Bill Eichelberger (June 13, 2007)
Anyone with an appreciation for model rocket history should love this kit, which is a slight upscale of a late 60's/early 70's Centuri payload bird with large engine capability. In updating the kit, Semroc has added through-the-wall fins of laser-cut basswood and a Kevlar shock cord. Everything else remains pretty much the same, as well it should. The parts list: BC-17567 balsa nose ...
 |
 |
Flights
|
|