| Diameter: | 1.64 inches |
| Length: | 15.20 inches |
| Manufacturer: | Semroc  |
| Skill Level: | 2 |
| Style: | Futuristic/Exotic, Glider |
 Brief:
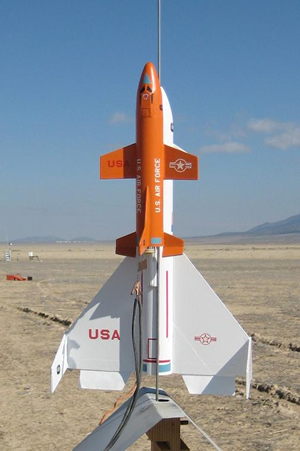
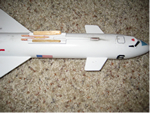
The Semroc Space Shuttle is a faithful reproduction of an old (OOP) Centuri kit that was introduced in 1971. It is a close approximation to the original full-scale model. All fins and rings are precision laser-cut balsa and sturdy fiber. The plastic nose cones are replaced with much lighter balsa reproductions.
Construction:
The instructions are well written and easy to follow with clear drawings for the most of the 53 steps. For a small model this kit can take a lot of time depending on what you want to do.
All of the parts are good quality including the balsa wood. I decided to coat all the balsa fins with CA, which took time.
A friend had told me that Golden Mediums GAC 100 Multi-Purpose Acrylic Polymer was good for filling balsa by spreading it on with a stiff piece of plastic like and old credit card. I tried this material, but I’m not sure that it helped that much. After painting most of the balsa grain has disappeared on the both nose cones and the orbiter fins, but some grain can be seen on the booster wings.
I decided to hollow out the nose cones, but the instructions do not call for this procedure. I later found the model to be unstable in flight, but it is hard to believe that this amount of balsa could equal all the lead weight that I later added. In order for the pop-pod to work correctly the glider nose cone must be glued in.
Conceivably, the nose cone on the booster could be left unglued for booster flight trimming. I did not want the gap to show, so I glued both nose cones to their body tubes. Steps 7 through 10 establish the location of the wood dowels on the booster for attaching the orbiter. Follow these steps closely. 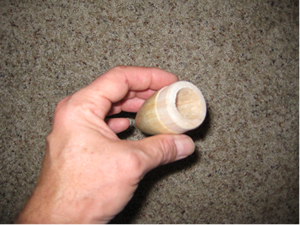
Especially, follow Step 10, which states that the pieces must be within 1/16” of the specified locations. Later, after painting I found that I had to sand and trim some of theses parts with an X-acto knife to make them fit properly. I put a small silver mylar adhesive strip on the aft motor mount tube under the engine hook. This should be done just before Step 18.
Step 19 turned out to be the most difficult for me. I followed the directions in Step 19 and put a small amount of wood glue in the top end of the engine tube and proceeded to slide the thrust ring (motor block) down to the engine hook. However, the glue had soaked into the body tube and the thrust ring actually tipped over in the process and hung up. Luckily, I had a long stick available in the workshop. I put the stick through the opposite end of the body tube and pushed the thrust ring out. Needless to say, the next time I repeated this step, I used a wood dowel and placed the glue down by the engine hook before I slid the thrust ring into place.
Finishing:
This shuttle concept reminds me of the Monogram plastic models that Willy Ley, a German rocket scientist, help advertised back in 1958. The model consisted of a large winged booster on the bottom and a winged orbiter vehicle on top.
The booster had a bright red color. The Semroc directions show a yellow orbiter on top of a white booster, which is probably consistent with the original Centuri configuration. I was taken to making an orange orbiter, probably from my recollection of seeing some Bell X-1 models painted orange. I used the old Rustoleum rust colored primer, which was very difficult to cover with the new Krylon gloss pumpkin orange that came out about a year ago.
After 5 coats or more I succeeded in covering the primer with the Krylon orange. The covering power of the Krylon was not good and it had a tendency to be transparent. The booster and orbiter weights from the instructions are listed to be 1.5 oz. and 0.5 oz., respectively. My painted and finished booster and glider weights turned out to be 2.5 oz. and 0.5 oz., respectively. I did not use all the Semroc decals and preferred to use some different decals that I had in my inventory.
Flight:
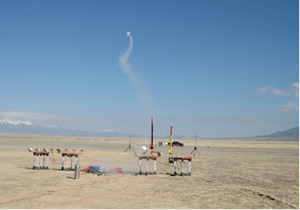
The first flight with an Estes C6-3 proved to be unstable and the Shuttle fishtailed badly without gaining much altitude. The altitude was only about 50 feet and the motor pod ejected on the ground. Only one fin was broken and it was easily reattached with super glue gel.
The second flight was again with a C6-3, but this time I epoxied about 0.5 oz of lead weight behind the forward bulkhead on the motor pod. I bought the lead weight at a fishing tackle store. It comes in a coil and is referred to as No. 1 3/16” hollow. This time the shuttle took off to about at an altitude of 20 feet and flew vertical to the ground. Again, the motor pod ejected on the ground and one fin broke off and was easily reattached.
For the third flight with a C6-3 I added about another 1 oz. of weight. This time I epoxied a wooden dowel as a boom to inside of the motor pod. Since I had hollowed out the nose cone of the orbiter, I had room to move the lead weight forward. I also noticed that the orbiter was a little bit loose on top of the booster, so I added some balsa shims that removed the wobble. On this flight the Shuttle flew straight and had enough altitude about 120 feet to eject the motor pod. The booster did glide for a very short distance before landing, but the orbiter did not glide very well. 
Care needs to be taken in flying away from spectators, because the pod does fall fast. I am now planning to attach a small 8” square parachute to the pod. Also, I am planning the next launch with an Apogee D10-3, which is the same size as the Estes C6-3.
 |
 |
Flights
|
|
R.A.M. (December 13, 2009)
Nathanael Yarger (June 27, 2013)
I'm pretty new to boost gliders and was considering getting this but I have one question (maybe an obvious one): wouldn't it make much more sense to use a 24 mm motor mount in the larger booster since it has a larger wing area and should be able to support more weight before the engine assembly pops out rather than the 18 mm motor on the smaller orbiter which would support less weight before the motor mount is released?
|
|
M.A.,. (December 4, 2009)