| Construction Rating: | starstarstarstarstar_border |
| Flight Rating: | starstarstarstarstar_border |
| Overall Rating: | starstarstarstarstar_border |
| Diameter: | 0.76 inches |
| Length: | 13.75 inches |
| Manufacturer: | Semroc  |
| Skill Level: | 2 |
| Style: | Clone, Glider |
Brief:
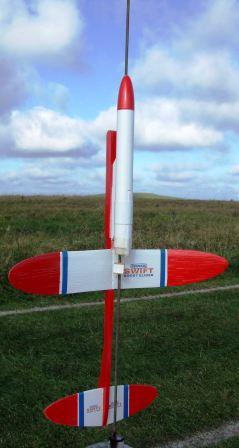
With the introduction of the Swift, Semroc has now added a conventional boost glider to their fleet, and one easy
enough for even a nove modeler to build and get flying reasinably well. Based upon the 1969 Centuri design, this
"retro repro" features laser-cut parts to speed up construction, as well as Kevlar®/elastic
shock cord on the pod to improve the durability.
Construction:
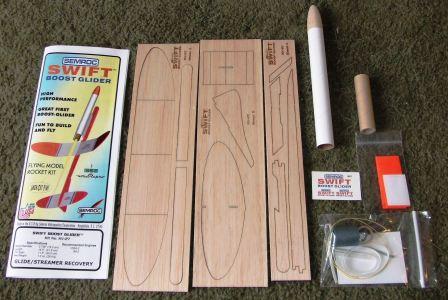
Semroc kits feature top quality parts, and this kit is no exception. Your $14.50 (retail) gets you:
- Balsa nose cone
- BT-20 body tube
- CR-18/13 motor blocl
- Metal motor hook
- Laser cut wing, stabilizer, rudder
- Laser cut fuselage
- Streamer
- Kevlar®/elastic shock cord
- waterslide decal
 The
instructions are well illustrated and generally well written. This is rated a skill level 1 kit by Semroc, though I'd
suggest it's a bit closer to a 2 just due to some of the nuances of building a polyhedral wing and trimming the glider
for good flights. Depending on how much time, if any, you invest in trying to airfoil the wing, you can expect
construction to take between 2 and 4 hours plus finishing.
The
instructions are well illustrated and generally well written. This is rated a skill level 1 kit by Semroc, though I'd
suggest it's a bit closer to a 2 just due to some of the nuances of building a polyhedral wing and trimming the glider
for good flights. Depending on how much time, if any, you invest in trying to airfoil the wing, you can expect
construction to take between 2 and 4 hours plus finishing.
The wing is built from a set of 4 laser-cut pieces. That certainly takes a good deal of the work and sloppiness out of trying to hand cut the swept eliptical pattern. I'd point out, though, that the illustration that points out the leading and trailing edges, due to the perspective view, makes it a little tricky to figure out that the straighter edge is leading and the swept edge is trailing. A beginner might not have the exerience to figure that out.
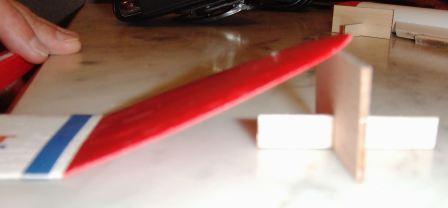
Since this is a polyhedral, there will be 3 angled joints for the 4 pieces. To help establish the correct
 dihedrals,
there are 2 slick little braces made from laser-cut balsa. In my case, the slots to accept the cross braces were a
little too tight, so I had to shave them a bit to widen the gap. The taller of the two braces is used for the outer
dihedral (between the inner wings and wing tips), and the smaller brace is used for the inner dihedral. To get a really
good glue joint, it's important to rough sand each surface angled for the dihedral. While the directions suggest this,
they overlook one handy tip--sand one surface perpenticular (90-degree) and use the brace to support the other piece at
an angle and using a sanding block sand the bevel to that side.
dihedrals,
there are 2 slick little braces made from laser-cut balsa. In my case, the slots to accept the cross braces were a
little too tight, so I had to shave them a bit to widen the gap. The taller of the two braces is used for the outer
dihedral (between the inner wings and wing tips), and the smaller brace is used for the inner dihedral. To get a really
good glue joint, it's important to rough sand each surface angled for the dihedral. While the directions suggest this,
they overlook one handy tip--sand one surface perpenticular (90-degree) and use the brace to support the other piece at
an angle and using a sanding block sand the bevel to that side.
Before bonding my wing pieces, I decided to sand in a decent airfoil first, then CA'd the pieces together rather than go through 3 different overnight waits for wood glue to cure well enough to hold the dihedrals.
The fuselage is built from 2 separate pieces fit together with a tongue and groove. At first I was concerned about the structural integrity of this, but then discovered that there are thin balsa cover pieces that close off the slot where the pod pylon slips in, and these wind up forming a reinforcing skin over the joint, so all should be fine.
With the fuselage joined and the covers in place, I then tacked the tail and rudder together, again aided by excellent laser-cut notches to ensure proper fit and alignment. The rudder/tail assembly is then tacked onto the aft end of the fuselage, and the wing tacked on about midway. It will probably look funny, as though the wing is too far back, but it's a fiarly small wing and this needs a lot of nose weight for proper balance, so the fuselage is quite extended, serving as ballast.
The pod is quite simple, typical of conventional pods. The BT-20 serves as motor and body tube, with a centering ring motor block anchoring the Kevlar® shock cord and a metal hook for motor retention (hel in place by an external coupler sleeve). There is a pylon for latching onto the glider, which is built up from two pieces of balsa, one of which is notched perfectly to fit over the coupler sleeve on the body tube for accurate placement. The elastic and nose cone, with streamer, go on next compelting the construction.
Finishing:
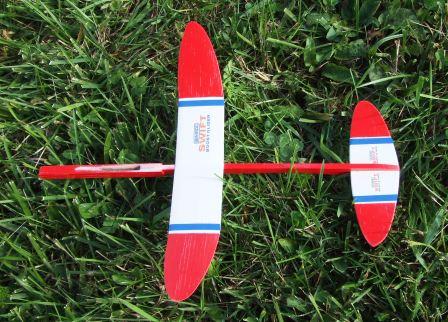
Normally I don't add finish to gliders, as the extra weight tends to diminish performance, and at most apply a thin
cover of sealant or dope. In this case, though, given the waterslide decal and cool looking color scheme on the cover
art, I decided to go ahead and paint it. I hit everything with a couple coats of white primer, followed by a single
coat of gloss white. After allowing a day for the white to dry, I then masked off the inner portions of the wing, the
middle of the stabilizer, and the pod and painted everything else red. I followed up with a little blue pin striping
I'd picked up a few years ago at a local hobby shop. The wateslide decals provided the finishing touch.
I should emphasize, though, that I went very light on the paint and did not use any filler. I suspect John Lee's glide/trim issues could be related to the added weight of a heavy finish job. In my case, the booster and glider prepped for flight, even painted, still weigh in at just under an ounce (27 grams).
Construction Rating: 4 out of 5
Flight:
I'm not sure why the recommended motors jump from 1/2A6-2 to B4-2, skipping over A's, but suspect it's because of the
3 second delay on A8's which might be a little too long. I went with the 1/2A6, fearing the B would send the glider
high enough to drift away in the 8 mph winds.
The 1/2A boost was almost comical, though--altitude of maybe 75-100 feet, deployed just at the end of the coast phase, and a clean transition though I nearly managed a Red Baron on the long streamer.
Recovery:
 Since I was
flying solo, I was a little worried about trying to track both the pod in tall grass and the glider, but caught a
break. The pod cam down so close to the pad area that it almost hit me on the head. The glider transitioned fairly
quickly into a nice level glide (I did not need any nails or weight for balancing), and circled into the wind. This is
where the flight got sort of comical, as the glider was oriented facing into the wind, but the wind was winning the
battle a bit. At first the glider merely hovered for maybe 5 seconds, then started drifting backwards a bit, finally
pulling away into a left turn. It circled twice before setting down for an overall flight of about 40 seconds. Not
exactly a slope soaring model, but commendable first flight.
Since I was
flying solo, I was a little worried about trying to track both the pod in tall grass and the glider, but caught a
break. The pod cam down so close to the pad area that it almost hit me on the head. The glider transitioned fairly
quickly into a nice level glide (I did not need any nails or weight for balancing), and circled into the wind. This is
where the flight got sort of comical, as the glider was oriented facing into the wind, but the wind was winning the
battle a bit. At first the glider merely hovered for maybe 5 seconds, then started drifting backwards a bit, finally
pulling away into a left turn. It circled twice before setting down for an overall flight of about 40 seconds. Not
exactly a slope soaring model, but commendable first flight.
Flight Rating: 4 out of 5
Summary:
I share the opinion that this would make a good beginner's glider. The laser-cut parts and dihedral jigs simplify
construction, and if built to the instructions it seems to come out trimmed fairly well. I do think the pod streamer is
a bit larger than necessary, and while that makes finding it easier, it also adds risk of tangling up with the glider.
Overall Rating: 4 out of 5
Other Reviews
- Semroc Swift Boost Glider By John Lee (September 28, 2009)
Brief: Retro Repro, Boost Glider, 18mm The Swift BG is one of the new kits released by Semroc for NARAM 51. It is a reproduction of an old Centuri design. Although I have had terrible luck with gliders, something prompted me to get started on this one right away. It might be the one to break the jinx. I ordered mine as soon as it was availible and in typical Semroc Time Warp ...
 |
 |
Flights
|
|