| Construction Rating: | starstarstarstar_borderstar_border |
| Flight Rating: | starstarstarstarstar_border |
| Overall Rating: | starstarstarstar_borderstar_border |
| Published: | 2011-03-30 |
| Diameter: | 2.22 inches |
| Manufacturer: | Semroc  |
| Skill Level: | 4 |
| Style: | Scale |
 (Large).jpg) Brief
Brief
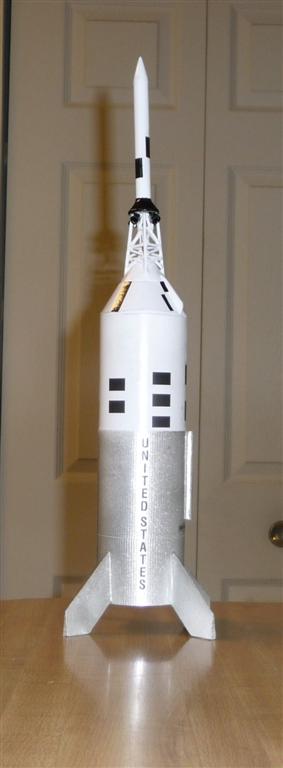
This 1/70 scale Little Joe II is one of Semroc’s “Retro-Repro” line of kits. It includes a separately bagged Apollo capsule kit and is billed as a Skill Level-4 “Master” kit. The base rocket is probably a ‘3’ but in my book the capsule is a ‘5’. I guess it all averages out. This rocket flies on 18mm motors and recovers on a single parachute. Specs: 14.6" x 2.217" - 1.9 oz.
While I know you will enjoy reading my review, if you really want a good, detailed, photo-documented tutorial on how to build this kit, I recommend Chris Michielssen's blog. Read my review to get a general idea about the kit and read Chris' set of posts as you build yours.
Components
The detailed list of parts is provided in other EMRR reviews, so I won’t repeat them here. The balsa and card stock components are laser cut and precise. This is good because there are lots of small details. I am glad that I never tried to build one of these from raw balsa stock!
The instructions are good but you definitely need to think your way through them. Experienced skill level 5 builders may not have any issues, but we level 2/3 types have room for error. There are several places that warranted a few more details.
Construction
The build starts with the motor mount which is employs typical tube, rings, block and hook construction. The twist Semroc adds is that the Kevlar leader is tied in a loop and placed under the motor hook. This seems to be a great mounting method, especially when the hook is held firmly down by a centering ring.. I also glued a small piece of scrap card stock just below where the hook is mounted to keep it from pulling backward. With the upper centering ring holding the hook in place, I doubt if this would be an issue but I added it anyway.
The wraps are put on next. This was pretty simple. Mine fit perfectly and I got them on with only a spot or two of glue on the outside.
Each fin is built up from a card stock wrap and 5 precision-cut balsa components. You can’t praise Semroc’s laser cut components enough! I scored the center line of the wraps with a screw driver blade on my Leatherman multi-tool. I usually use a ball point pen for this, bit used what I had within reach. Tightbond Molding and Trim Glue worked very well for the fins. It is thick and tacky and all the parts stayed in place well. There were small gaps where the balsa braces meet, which were easily plugged with Fill’n’Finish. The resulting wedge shaped fins look great.
Stick the mount in, the fins on, and attach the lug...voila the base rocket is done. Then things get fun...you have to build the capsule! Some parts of the capsule are straightforward, i.e. the launch escape tower is made up of a small cone, tube, and flared balsa transition. The core of the capsule is a made from a balsa cone and a card stock shroud. This SHOULD have been easy but I had build fever and forgot to re-read the main instructions, which include several modifications to the capsule. I forgot to build the capsule with the decorated surface on the inside. The Little Joe II flights mostly flew boiler plate capsules and even the one actual capsule was not trimmed like the operational ones. Luckily, this goof was self-correcting - you paint the capsule anyway!
The difficult part is, of course, building the escape tower. You are provides four 1/12” (.083”) dowels that have to be sanded to 0.058 and 0.041. While I met this step with trepidation, it turned out to be easier than expected. I didn’t follow the technique presented in the instructions. Instead, I set the dowels on my cabinet door/sawhorse bench and sanded as I slowly rolled the dowel. I sanded about 60% at a time with sweeping motions towards their ends.
I first cut all the dowels required for the main struts. I carefully laid them out in order off to the side. The kit includes template guides. The instructions have you pin them down during assembly. I pinned them to scrap foam board and added extra pins at the ends of each vertical member. Once the Tightbond Trim and Molding glue was dry on the perpendicular cross-pieces, I added the diagonal pieces. These were then inserted into the laser cut alignment jig where the remaining side struts were added. So far so good.
The tower has a set of internal struts that are assembled using the ‘v’ shaped guides on the template. There isn’t enough of the thinner dowel to complete all these pieces so some more sanding is required. You assemble two subaasemblies from the assembled ‘v’s and a cardstock ring. The template also includes guides to help, but I had a hard time with this step. The cuts have to be uber precise.
The assembly jig mentioned above also used to notch the base of the escape motor and the top of the capsule to accept the tower legs. The positioning of the capsule jig is critical so, after I had it positioned, I added some light pencil marks. I removed the jig and measured the distance of each to the rim of the capsule shroud. Once I was convinced the jig was positioned properly, I used a small drill bit to form the notches.
Stacking the escape motor, tower and capsule was simple. The final steps were adding the balsa stabilizing plates that are included in the main kit and forming the escape motors nozzles. The inside of the nozzle shrouds are oddly "S" shaped. This odd shape provides the proper angle to the base but also indicates that the shrouds must be wrapped twice. This wasn’t obvious to me but luckily I had help. I formed mine around the tip of a pen before gluing them together.
I didn’t heed the advice of other builders and used Trim and Molding glue to build the tower instead of thick CA. What started as smallish looking bumps looked awful when primed. I used a fine tipped grinder on my Dremel to clean them up. Also, don’t drop the model on the tower. I dropped mine twice. This does NOT help with tower alignment!
In the end, some parts of the build were easier than expected and others, that I thought would be simple, weren’t. I personally didn’t enjoy the tower details, but your mileage may vary.
Finishing
The stock paint scheme results in a model of the first Little Joe II Qualification Test Vehicle. If you are going to follow this scheme, I recommend that the sub-assemblies be painted prior to being joined. I chose to vary somewhat and used a 'parts is parts' mishmash. Per ROTW:
* From the wraps down it is basically be the QTV (i.e. silver with the USA decals). ROTW doesn't show the black stripes specified in the instructions, so I'm not putting them on. It does show white fins in one view. Mine will be all silver. So, this part itself is a mixture.
* The upper body will have the stock decals but will be white like the later rounds. The decal is obviously from the QTV.
* The capsule will be per round A-001 with the BP-12 capsule. But, with the vanes that appeared on the QTV. I could have taken the vanes off, I guess.
* The abort motor will be per round A-004/Spacecraft 002.
The white is Krylon white, the silver is Rusoleum Titanium Metalflake, the black trim is vinyl pin striping, and the bottom of the escape motor is brush-on Testors. The final insult was that one of the 'United States' decals strips stuck in place prematurely so it's a tad wavy. I gave it an over spray with a clear coat to protect the decals.
Flight
The kit comes with two 12” ‘chutes, one in the base kit and one with the capsule kit. However, I decided to keep it simple and use a single ‘chute.
I chose a Quest B6-4 for the first flight and stuffed in a big ball of wadding (Quest paper wrapped around dog barf). The flight was good with ejection just past apogee.
Recovery
Unfortunately, the escape tower rebounded into the body and the top of the tower broke off. It was found and I noticed it took a layer of the balsa cone with it. I'll reattach it, touch up the ding, and will switch back to the two 'chute configuration for the next flight. Sometimes it pays to follow the manufacturer's instructions! (I won't count the broken tower as a problem.)
Summary
This is one of the more challenging kits that I’ve built. If you are a skilled, patient builder, this kit should result in a great looking, scale rocket. However, I’m not used to such small, detailed parts and I had my share of issues. Mine looks fine from a distance and at the proper angle. Nevertheless, I like the Little Joe II and this is a welcome addition to my fleet.
Other Reviews
- Semroc Little Joe II By Chan Stevens (January 1, 2007)
Brief: This is another excellent addition to Semroc's "Retro-Repro" line of reintroduced classics from the early years of model rocketry. The LJ-II was issued in 1968 as a companion to the 1/70 Saturn 1B, making it almost as old as I am. As with the original Estes kit, this one shares the same command module, which is also available as a very nice separate kit. At $21, it's ...
 |
 |
Flights
 (Large).jpg)
.jpg)
|
|