| Construction Rating: | starstarstarstarstar_border |
| Flight Rating: | starstarstarstarstar_border |
| Overall Rating: | starstarstarstarstar_border |
| Published: | 2010-11-27 |
| Manufacturer: | Semroc  |
Brief:
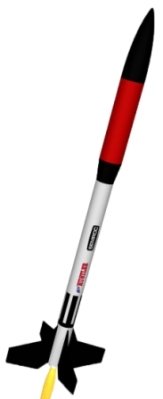
This is #8 of 10 "ready to build" models released by Semroc at NARAM-52. The Mini Hustler is based upon the Lee Piester/Centuri large scale series design but downscaled to fly on 18mm motors. This could also be considered the little brother of Semroc's SLS Hustler and Lil' Hustler models.
Construction:
Parts were excellent quality, and the sealed bag contained:
- Balsa nose cone
- Series 10 slotted body tube (1" ID)
- Series 13 payload bay (tube, balsa transition)
- Series 10 booster tube
- 18mm booster motor mount (tube, metal hook, centering rings)
- TC-10 coupler
- Series 9 stuffer tube (1" OD)
- 18mm motor mount (tube, metal hook, centering rings)
- Laser-cut balsa fins (2 sets of 4)
- Elastic shock cord
- 12" plastic chute
- Waterslide decals
The "ready to build" series is Semroc's answer to numerous requests for "ready to fly" rockets. In the RTB series, the modeler still has to actually do work to build and fly the model, but the design includes a number of features that simplify the build process, including slotted body tubes for thru-wall fin mounting, an alignment jig, and a stuffer tube to serve as shock cord anchor and reinforce the body tube.
The RTB series are all fairly easy to build, with almost all of the construction process using the same standardized steps. This is definitely a skill level 1 model, and aside from paint and surface prep, the total build is well under an hour.
The motor mount is a standard BT-20 tube, metal hook, and a pair of centering rings. Unlike the typical mount, though, there are two different centering rings involved with slightly different diameters. Pay careful attention to the instructions, as the white ring goes forward and the brown ring goes aft. This is critical later in the process. Surprisingly, the mount does not include an inner motor block, so the metal hook will have to hold for the life of the model. I found the centering rings a bit too snug, and had to peel off a layer of paper from the inside of each, plus one layer of paper from the outside of the white ring.
The stuffer tube contains a couple slits, which are used to slip the elastic shock cord through, serving as an anchor. After knotting the cord and reinforcing with a drop of glue, it's ready for the motor mount. The motor mount slides just a tiny bit into the stuffer tube, enough that the forward (white) centering ring is flush with the aft end of the stuffer tube. Do not slide the motor tube any further--the aft/brown ring is too large for the stuffer tube and instead is used to align inside the large series 10 body tube. Sliding the assembly into the body tube to dry fit is a good idea at this point, to make sure the forward centering ring is aligned properly inside the stuffer tube. Once the motor mount/stuffer tube assembly has completely dried, it can then be glued inside the body tube (though be careful to make sure the metal engine hook does not line up under a fin slot).
Using the same two-piece fin lock technology as the larger Hustlers, these fins need to be bonded together first, carefully lining up the matching groove patterns. As noted, fins are thru-wall, and the fit against the motor tube was very good. Included in the kit is a nifty little cardboard fin alignment jog, which fits smoothly on the series 10 body tube and has notches to accept 3 and 4 fin patterns. The fixture fits well for most fins in the RTB series, though for fins that have a significant span and are not swept back very far, the slots in the jig are not long enough to be of much use. That wound up not being an issue on this model.
The payload bay is a simple extension, consisting of a 4.6" length of body tube and a balsa transition, into which a screw eye anchor is inserted. I also drilled a couple vent holes in mine for altimeter use down the road.
Tack on a pair of launch lugs with standoffs , make the chute and construction's done.
Finishing:
I went with the stock paint scheme on this, starting with two coats of primer, following up with a couple thin coats of gloss white, then masking off to hit the fins, transition and nose cone gloss black, and the payload bay gloss red.
The waterslide decals add the name and a roll pattern.
Construction Rating: 4 out of 5
Flight:
The first flight on this turned out to be a bit of an adventure, more my fault than that of the model. I loaded up a C6-5, and has intended to load an altimeter in the payload bay, but wound up skipping that due to issues with the battery holder on my altimeter. As a result, the nose cone was only secured with a light friction fit.
The model flew perfectly straight off the rod, and the -5 was the right delay, deploying just over apogee. Unfortunately, the elastic shock cord resulted in a snap-back effect on the nose cone/payload, and the nose cone picked up one of those common smiles/dings when it struck the body tube. That was also enough force to knock the nose cone off the bay. I was able to track the tumbling cone along with the rocket, so I manage a full recovery.
Recovery:
Other than the nose cone issue, the recovery was fine. The 12" chute is adequate for this weight.
Flight Rating: 4 out of 5
Summary:
This Mini Hustler is a neat little payloader, and makes a nice addition to the Hustler family (SLS Hustler, Lil' Hustler).
Overall Rating: 4 out of 5
 |
 |
Flights
|
|