| Construction Rating: | starstarstarstarstar |
| Flight Rating: | starstarstarstarstar |
| Overall Rating: | starstarstarstarstar_border |
| Published: | 2011-01-20 |
| Diameter: | 1.34 inches |
| Length: | 12.60 inches |
| Manufacturer: | Semroc  |
| Skill Level: | 1 |
| Style: | Sport |
 Brief
Brief
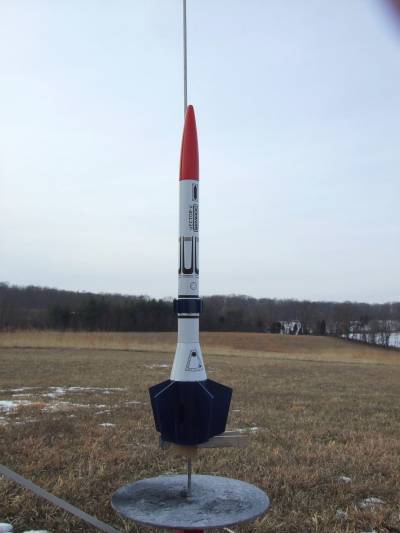
This is a retro-repro of the 1972 Centuri kit. The original featured die-cut fiber fins,which have been upgraded today to laser-cut mat board. Semroc has also supplied a beefier Kevlar/elastic shock cord and a balsa nose cone replacing the Centuri plastic cone.
Components
Semroc parts are excellent quality, and the kit includes:
- Balsa nose cone
- Series 7 body tube
- Series 13 aft body tube
- laser-cut fins (5), vanes (8)
- Paper transition
- 18mm motor tube, metal clip
- Kevlar/elastic cords
- 12" plastic chute
- waterslide decals
Construction
There are three pages of 8.5x11 instructions. The instructions are typical Semroc, clearly written and fairly-well illustrated. It's probably an overall skill level 2 kit, given the paper transition shroud.
The motor mount is a pre-slotted BT-20. The motor hook gets taped in place, and a single centering ring goes on the aft end. The forward end will get another once the shroud is formed, since the base of the shroud is the other centering ring. The completed assembly (including the paper shroud) slides into one end of the series 13 aft tube. This is then marked using a template for 5 fins. The fins, pre-cut from mat board, are tacked on using wood glue and get thin fillets. A coupler goes in the front end to finish the lower assembly.
On the upper tube, a wrap-around template is glued on with lines for mounting the laser-cut vanes. These are tacked on with wood glue as well. Once everything's dry, the upper tube is glued onto the lower tube's coupler. Slip a screw eye into the nose cone and construction's done, typically between one and two hours of effort.
Finishing
The mat board fins and vanes are certainly nice for finishing (no grain to fill), and the tubes got a thin smear of Fill N Finish. I then hit everything with two very thin coats of white primer. The fins really tend to soak up the first coat, which was really just a sealer, so the second coat was necessary for a base. After that, I painted the model gloss white, masked off to paint the lower fin can and vanes/wrap a gloss blue, then the nose cone got red.
There is a small sheet of waterslide decals for decoration, with plenty of extras to exhibit a little creativity. The decals are excellent, go on smoothly, and the transparent is invisible against any gloss paint.
Flight
For the first flight, I went with a B6-4 on a calm day, winds under 5 mph. Boost was straight, slight whip off the rod, and deployment right at apogee. I'd guess altitude wound up around 400 feet.
Recovery
Thanks to the light winds and moderate motor choice, I was rewarded with a short walk on the chilly winter day. The 12" plastic chute is more than enough for this, and even with some initial delay in unfurling, it kept it nice and slow for a soft landing about 30 yards from the pad.
Summary
This is a pretty good little model, slightly more interesting than the basic 3FNC (I guess you'd have to at least call it a 5FNC). The fiber fins are certainly easy on the finishing effort, and it flies fine.
 |
 |
Flights

|
|