| Construction Rating: | starstarstarstar_borderstar_border |
| Flight Rating: | starstarstarstarstar_border |
| Overall Rating: | starstarstarstarstar_border |
| Manufacturer: | Shrox Industria  |
Brief:
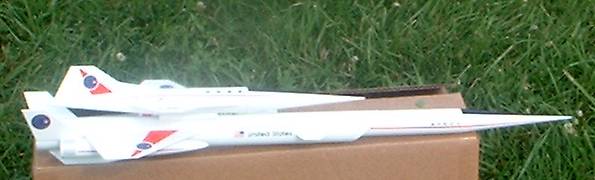
A magnificent-looking boost glider, sleek futuristic design, sure to draw some
attention at the pad. Flies on 24mm motors.
Construction:
I was very impressed opening this kit, as the parts were top quality.
Parts included:
- 18-inch BT-55
- 18-inch BT-60
- (2) 4.5-inch BT-55’s
- (2) 4.5-inch BT50’s
- 5 nose cones
- (2) 12-inch ripstop nylon chutes (bright orange)
- plenty of Kevlar®
- 1/2-inch elastic shock cord
- basswood and assorted couplers, lugs, nose weight, etc.
It also comes with two sheets of waterslide decals which were very nice looking.
While the instructions were well illustrated, I found them a bit hard to follow, and would not recommend this model for anyone without significant boost glider building experience. Tube marking guides would also have been a HUGE help. I used every crafty little tool in my box, and still had trouble with fin locations and alignments (Shrox kits are wonderfully creative, but the drawback is that you’ll hardly ever see a standard 3-fin/120 degree alignment).
The plan starts with the glider construction. The glider is basically a BT-55 with a couple of long nose cones, two-piece wings, elevators, and a rudder. All are cut from 1/16-inch basswood using templates provided. The wing attachment is where I first started to find fault with the directions. The directions call for a 10-degree dihedral, though it would have saved me a bit of trigonometry if the dihedral height were included. The wings actually attach slightly below the centerlines of the body, which makes it even trickier to get the dihedral right. The glider attaches to the booster through a small wood dowel inserted into the glider at a 45-degree angle.
Trimming the glider was fairly easy, though I had to use considerably more nose weight than the suggested starting point of 1/8-inch x 1-inch (the size of a launch lug?).
The main body assembly is composed of 22.5-inches of BT-55 joined with a tube coupler. The motor mount construction is straightforward, and included in the motor mount is a nice length of Kevlar® line attached below the centering ring (by far the best way to go). The body then goes inside a BT-60, but not using centering rings. Instead, they’re glued together at the “top” of the BT-55, but before gluing them together you cut the BT-60 at a 45-degree angle (template provided). The end result winds up making the BT-60 look like a sort of air scoop, a very sharp effect.
Next up comes bonding a couple of side pods (BT-50’s with parabolic cones) to the BT-60 assembly. At this point, you're ready for the fin festival. There are lots of fins to cut from the 3/32-inch basswoods sheets, all using templates provided. The festival starts with a couple of tail fins mounted in the seam between the side pods and main tube, followed by wings attached at some point above the centerline of the BT-60, laying against the top of the side pods, allegedly resulting in a 15-degree downward dihedral angle. A couple of small canards go up front (the only fins actually mounted on anything resembling a centerline, placed 180 degrees apart). The fin festival wraps up with an “under-fin,” or small rudder mounted at the bottom.
Construction wraps up with mounting tubes to cradle the glider, drilling a hole for the dowel pin, installing the beautiful nylon chutes, and adding the nose weight.
As I had mentioned earlier, a tube marking guide with this kit would have saved A LOT of headache, and the tubes should be completely marked before construction begins. I found myself trying to draw fin mounting lines without being able to establish reference points, with parts already mounted and in the way.
One other thing that I think could use improvement is the launch lug. This is a very heavy rocket (with glider, I came in at 8-ounces). The kit comes with a single 1/8-inch x 1-inch lug, and it's mounted at the tail end of the rocket. I’d like to see at least a second lug toward the forward end, and ideally upgrade to 3/16-inch. 24mm motors provide too much thrust for a wimpy little 1/8-inch rod, even if going with steel instead of aluminum.
Finishing:
Finishing was quite challenging. I went with a basic white paint scheme, and
had used a little Fill ’n’ Finish to fill the spirals and seal what
little grains were showing in the basswood. I then applied two coats of white
primer, and two coats of gloss white paint. Painting this kit is very
difficult, as there are lots of little nooks and crannies between pods and
fins. One tip I’d offer on the finishing—DO NOT glue in the cones to
the side pods. Instead, paint the rocket first, as well as the cones
separately. After everything’s finished, you can glue on the cones. This
eliminates one of the hardest blind spots for painting.
The waterslide decals were beautifully done, and provide a very colorful finish. The instructions called for gray paint, though, and I think that the color would be a bit dull, as the decals are translucent.
Construction Rating: 3 out of 5
Flight:
This is my second Shrox kit, and I found it odd that neither kit includes any
motor recommendations, nor can I find any Rocksim files available (these would
have been impossible to model prior to version 7.1). I started cautiously with
a D12-3, on a fairly windy day (8-12 mph). The boost weathercocked pretty
badly, though flew straight without a trace of roll. The shuttle popped off
right at burnout (it was on a horizontal pattern, so drag separation came
early). Glider flight was very good, slowly circling with a slight nose-down
line. At about 20 feet off the ground, though, it went into a sharp nose dive.
It almost seems like that’s by design, as it did the same thing in my back
yard no matter how much I added or removed on trim weight.
The booster, though, was snake-bit. The D12-3 kicked while still moving at a pretty fast pace on the horizontal path. I avoided a zipper, but the 1/2-inch elastic cord burned through, and my nose separated, drifting away with both chutes. The body tumbled, landing in short grass a bit muddy but otherwise okay. The nose cone came down on an access road, and suffered a slight paint chip (that $%^@%# road only covers 10-feet of a square mile field, but sure caught a lot of my birds that day).
The shock cord repair will be minor, and I’m at a loss as to how it happened—I used 3-inches of dog barf and a Kevlar® shield, and neither of the chutes showed any sign of char.
Recovery:
Overall, I think the D12-3 was a fair choice, and I’m anxious to fly it
again with less wind to see how it goes on a more vertical path. I’d also
like to move up to an E28 RMS reload, and put this bird on some more serious
thrust.
Flight Rating: 4 out of 5
Summary:
Overall opinion—beautiful rocket for the experienced craftsman. You really
need to walk through the construction in your head first, figure out the tube
markings on your own, then put it together.
It’s well worth the effort and money, though sadly I hit the Shrox site the other day and did not see this kit on the products page any more. Hopefully, it will make a comeback in the near future.
Overall Rating: 4 out of 5
 |
 |
Flights
|
|